メインコンテンツにスキップ
リペアコミュニティに参加 - アカウントの作成

Ring Floodlight Cam Camera Module Replacement

必要な工具と部品

  1. Ring Floodlight Cam Camera Module Replacement, Motherboard: 手順 1、 2の画像 1 Ring Floodlight Cam Camera Module Replacement, Motherboard: 手順 1、 2の画像 2
    • Remove the external cover with a Jimmy tool.

    FixBotに聞いてみる

    コメントを追加

  2. Ring Floodlight Cam Camera Module Replacement: 手順 2、 2の画像 1 Ring Floodlight Cam Camera Module Replacement: 手順 2、 2の画像 2
    • Remove the four outer cover 4.5mm screws with a Philips 1 screwdriver.

    FixBotに聞いてみる

    コメントを追加

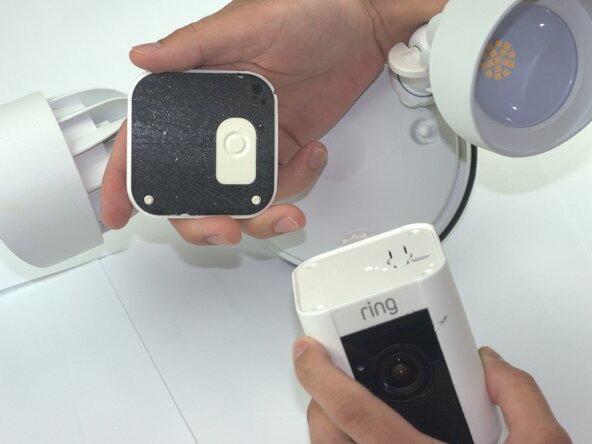
  3. Ring Floodlight Cam Camera Module Replacement: 手順 3、 1の画像 1
    • Remove the internal cover.

    FixBotに聞いてみる

    コメントを追加

  4. Ring Floodlight Cam Camera Module Replacement: 手順 4、 1の画像 1
    • Disconnect the flexible flat cable (FFC) from the motherboard.

    FixBotに聞いてみる

    コメントを追加

  5. Ring Floodlight Cam Camera Module Replacement: 手順 5、 1の画像 1
    • Remove the three-prong connector with angled tweezers.

    FixBotに聞いてみる

    コメントを追加

  6. Ring Floodlight Cam Camera Module Replacement: 手順 6、 1の画像 1
    • Remove the 2mm screws with a Phillips #00 screwdriver.

    FixBotに聞いてみる

    コメントを追加

  7. Ring Floodlight Cam Camera Module Replacement: 手順 7、 2の画像 1 Ring Floodlight Cam Camera Module Replacement: 手順 7、 2の画像 2
    • Remove the power supply.

    • Disconnect the power supply from the device.

    FixBotに聞いてみる

    コメントを追加

  8. Ring Floodlight Cam Camera Module Replacement: 手順 8、 1の画像 1
    • Remove the 2mm screws with a Phillips 00 screwdriver from the base connector.

    • From this step forward use a low profile wrench instead of a screwdriver with the correct bit size to remove screws non-destructively.

    FixBotに聞いてみる

    コメントを追加

  9. Ring Floodlight Cam Camera Module Replacement: 手順 9、 2の画像 1 Ring Floodlight Cam Camera Module Replacement: 手順 9、 2の画像 2
    • Drill holes into the exterior with a 1/16 drill bit.

    • Skip this step unless you lack the specialized tools or other attempts to remove screws non destructively were unsuccessful.

    FixBotに聞いてみる

    コメントを追加

  10. Ring Floodlight Cam Camera Module Replacement: 手順 10、 1の画像 1
    • Unscrew the 2mm screws on the metal baseplate with a Phillips 00 screwdriver.

    FixBotに聞いてみる

    コメントを追加

  11. Ring Floodlight Cam Camera Module Replacement: 手順 11、 1の画像 1
    • Remove the metal baseplate.

    FixBotに聞いてみる

    コメントを追加

  12. Ring Floodlight Cam Camera Module Replacement: 手順 12、 1の画像 1
    • Remove the power connector from the motherboard using angled tweezers.

    FixBotに聞いてみる

    コメントを追加

  13. Ring Floodlight Cam Camera Module Replacement: 手順 13、 1の画像 1
    • Remove the front-end flexible flat cable (FFC) with angled tweezers.

    FixBotに聞いてみる

    コメントを追加

  14. Ring Floodlight Cam Camera Module Replacement: 手順 14、 1の画像 1
    • Remove the motion sensor flat flexible cable (FFC).

    FixBotに聞いてみる

    コメントを追加

  15. Ring Floodlight Cam Camera Module Replacement: 手順 15、 2の画像 1 Ring Floodlight Cam Camera Module Replacement: 手順 15、 2の画像 2
    • Remove the motherboard module.

    FixBotに聞いてみる

    コメントを追加

  16. Ring Floodlight Cam Camera Module Replacement, Camera Module: 手順 16、 1の画像 1
    • Drill holes with a 1/16 drill bit.

    FixBotに聞いてみる

    コメントを追加

  17. Ring Floodlight Cam Camera Module Replacement: 手順 17、 2の画像 1 Ring Floodlight Cam Camera Module Replacement: 手順 17、 2の画像 2
    • Remove the 2mm screws with an iFixit PH00 screwdriver.

    FixBotに聞いてみる

    コメントを追加

  18. Ring Floodlight Cam Camera Module Replacement: 手順 18、 1の画像 1
    • Peel the copper strip from camera module.

    • Remove the metal baseplate.

    FixBotに聞いてみる

    コメントを追加

  19. Ring Floodlight Cam Camera Module Replacement: 手順 19、 2の画像 1 Ring Floodlight Cam Camera Module Replacement: 手順 19、 2の画像 2
    • Unplug the WiFi antenna cables with angled tweezers.

    FixBotに聞いてみる

    コメントを追加

  20. Ring Floodlight Cam Camera Module Replacement: 手順 20、 2の画像 1 Ring Floodlight Cam Camera Module Replacement: 手順 20、 2の画像 2
    • Remove 2mm screws with a PH00 screwdriver.

    FixBotに聞いてみる

    コメントを追加

  21. Ring Floodlight Cam Camera Module Replacement: 手順 21、 1の画像 1
    • Remove the 3 pin power connector from the camera module.

    FixBotに聞いてみる

    コメントを追加

  22. Ring Floodlight Cam Camera Module Replacement: 手順 22、 3の画像 1 Ring Floodlight Cam Camera Module Replacement: 手順 22、 3の画像 2 Ring Floodlight Cam Camera Module Replacement: 手順 22、 3の画像 3
    • Remove the camera module.

    FixBotに聞いてみる

    コメントを追加

終わりに

To reassemble your device, follow these instructions in reverse order and before inserting power supply fill the drill holes with plastic putty.

キャンセル: このガイドを終了できませんでした。

作成者

3人の作成者と共同で作成されました。

Samuel Garcia

メンバー登録日: 02/04/26

381 ポイント

2のガイドは作成済み

チーム

Texas Tech, Team 41-3, Johansen Spring 2026 Texas Tech, Team 41-3, Johansen Spring 2026人のメンバー

TTU-JOHANSEN-S26S41G3

4 メンバー

5のガイドは作成済み

0件のガイドコメント

コメントを追加

統計データ:

過去 24時間: 8

過去 7 日: 16

過去 30 日: 54

今までの合計 127