はじめに
Use this guide to replace the directional pad (D-pad) in a Retroid Pocket Flip handheld gaming console. The D-pad is used for directional input during gameplay and menu navigation. If the D-pad becomes unresponsive, registers incorrect inputs, or feels uneven when pressed, it may need to be replaced.
This repair requires moderate technical experience because internal components must be removed to access the D-pad.
Before beginning, power off the device completely and remove the microSD card. Battery, joystick, and motherboard removal are required before accessing the D-pad. Follow Electrostatic Discharge when working inside the device to prevent damage to sensitive components.
必要な工具と部品
-
-
Remove the four 5.9 mm screws from the backplate of the device with a 1.3mm hex screwdriver.
-
Use a plastic opening pick to carefully separate the back cover from the device.
 FixBotに聞いてみる
-
-
-
Use a plastic spudger to carefully lift and disconnect the battery connector.
-
Use tweezers to disconnect the connector from its socket.
-
-
-
Remove the two 3.2 mm screws securing the top of the shield with a JIS #000 screwdriver.
-
Remove the five 3.2mm screws securing the plastic insulating shield to the motherboard.
-
-
-
-
Carefully lift and unstick the fan module using a plastic spudger, then remove it.
-
Remove the sticky ribbon connectors on each side of the plate with a plastic spudger.
-
Use a plastic spudger to carefully separate the shield from the board.
-
-
-
Use tweezers to unclip and remove the two ribbon cables on each joystick module.
-
Use a plastic spudger to lift and remove the joystick modules; they are secured with double sided tape.
-
-
-
Use a plastic spudger to disconnect the sliding connector by pushing on the tab to slide it out of its socket.
-
Use tweezers to disconnect the ribbon cables from the board.
-
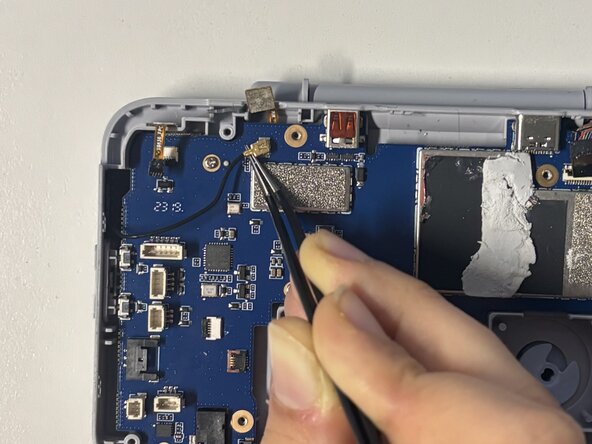
Disconnect the coaxial connector on the left of the motherboard by positioning tweezers under the metal neck of the connector to lift it straight up.
-
-
-
Remove the six 5.8 mm screws from the motherboard using a JIS #00 screwdriver.
-
Carefully lift the motherboard out of the device.
-
-
-
Remove the rubber piece backing the D-pad out of the device.
-
Lift the D-pad out of the device.
-


To reassemble your device, follow these instructions in reverse order.

チーム

Université Paris Cité, Team 2-2, Grohan Winter 2026 Université Paris Cité, Team 2-2, Grohan Winter 2026人のメンバー
UPARIS-GROHAN-W26S2G2
4 メンバー
6のガイドは作成済み