メインコンテンツにスキップ
リペアコミュニティに参加 - アカウントの作成

Removing LG VX8350 Screen Assembly

必要な工具と部品

  1. Removing LG VX8350  Screen Assembly, Battery: 手順 1、 2の画像 1 Removing LG VX8350  Screen Assembly, Battery: 手順 1、 2の画像 2
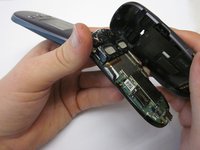
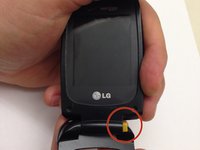
    • Locate the horizontal grip located on the back cover of the phone.

    • Slide the back cover down and off of the phone.

    FixBotに聞いてみる

    コメントを追加

  2. Removing LG VX8350  Screen Assembly: 手順 2、 2の画像 1 Removing LG VX8350  Screen Assembly: 手順 2、 2の画像 2
    • Insert a plastic opening tool into the battery release point located above the battery.

    • Pull outwards in order to release the battery.

    FixBotに聞いてみる

    コメントを追加

  3. Removing LG VX8350  Screen Assembly, Circuit Board Housing: 手順 3、 3の画像 1 Removing LG VX8350  Screen Assembly, Circuit Board Housing: 手順 3、 3の画像 2 Removing LG VX8350  Screen Assembly, Circuit Board Housing: 手順 3、 3の画像 3
    この手順で使用する道具:
    Tweezers
    $4.99
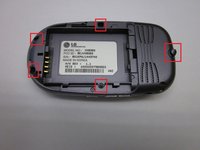
    • Locate the 5 screws holding the body of the phone together.

    • The top screw will have a plastic cover, remove it using tweezers.

    • Using a Philips head screwdriver, twist counterclockwise to remove the screws.

    • Take special care with the screw located at the top of the phone. It is smaller and more likely to be damaged or improperly attached.

    FixBotに聞いてみる

    コメントを追加

  4. Removing LG VX8350  Screen Assembly: 手順 4、 2の画像 1 Removing LG VX8350  Screen Assembly: 手順 4、 2の画像 2
    • Lift the back cover starting at the bottom of the phone.

    FixBotに聞いてみる

    コメントを追加

  5. Removing LG VX8350  Screen Assembly: 手順 5、 2の画像 1 Removing LG VX8350  Screen Assembly: 手順 5、 2の画像 2
    • Remove the back cover completely from the phone.

    FixBotに聞いてみる

    コメントを追加

  6. Removing LG VX8350  Screen Assembly, Circuit Board: 手順 6、 1の画像 1
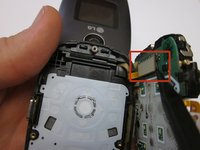
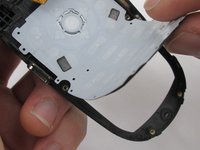
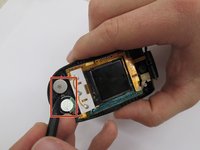
    • Locate the clamp at bottom right side of the Circuit Board.

    • Pull the circuit board from the phone being cautious to pull out underneath the clamp.

    FixBotに聞いてみる

    コメントを追加

  7. Removing LG VX8350  Screen Assembly: 手順 7、 2の画像 1 Removing LG VX8350  Screen Assembly: 手順 7、 2の画像 2
    • Locate the ribbon connecting the circuit board to the phone display.

    • Using the spudger, disconnect the ribbon connecting the phone's display and the circuit board.

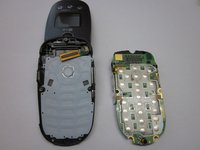
    • Remove the circuit board

    FixBotに聞いてみる

    コメントを追加

  8. Removing LG VX8350  Screen Assembly, Keypad: 手順 8、 2の画像 1 Removing LG VX8350  Screen Assembly, Keypad: 手順 8、 2の画像 2
    • Lift the keyboard and remove it from the phone.

    FixBotに聞いてみる

    コメントを追加

  9. Removing LG VX8350  Screen Assembly, Screen Cover: 手順 9、 3の画像 1 Removing LG VX8350  Screen Assembly, Screen Cover: 手順 9、 3の画像 2 Removing LG VX8350  Screen Assembly, Screen Cover: 手順 9、 3の画像 3
    この手順で使用する道具:
    Tweezers
    $4.99
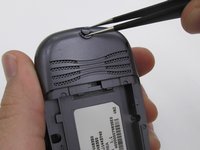
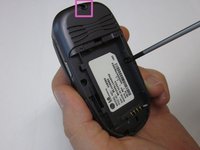
    • Locate the two rubber circles covering the screws.

    • Remove the rubber covers using tweezers.

    • Using the Phillips head screwdriver, unscrew and remove the two screws.

    FixBotに聞いてみる

    コメントを追加

  10. Removing LG VX8350  Screen Assembly: 手順 10、 3の画像 1 Removing LG VX8350  Screen Assembly: 手順 10、 3の画像 2 Removing LG VX8350  Screen Assembly: 手順 10、 3の画像 3
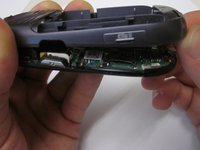
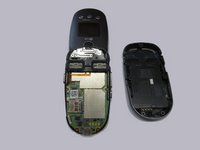
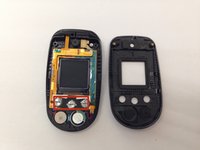
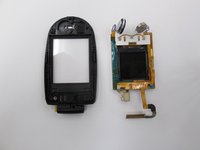
    • Close the phone and gently pull outwards from the bottom left portion of the phone cover.

    • Take care not to do this with too much force, as it could crack the cover.

    • Completely remove the cover from the phone.

    FixBotに聞いてみる

    コメントを追加

  11. Removing LG VX8350  Screen Assembly, Screen Assembly: 手順 11、 2の画像 1 Removing LG VX8350  Screen Assembly, Screen Assembly: 手順 11、 2の画像 2
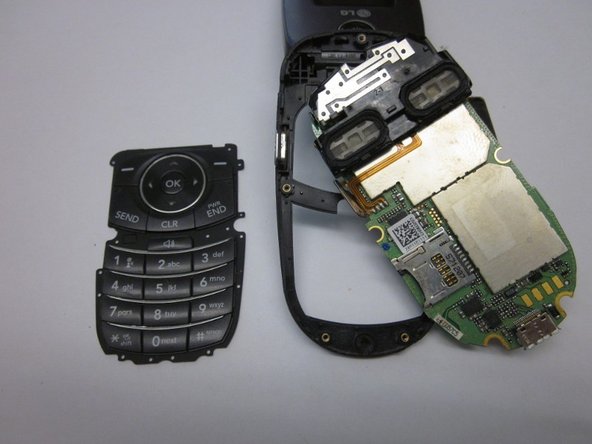
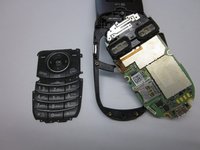
    • Locate the front music buttons.

    • Remove the music control buttons on the face of the phone.

    FixBotに聞いてみる

    コメントを追加

  12. Removing LG VX8350  Screen Assembly: 手順 12、 2の画像 1 Removing LG VX8350  Screen Assembly: 手順 12、 2の画像 2
    • While grasping the top and bottom sections torque the pieces until the indicated hinge has popped out. The two sections of the phone are now able to separate.

    • Make sure the right side of the hinge is removed first and not the left as you will likely damage the ribbon connection.

    FixBotに聞いてみる

    コメントを追加

  13. Removing LG VX8350  Screen Assembly: 手順 13、 3の画像 1 Removing LG VX8350  Screen Assembly: 手順 13、 3の画像 2 Removing LG VX8350  Screen Assembly: 手順 13、 3の画像 3
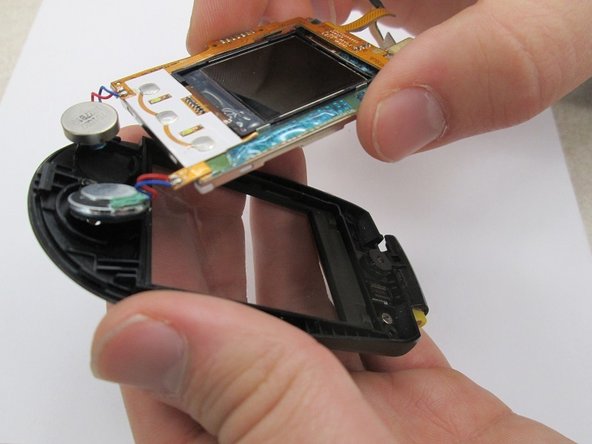
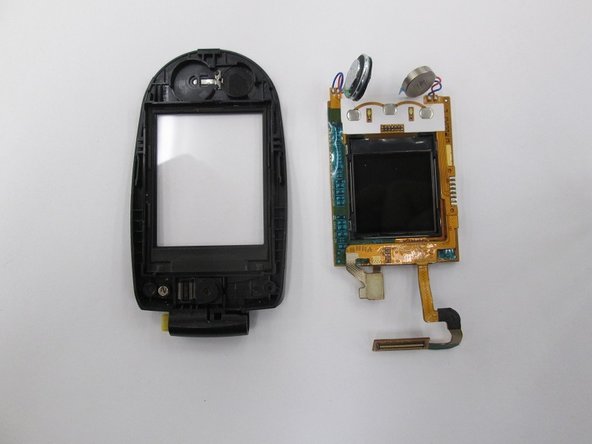
    • Locate the two speakers. Using a spudger disconnect the speakers from the assembly.

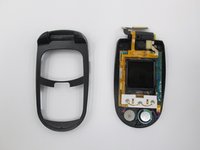
    • Lift the screen assembly from the casing.

    • The screen assembly is completely removed to allow for easier access to the speaker connections when performing further repairs on the speakers.

    FixBotに聞いてみる

    コメントを追加

終わりに

To reassemble your device, follow these instructions in reverse order.

キャンセル: このガイドを終了できませんでした。

作成者

3人の作成者と共同で作成されました。

James Brandon

メンバー登録日: 10/18/13

207 ポイント

2のガイドは作成済み

チーム

Clemson, Team 14-7, Benson Fall 2013 Clemson, Team 14-7, Benson Fall 2013人のメンバー

CLEM-BENSON-F13S14G7

3 メンバー

16のガイドは作成済み

0件のガイドコメント

コメントを追加

統計データ:

過去 24時間: 1

過去 7 日: 12

過去 30 日: 36

今までの合計 1,034