メインコンテンツにスキップ
Razer Basilisk V3 Scroll Wheel Assembly Replacement

Razer Basilisk V3 Scroll Wheel Assembly Replacement

Mary Quin

Mary Quin とその他 3 人の作成者

最終更新日: March 3, 2025

25 - 45 分
中レベル

It is not uncommon for mice, such as the Razer Basilisk V3, to see mechanical difficulties through wear and tear of the mouse. In order to fix issues such as unregistered scrolls, double scrolling, or general friction, it might be necessary to take apart the mouse and perform a replacement. Additionally, customization and upgrades could also be a reason to replace the scroll wheel.

It should be noted that disassembling the mouse to replace the scroll wheel will most likely damage the mouse skates. Also, it is helpful for users to have knowledge in basic electronics as well as the internal structure of a mouse. This guide will assist in replacing the Basilisk V3 scroll wheel.

必要な工具と部品

ツール

もっと見る

  1. Razer Basilisk V3 Scroll Wheel Assembly Replacement, Skates: 手順 1、 1の画像 1
    • Locate each of the skates.

  2. Razer Basilisk V3 Scroll Wheel Assembly Replacement: 手順 2、 3の画像 1 Razer Basilisk V3 Scroll Wheel Assembly Replacement: 手順 2、 3の画像 2 Razer Basilisk V3 Scroll Wheel Assembly Replacement: 手順 2、 3の画像 3
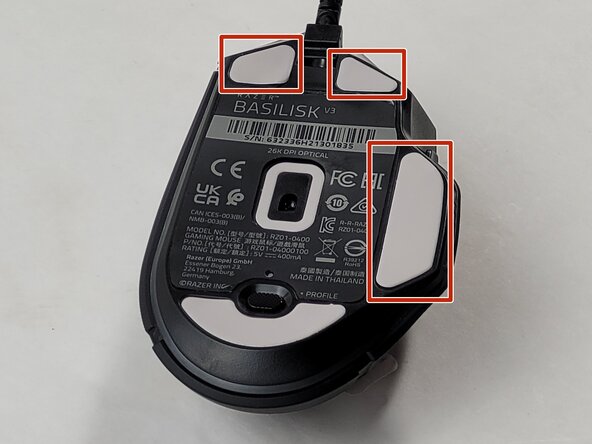
    • Heat the skate using a heat gun or hair dryer.

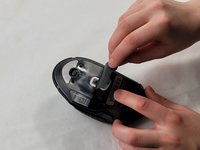
    • Using the pointy end of the spudger pry away a corner of the skate.

    • If the adhesive does not pull away easily, heat the skate more.

    • Once the corner of the skate comes free use the flat end of the spudger to peel off the rest of the skate.

    • Repeat these steps for each of the skates.

  3. Razer Basilisk V3 Scroll Wheel Assembly Replacement, Backplate: 手順 3、 1の画像 1
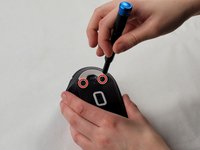
    • Remove two 4.8 mm screws that were hidden under the skates using a JIS #1 screwdriver.

    • Remove the single 4 mm screw beneath the thumb grip using a JIS #1 screwdriver.

  4. Razer Basilisk V3 Scroll Wheel Assembly Replacement: 手順 4、 3の画像 1 Razer Basilisk V3 Scroll Wheel Assembly Replacement: 手順 4、 3の画像 2 Razer Basilisk V3 Scroll Wheel Assembly Replacement: 手順 4、 3の画像 3
    • Heat the label gently with a heat gun or hair dryer.

    • Once the adhesive is loosened, use a spudger to peel off the label carefully, revealing two additional screws.

    • Remove the two 4.8 mm screws using a JIS #1 screwdriver.

  5. Razer Basilisk V3 Scroll Wheel Assembly Replacement: 手順 5、 3の画像 1 Razer Basilisk V3 Scroll Wheel Assembly Replacement: 手順 5、 3の画像 2 Razer Basilisk V3 Scroll Wheel Assembly Replacement: 手順 5、 3の画像 3
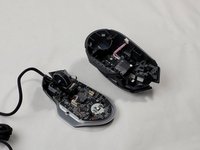
    • Carefully pry apart the mouse's top and bottom halves. Using the iFixit opening tool, start at one corner and work around the edge.

    • Be cautious of the clips that may break during this process.

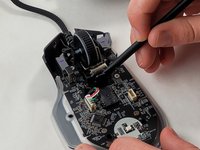
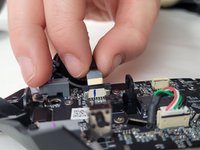
    • Using a plastic opening tool, gently pry the connector apart by moving side to side to avoid bending the pins.

    • When reassembling, be mindful that the connector only fits one way, as shown in the pictures.

  6. Razer Basilisk V3 Scroll Wheel Assembly Replacement, Scroll Wheel Assembly: 手順 6、 3の画像 1 Razer Basilisk V3 Scroll Wheel Assembly Replacement, Scroll Wheel Assembly: 手順 6、 3の画像 2 Razer Basilisk V3 Scroll Wheel Assembly Replacement, Scroll Wheel Assembly: 手順 6、 3の画像 3
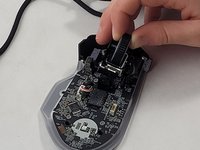
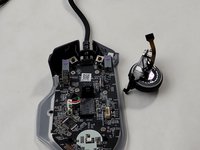
    • Use the flat end of the spudger to pop-out the scroll wheel assembly.

    • Make sure you are careful when removing the assembly since it is still connected to the device with a ribbon cable. If you pull too hard the cable could break.

  7. Razer Basilisk V3 Scroll Wheel Assembly Replacement: 手順 7、 3の画像 1 Razer Basilisk V3 Scroll Wheel Assembly Replacement: 手順 7、 3の画像 2 Razer Basilisk V3 Scroll Wheel Assembly Replacement: 手順 7、 3の画像 3
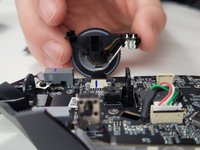
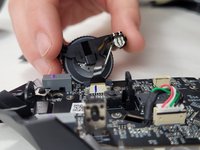
    • Pull up on the top half of the cable connector and pull the cable from the connector.

    • The connection pins on the wire face towards the scroll wheel assembly housing. When reassembling, make sure the connectors on the cable are facing the correct direction.

終わりに

To reassemble your device, follow these instructions in reverse order.

2 の人々がこのガイドを完成させました。

作成者

3人の作成者と共同で作成されました。

Mary Quin

メンバー登録日: 03/20/24

252 ポイント

2のガイドは作成済み

チーム

UMass Dartmouth, Team 1-2, Santin Spring 2024 UMass Dartmouth, Team 1-2, Santin Spring 2024人のメンバー

UMASSD-SANTIN-S24S1G2

3 メンバー

11のガイドは作成済み

コメント 1 件

Where can I buy this complete spare part?

Van4ESss - 返信

コメントを追加

統計データ:

過去 24時間: 7

過去 7 日: 107

過去 30 日: 349

今までの合計 2,360