はじめに
このガイドを参照して、PlayStation 5のUSBボードを取り出して交換します。
修理を始める前に、ゲームコンソールの電源を完全に切り、すべてのケーブルを抜いてください。ゲームコンソールを修理する際には、一般的な静電放電(ESD)の安全手順に従ってください。
必要な工具と部品
-
-
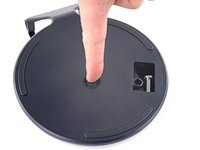
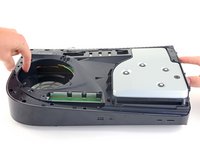
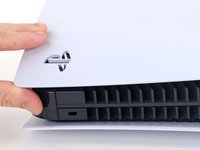
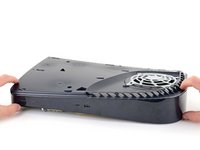
PlayStation 5が縦置きの場合は、スタンドが上を向くように逆さまにしてください。
-
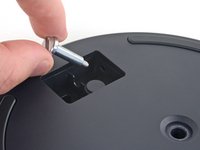
コインもしくはマイナスドライバーを使って、長さ26.5mmのスタンドネジを外します。
-
-
この手順で使用する道具:Tweezers$4.99
-
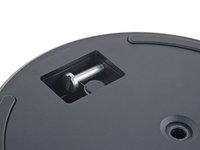
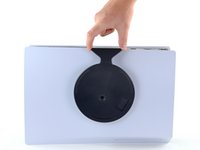
ピンセットもしくは指先を使って、立方形の溝からキャップを取り出します。
-
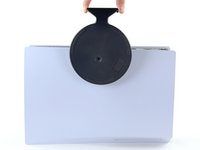
指先を使って、キャップをネジ穴に押し込みます。
-
-
-
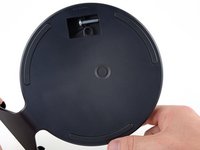
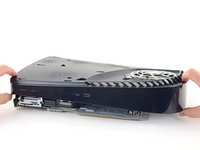
PlayStation 5が横向きに配置されている場合、充電ポートが上向きに配置されるように設置します。
-
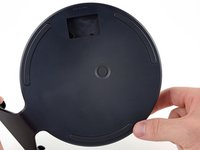
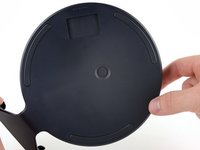
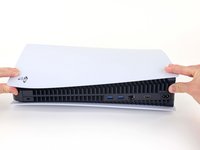
スタンドをまっすぐ持ち上げて、取り出します。
Do you guys sell the stand
-
-
-
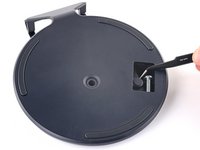
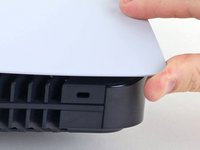
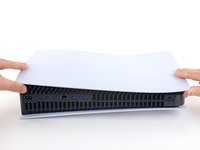
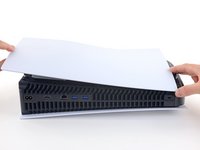
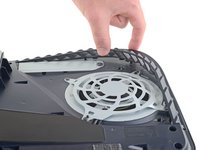
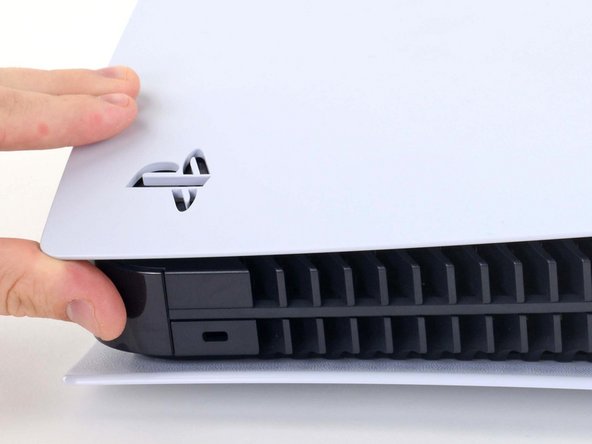
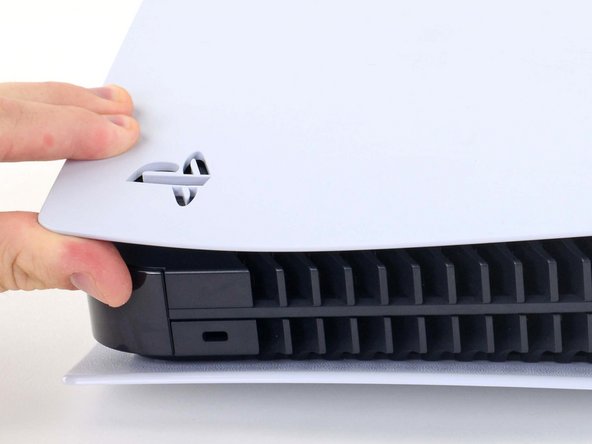
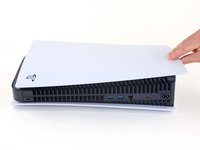
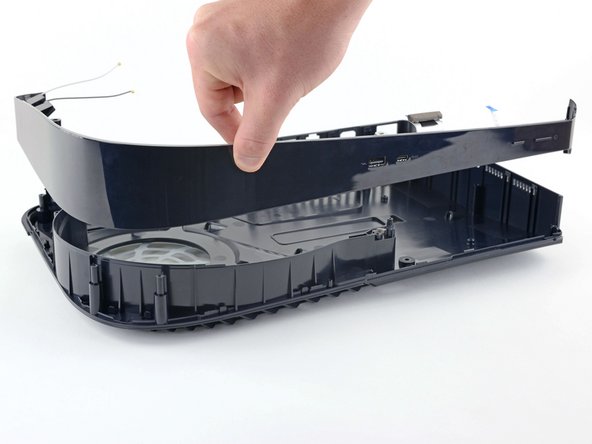
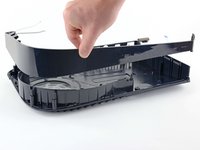
コーナーを持ち上げながら、フェイスプレートをデバイスの下側に向けてスライドします。
-
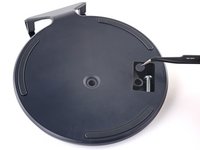
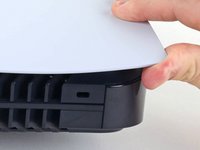
右側のフェイスプレートを外します。
I recommend doing both covers at this time, to avoid hassle later. Skip to step 38, then come back here
-
-
-
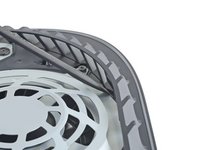
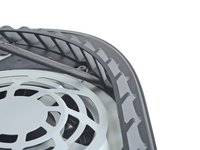
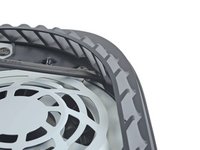
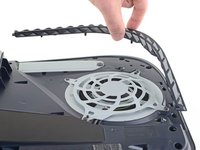
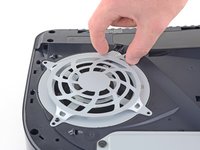
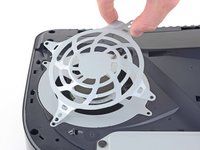
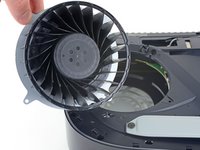
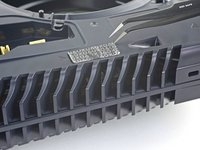
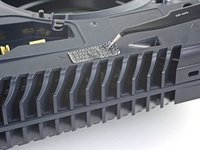
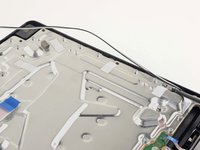
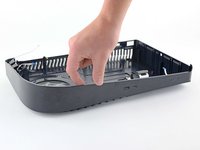
グリルをケースから持ち上げて取り出します。
During reassembling:
There is a little flat pin in each end, they need to go into the console
-
-
この手順で使用する道具:Magnetic Project Mat$19.95
-
T8トルクスセキュリティドライバーを使って、ファンシュラウドをケースに固定している4本のネジを外します。
-
23.3 mm長ネジー2本
-
11.4 mm 長ネジー1本
-
31 mm 長ネジー1本
My ps5 seems to have tiny black caps over each screw. My spudger can’t get them off I see no other way to move forward besides breaking the shroud
wrong side, take the cover off the other side
The 31 mm-long screw just wont budge! do I turn that one counter-clockwise or clockwise? someone please help!
Chris Love - 返信
counter clockwise to remove
I damaged the 23.3mm on the bottom right next to fan connector. Is there any replacements? Can't seem to find any 23.3mm t8 screw anywhere online
forsage.rh - 返信
I used a t8 for all of them and had no problem removing, except for that bottom right screw
Is there any replacement screws you can buy for the fan? I slightly damage 23.3mm screw.
My PS5 has TX8 (security Torx bit) screws on my fan shroud and all the case screws. A normal Torx driver won’t work you need the one with the hole in the middle of the bit driver.
Why does my ps5 have 3 different screws? 2 are the same then 2 other ones? Why?
Does anyone know the thread pitch of these screws? I just bought a used PS5 and the screws are missing. The fan has been glued in. Can't make this up.....
Ci sono viti di ricambio?
Dove posso trovarle?
Ho guardato dappertutto e non se ne trovano
Sind mit den Massen die dicke oder die Länge gemeint
-
-
-
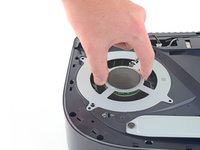
ファンシュラウドをまっすぐ持ち上げて、取り出します。
-
-
-
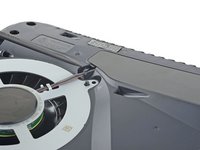
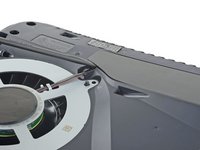
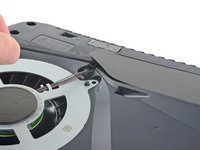
スパッジャーの平面側先端を、黒いワイヤカバーとファンワイヤ上部の隙間に差し込みます。
-
スパッジャーを使って、ワイヤカバーを指で掴めるまで剥がします。
-
-
-
-
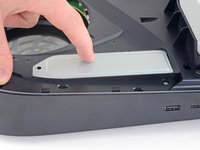
指を使って、SSDカバーをデバイス上部に向けてスライドして、ケースからクリップを外します。
-
SSDカバーを外します。
It is unnecessary to remove the SSD screw and cover for power supply replacement.
The only thing you can do without removing the ssd cover and screw is remove the fan.
-
-
-
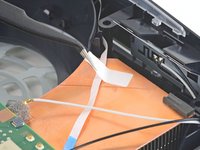
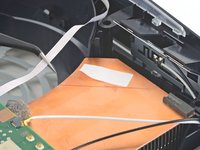
指を使って光学ドライブのケーブルコネクタの端を摘み、マザーボードから引き抜いて接続を外します。
For some PS5's, the optical drive connector is still covered in this step. Proceed up to step 22, then you will be able to access these connecters. The connectors will be running across the heatsink visible from step 24.
-
-
-
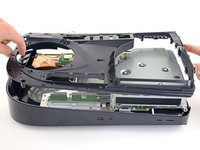
T8トルクスドライバーを使って、ケースを固定している11本のネジを外します。
-
18.6mm 長ネジー6本
-
23.3mm 長ネジー2本
-
43.2mm 長ネジー2本
-
7.3mm 長ネジー1本
-
-
-
スパッジャーの平面側先端を使って、光学ドライブコネクタのメタル製ロッキングタブを押さえます。
-
メタルタブを押し下げた状態で、ピンセットを使って青いプルタブをコネクタから直接引き抜き、光学ドライブからケーブルを取り外します。
-
-
この手順で使用する道具:Tweezers$4.99
-
光学ドライブコネクターのメタル製のロックタブをスパッジャーの平面側を使って押してください。
-
メタル製タブを押し下げた状態で、ピンセットを使って青いプルタブをコネクタから直接引き抜き、マザーボードからケーブルを取り外します。
-
-
-
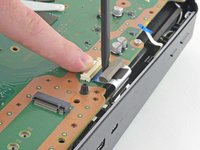
ピンセットを使って、ブルーのプルタブをコネクタから抜いて、電源とエジェクトボタンのリボンケーブルの接続を外します。
-
-
-
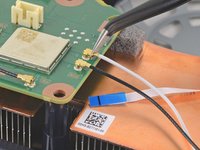
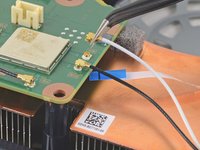
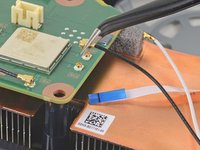
ピンセットを使って、白いWi-Fiアンテナ線のメタル製ベースを摘みます。
-
ワイヤのコネクタをまっすぐ持ち上げて、マザーボードから接続を外します。
-
黒いWi-Fiアンテナワイヤにも同じ作業を繰り返します。
-
ボードのリビジョンによっては、これらのアンテナ線がない場合があります。お使いのボードにこれらのコネクタがない場合は、この手順を飛ばしてください。
Black and white antennas are reversed, black should go on RB and white on RW
It looks like some models of PS5 lack these antenna wires. My PS5 only has Power Supply antennas, which are in the next step.
Can confirm, on a PS5 I got for repair, there are only antenna connectors that are in the next step. The antenna connectors of this step are physically absent from the PCB. There are only 2 coaxial connectors in total, not 4. From the image it seems the PCB routing is slightly different (my board with missing connectors seems to use PCB traces as antennae given trace shapes)
-
-
-
ピンセットを使って、アンテナワイヤを上部シールドプレートに固定している白いシールを剥がします。
-
スティッカーの下からアンテナワイヤを取り出します。
-
白いシールをトップシールドプレートに戻して、再利用します。
-
-
-
T8トルクスドライバーを使って、上部シールドプレートを固定している42本のネジを外します。
-
長さ7.3 mmネジー41本
-
長さ43.2 mmネジー1本
Your image already has the long black screw removed from the left hand side half way down.
You should add a step for this screw for people re-assembling.
infiniti25 - 返信
I second this! I had an extra long screw when I was done, it was likely this. This is one of the screws that reach down to the PSU
I believe that this was an unintentional oversight in the guide, as I cannot find any guide that mentions removing this screw. I have made an edit to this guide to clarify that final screw must also be removed, hoping it is approved and published!
I can’t see how removing 41 of these 7.3mm screws to replace the power supply. None of them hold the power supply to the board. Waste of time.
The reason why is because you need to remove the top shield plate to get to the usb ribbon cable.
Some PS5's have a removable cover for the USB board (step 36). If this is your situation, then I think removing this entire plate is unnecessary for removing the PSU (80% sure, I haven't exactly tried.)
-
-
-
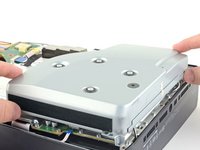
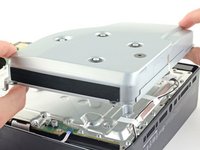
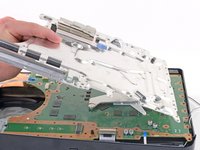
上部シールドプレートをマザーボードから持ち上げて、取り出します。
Unnecessary step to replace power supply.
Debatable, removing the top shield makes it much more comfortable to remove the USB ribbon cable.
I would say it's required since there's no way to get to the metal release otherwise
The grey rubber came off in some spots, what do I use to replace it? It attaches to cylinder things (opposite side of power supply) which then attaches to a copper bus.
That's thermal paste, it's recommended to keep it all on there. If you lost some paste, check on Google for the proper thermal paste for the PS5
-
-
-
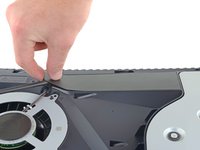
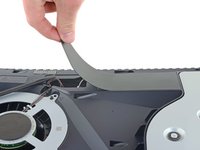
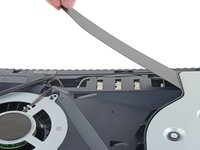
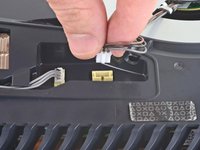
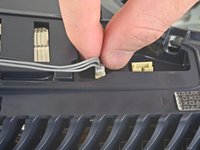
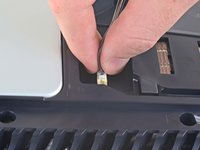
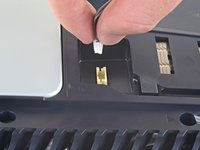
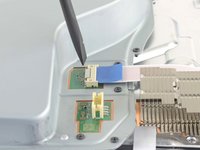
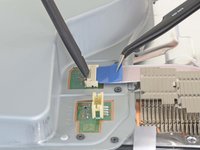
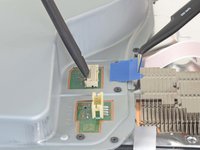
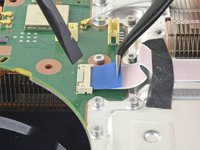
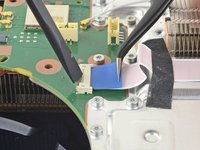
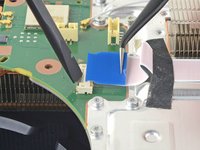
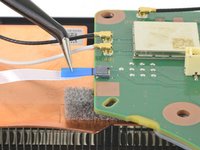
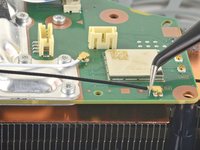
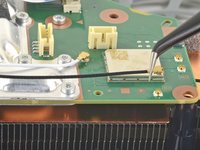
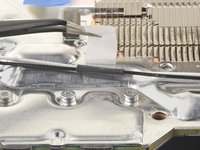
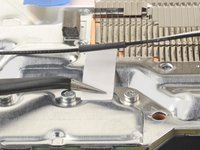
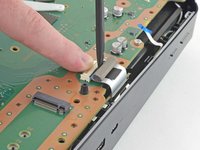
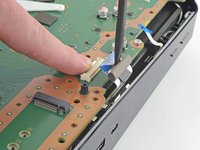
USBボードケーブルのボードコネクタのメタル製ロッキングタブを指で押します。
-
メタルタブを押し下げた状態で、スパッジャーの平面側先端を、リボンケーブルの絶縁フォームパッドに当て、コネクタからまっすぐ離して、ケーブルをの接続を外します。
-
-
-
PlayStationロゴの入っている側のフェイスプレートのコーナーを持ち上げて、ケースからクリップを外します。
-
-
-
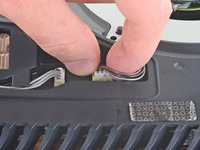
トルクスT8ドライバーを使って、ヒートシンクアセンブリとマザーボードを固定している29.4mm 長ネジを2本外します。
These screws are T9 security, or, if they are designed to be T8 security, they also accommodate T9 bits and you should definitely use T9. Source: Myself after stripping a highly torqued bolt 🤦♂️
-
-
-
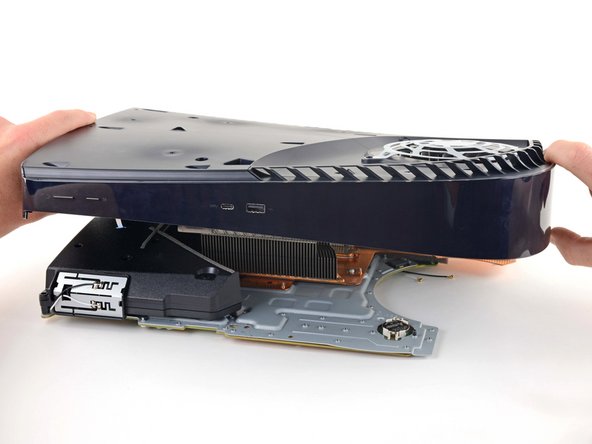
ケース前端を持ち上げて、マザーボードとヒートシンクアセンブリから外します。
-
フロントエッジを上げたままで、マザーボードとヒートシンクアセンブリから離してケースを押し戻し、充電ポートをケースのスロットから出します。
-
ケースを外します。
-
フロントプレートがプラスチックケースから外れることがあります。再組み立ての際は、フロントプレートが所定の位置にあることを確認してから、マザーボードと電源を再挿入してください。
-
-
-
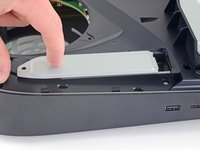
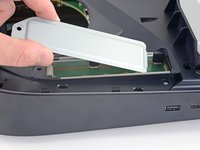
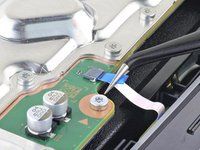
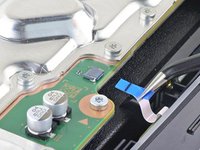
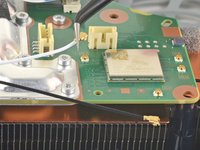
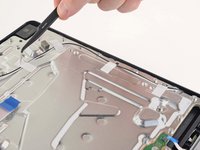
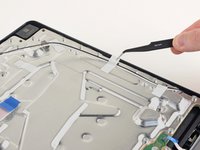
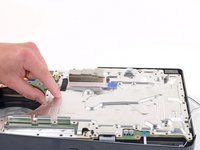
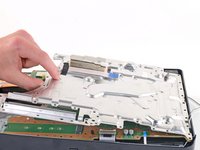
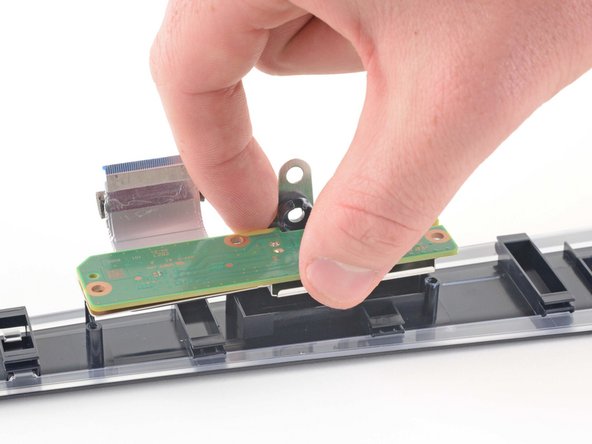
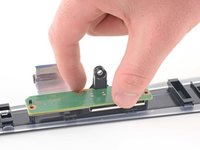
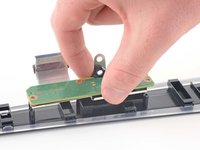
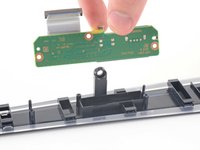
USBボードをまっすぐ持ち上げて、インタラクティブバンドから取り外します。
-


このデバイスを再組み立てするには、インストラクションを逆の順番に従って作業を進めてください。
e-wasteを処理する場合は、認可済みリサイクルセンターR2を通じて廃棄してください。
修理が上手く進みませんか?ベーシックなe-wasteを処理する場合は、 トラブルシューティングを試みるか、PlayStation 5 のアンサーコミュニティを参照してください。
このデバイスを再組み立てするには、インストラクションを逆の順番に従って作業を進めてください。
e-wasteを処理する場合は、認可済みリサイクルセンターR2を通じて廃棄してください。
修理が上手く進みませんか?ベーシックなe-wasteを処理する場合は、 トラブルシューティングを試みるか、PlayStation 5 のアンサーコミュニティを参照してください。
6 の人々がこのガイドを完成させました。
以下の翻訳者の皆さんにお礼を申し上げます:
100%

Midori Doiさんは世界中で修理する私たちを助けてくれています! あなたも貢献してみませんか?
翻訳を始める ›

3 件のコメント
Is the USB board married to the motherboard?
Dean Groth - 返信
No - the USB board is not married to the motherboard. You can use a USB board from any PS5 and it will work. Be careful that you buy the correct replacement though as there are two versions of the USB board.
James H -
Do you have guide to replacing the front USB board(EDU-030) on a CFI-1215A? From other teardown videos, it should be simpler as you don't need to remove the top shield plate to access the USB cable. Hopefully I can figure it out on my own by ignoring some of these steps. PSVR 2 uses that USB-C port and I imagine I won't be the only VR user whose usb-c port goes wonky from all the plugging in and out.