はじめに
The ISO resistor is a common point of failure in the Pentax LX. The component consists of a pair of feeler contacts sliding along a carbon filament. The resistance value created by this assembly communicates the ISO and exposure compensation settings to the camera. Over time the contacts can become oxidized and/or dirty resulting in erratic meter readings in the viewfinder. Cleaning the resistor can restore the camera to normal functionality.
Any disassembly of the LX body will compromise the weather sealing. New seals must be reapplied during final reassembly to restore weather proofing.
必要な工具と部品
-
-
-
Place a thin tool in the rewind fork and unscrew the topside knob.
-
Remove the washer under the rewind knob.
 FixBotに聞いてみる
-
-
-
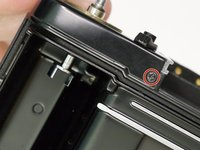
Remove three #000 5.5 mm screws.
-
Remove exposure compensation dial assembly.
-
Remove washer.
-
Remove rubber seal.
-
-
-
-
Remove one #00 X mm screw.
-
Remove one #00 2.5 mm screw.
-
-
-
-
-
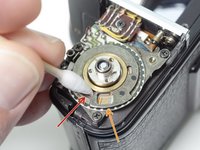
Use a cotton bud and isopropyl alcohol to clean the surface of the resistive element.
-
Spray a plastic safe contact cleaner in the area of the feeler contacts.
-
Rotate the dial back and forth several times.
-
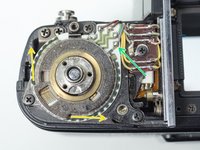
Check the resistance between the purple wire and ground. It should range from 7.5 kΩ to 200 kΩ with no dead spots.
-
-
-
Unsolder one purple wire.
-
Unsolder one green wire.
-
Unsolder two brown wires.
-
Remove three #00 screws.
-
-






To reassemble your device, follow these instructions in reverse order.

2件のガイドコメント
Hi Sam, I have to congrat with you, your guides are the most detailed guides concerning LX issues. I also try to repair some LX, always with success! Unfortunatly, I have a new LX, that I'm not able to fix...the camera still always "on". I thought it could depend by main switch setting; I try to modify the contacts position without success. I Don't know where it could be located the issue. Did you ever had experience with similar issues? How do you eventually solve the problem?
Yeah, my first guess for this kind of issue was also a bad switch contact. While this can sometimes be the source, it's more often a fault in the main PCB. A component failure. The only way I've heard of resolving it is by replacing the entire main PCB. But I'm hopeful that we will eventually learn more about the design of the main PCB and be able to identify exactly which component is responsible for the failure. It would be much easier to replace a bad capacitor than to source an entire PCB.
