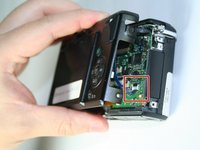
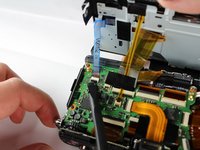
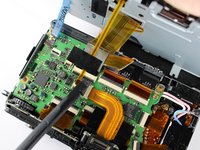
メインコンテンツにスキップ

Panasonic Lumix DMC-GF2 Back Panel Buttons Replacement

必要な工具と部品

  1. Panasonic Lumix DMC-GF2 Back Panel Buttons Replacement, Battery: 手順 1、 1の画像 1
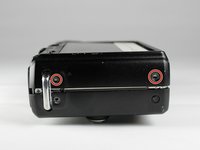
    • On the bottom of the camera, use your finger to push the lock button to the open position which will cause the hinged door to swing open.

  2. Panasonic Lumix DMC-GF2 Back Panel Buttons Replacement: 手順 2、 2の画像 1 Panasonic Lumix DMC-GF2 Back Panel Buttons Replacement: 手順 2、 2の画像 2
    • Push the small black tab that holds the battery with your finger to release the battery.

    • Use your fingers to pull the battery out of the camera.

  3. Panasonic Lumix DMC-GF2 Back Panel Buttons Replacement, Back Cover: 手順 3、 3の画像 1 Panasonic Lumix DMC-GF2 Back Panel Buttons Replacement, Back Cover: 手順 3、 3の画像 2 Panasonic Lumix DMC-GF2 Back Panel Buttons Replacement, Back Cover: 手順 3、 3の画像 3
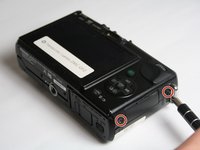
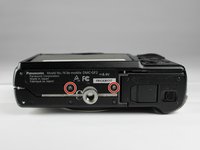
    • Using a Phillips #00 screwdriver, remove six 2.69mm, silver screws located on the two short sides of the camera and the bottom side.

  4. Panasonic Lumix DMC-GF2 Back Panel Buttons Replacement: 手順 4、 3の画像 1 Panasonic Lumix DMC-GF2 Back Panel Buttons Replacement: 手順 4、 3の画像 2 Panasonic Lumix DMC-GF2 Back Panel Buttons Replacement: 手順 4、 3の画像 3
    • Gently lift up the back cover to access the ZIF connectors for the blue and yellow ribbons.

    • To unlock the ZIF connectors, gently push the black portion of the lock from a flat position to an upright position using a spudger.

    • Take caution not to rip the ribbons out of the ZIF connectors when lifting the back panel.

  5. Panasonic Lumix DMC-GF2 Back Panel Buttons Replacement: 手順 5、 1の画像 1
    • Gently push the blue and yellow ribbons out of the unlocked ZIF connectors using your fingers.

  6. Panasonic Lumix DMC-GF2 Back Panel Buttons Replacement: 手順 6、 1の画像 1
    • Using a Phillips #00 screwdriver, remove the 3.5 mm silver screw from the upper left hand corner of the back cover.

  7. Panasonic Lumix DMC-GF2 Back Panel Buttons Replacement: 手順 7、 1の画像 1
    • Using a spudger, lift up and remove the plastic cover piece from the back cover.

    • Plastic cover may fall off without prying.

  8. Panasonic Lumix DMC-GF2 Back Panel Buttons Replacement: 手順 8、 1の画像 1
    • Using a Phillips #00 screwdriver, remove the 2.69 mm silver screw located beneath the plastic piece that was previously removed.

  9. Panasonic Lumix DMC-GF2 Back Panel Buttons Replacement: 手順 9、 1の画像 1
    • Using a spudger, lift up and separate the heavier metal cover from the light, plastic back cover.

    • Metal cover may fall off without prying.

  10. Panasonic Lumix DMC-GF2 Back Panel Buttons Replacement, Back Panel Buttons: 手順 10、 2の画像 1 Panasonic Lumix DMC-GF2 Back Panel Buttons Replacement, Back Panel Buttons: 手順 10、 2の画像 2
    • Push on the back panel buttons from the frontside of the back cover.

    • There might be some adhesives holding the back panel buttons to the cover. Extra force may be necessary.

終わりに

To reassemble your device, follow these instructions in reverse order.

作成者

3人の作成者と共同で作成されました。

Kingsley East

メンバー登録日: 10/30/16

462 ポイント

4のガイドは作成済み

チーム

Baylor, Team 5-9, Williams Fall 2016 Baylor, Team 5-9, Williams Fall 2016人のメンバー

BU-WILLIAMS-F16S5G9

3 メンバー

11のガイドは作成済み

0 件のコメント

コメントを追加

統計データ:

過去 24時間: 0

過去 7 日: 1

過去 30 日: 4

今までの合計 604