メインコンテンツにスキップ

PalmOne Zire 72 Battery Replacement

必要な工具と部品

  1. PalmOne Zire 72 Battery Replacement, Battery: 手順 1、 2の画像 1 PalmOne Zire 72 Battery Replacement, Battery: 手順 1、 2の画像 2
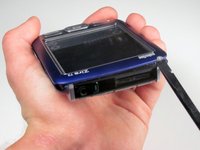
    • Using a T5 Torx screwdriver, unscrew the two 5mm screws located at the bottom of the device.

  2. PalmOne Zire 72 Battery Replacement: 手順 2、 1の画像 1
    • Peel back the adhesive label below the camera on the rear to reveal a hidden screw.

    • If you peel the entire adhesive off, two holes underneath will be exposed to future damage. Try to preserve the label to reapply later.

    • Alternate Procedure: Underneath the camera, feel for a depression and cut the sticker directly above the depression to reveal the hidden screw.

  3. PalmOne Zire 72 Battery Replacement: 手順 3、 1の画像 1
    • Use a #00 Philips screwdriver to remove the 2.5mm hidden screw.

  4. PalmOne Zire 72 Battery Replacement: 手順 4、 1の画像 1
    • Use either end of a a spudger to carefully pry off the camera lens mesh cover.

  5. PalmOne Zire 72 Battery Replacement: 手順 5、 1の画像 1
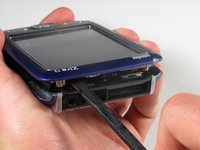
    • Using the #00 Phillips screwdriver, remove the two 9mm screws on the top corners of the device.

  6. PalmOne Zire 72 Battery Replacement: 手順 6、 2の画像 1 PalmOne Zire 72 Battery Replacement: 手順 6、 2の画像 2
    • Spin the phone around so that the headphone jack is facing you.

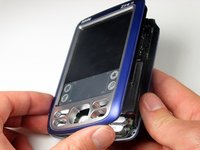
    • Run the flat end of the spudger around the entire edge of the device to gently pry the case off.

    • Gently remove the case to avoid damaging it. Do not try to force the case open.

    • The L shaped latches located on the bottom of the device make it hard to remove the case; you should run the spudger around the device's edges again if you are having problems.

  7. PalmOne Zire 72 Battery Replacement: 手順 7、 2の画像 1 PalmOne Zire 72 Battery Replacement: 手順 7、 2の画像 2
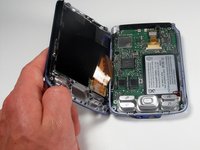
    • Remove the cover by lifting it from right to left.

    • This should be similar to the action of the opening of a book.

    • A connector may tear if this is not done carefully. The connector is a brown film connecting the motherboard to the case.

  8. PalmOne Zire 72 Battery Replacement: 手順 8、 1の画像 1
    • Lift the control pad buttons off of the motherboard.

  9. PalmOne Zire 72 Battery Replacement: 手順 9、 1の画像 1
    • Wedge the flat end of the spudger underneath the battery and gently pry it out.

    • Be cautious of the red and black wires on the battery, which may rip easily.

    • The battery may have adhesive holding it to the device.

    • The battery connector may rip if the battery is not removed carefully.

  10. PalmOne Zire 72 Battery Replacement: 手順 10、 1の画像 1
    • Gently disconnect the white component connecting the battery to the motherboard.

    • The connector should be pulled upward.

終わりに

To reassemble your device, follow these instructions in reverse order.

2 の人々がこのガイドを完成させました。

作成者

5人の作成者と共同で作成されました。

Michelle Medina

メンバー登録日: 04/10/12

63 ポイント

5のガイドは作成済み

チーム

Cal Poly, Team 6-49, Amido Spring 2012 Cal Poly, Team 6-49, Amido Spring 2012人のメンバー

CPSU-AMIDO-S12S6G49

4 メンバー

11のガイドは作成済み

2 件のコメント

When going to put this back together the clips at the bottom of the unit did not want to go back into place. I found I had to clip off the clips with some high end wire cutters. The screws will hold it together anyway so they are redundant and you will be happier the next time you have to open it as it will be easier.

Also the first time you pry open the top of the unit as described you may bend a metal clip for the card slot. Be careful or you might destroy it. In my case it was just a bit bent and with electronics tweezers I was able to bend it back into shape and put it back in it's proper place. This is likely unavoidable especially the first time due to how tight the plastic and metal clips are.

Whatever you do be slow with the process. Trying to do it to fast will likely lead to problems. Thanks for the excellent instructions. They were quite helpful.

Leland Whitlock - 返信

Hi is this unit of any value today?

Frank carmona - 返信

コメントを追加

統計データ:

過去 24時間: 2

過去 7 日: 2

過去 30 日: 33

今までの合計 3,132