はじめに
If your OnePlus 6T is scratched, cracked, or malfunctioning, it may be time to replace it! This is a very detailed guide on how to fix the OnePlus 6T. When fixing your OnePlus 6T, you will need to acquire some tools before fixing the device, so make sure to use the links given on the right-hand side under “What you need” to ensure that the OnePlus 6T is properly fixed. From physical damage to unresponsiveness in the device, following the steps below will tell you exactly how to replace your device's AMOLED touch screen.
必要な工具と部品
-
-
Make sure the phone is powered off and placed with the back cover facing towards you on a stable surface.
-
-
この手順で使用する道具:Plastic Cards$2.99
-
Insert a Jimmy under one of the heated corners of the phone to lift it slightly.
-
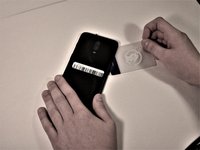
Insert a plastic card underneath the slightly lifted lip on the back cover and gently glide the card under the lifted phone casing.
-
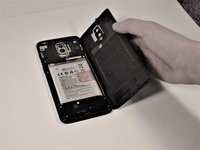
Remove the back cover from the phone.
-
-
-
-
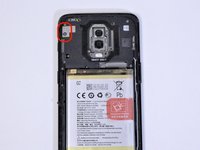
Remove all visible screws securing the housing above the battery
-
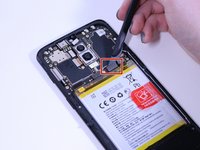
Insert a pick or a spudger by the silver slot on the left. Along the phone's edge, gently pry up until the housing is released.
-
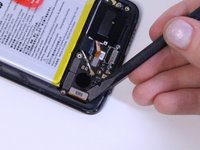
Disconnect the battery from the phone by lifting the battery connector from the phone with a spudger.
-
Using a spudger, disconnect the screen by carefully lifting the screen connector.
-
-
-
Remove the display from the phone.
-
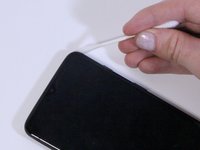
ALWAYS remember to thoroughly and gently clean the surfaces and remove any and all remaining or leftover old adhesive. this is a crucial step in assuring that your new adhesives "bond" properly and securely to provide adequate adhering, as well as to keep any dust or dirt and other undesired subjects from entering the device.
-


To reassemble your device, follow these instructions in reverse order. Take your e-waste to an R2 or e-Stewards certified recycler.
25 の人々がこのガイドを完成させました。
チーム

Grand Valley State University, Team S4-G6, DeVasto Fall 2019 Grand Valley State University, Team S4-G6, DeVasto Fall 2019人のメンバー
GVSU-DEVASTO-F19S4G6
4 メンバー
21のガイドは作成済み
6件のガイドコメント
skipped a step removing the plate around the camera. It should be after step 6 and before step 7.
otherwise this guide is meh. its okay. it gets the job done, I guess.
Billieving - 返信
I only have a broken front glass on my 1+6t the screen seems ok what differences are there and where do I get a good quality front glass for it. I have never disassembled a phone before but I know a bit about electronics and know how to put computers together and I don't think it is worth me paying a third of the phon's cost for a whole screen and/or pay someone to repair it
step 9 was kinda implossible for me, even though i used alcohol and heat before.. had to dig my Jimmy under the broken corner (top left), cracked some of my screen and was somehow able to lift the screen far enough to get under it.. im also missing some detailed instructions of the reassembly, had to watch a video for this
My phone fell down and has a black screen. The screen has no cracks at all. And the phone is working too as I am able to hear the notifications and incoming calls. So any idea how much it would cost to repair it?