メインコンテンツにスキップ

Nokia 2610 Screen Replacement

必要な工具と部品

  1. Nokia 2610 Screen Replacement, Battery and Sim Card: 手順 1、 3の画像 1 Nokia 2610 Screen Replacement, Battery and Sim Card: 手順 1、 3の画像 2 Nokia 2610 Screen Replacement, Battery and Sim Card: 手順 1、 3の画像 3
    • Place your thumb on the middle of the back cover and push it toward the bottom of the phone to slide the cover off.

  2. Nokia 2610 Screen Replacement: 手順 2、 3の画像 1 Nokia 2610 Screen Replacement: 手順 2、 3の画像 2 Nokia 2610 Screen Replacement: 手順 2、 3の画像 3
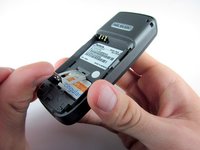
    • Use a plastic opening tool (or your finger) to gently pry the battery out of the battery slot on the back of the phone.

  3. Nokia 2610 Screen Replacement: 手順 3、 3の画像 1 Nokia 2610 Screen Replacement: 手順 3、 3の画像 2 Nokia 2610 Screen Replacement: 手順 3、 3の画像 3
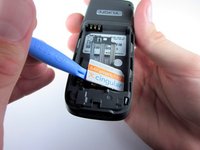
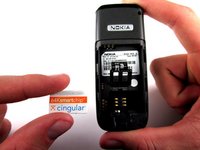
    • Lift the metal sim card holder (at the bottom of the battery slot) up and carefully pry the sim card out of its slot with a plastic opening tool or your finger.

    • After removal, lower the metal sim card holder into its original position.

  4. Nokia 2610 Screen Replacement, Front Pannel: 手順 4、 2の画像 1 Nokia 2610 Screen Replacement, Front Pannel: 手順 4、 2の画像 2
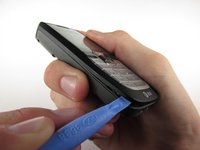
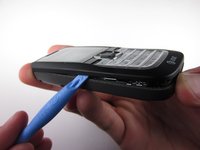
    • Insert the plastic opening tool into the crack between the front and back panels.

    • Gently pry the front cover away from the back cover while sliding the plastic opening tool towards the top of the phone.

  5. Nokia 2610 Screen Replacement: 手順 5、 2の画像 1 Nokia 2610 Screen Replacement: 手順 5、 2の画像 2
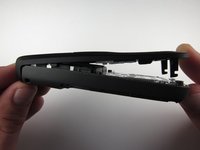
    • Lift the bottom of the front cover away from the phone.

    • Continue lifting until the top of the front cover is fully removed from the phone.

    • Note: To replace the Keypad, gently lift it out of the front cover. It is located below the clear viewing window.

  6. Nokia 2610 Screen Replacement, Screen: 手順 6、 1の画像 1
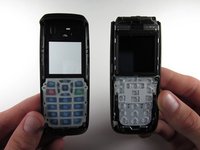
    • Remove the 4 screws surrounding the screen using the precision T6 screwdriver.

  7. Nokia 2610 Screen Replacement: 手順 7、 1の画像 1
    • Lift the screen away from the phone and circuit board.

    • Warning: The screen is attached to the circuit board by a connector on the circuit board, so lift the screen straight up to avoid damage to the connector.

終わりに

To reassemble your device, follow these instructions in reverse order.

2 の人々がこのガイドを完成させました。

作成者

4人の作成者と共同で作成されました。

Andrew Wood

メンバー登録日: 10/05/10

336 ポイント

3のガイドは作成済み

チーム

Cal Poly, Team 7-52, Amido Fall 2010 Cal Poly, Team 7-52, Amido Fall 2010人のメンバー

CPSU-AMIDO-F10S7G52

4 メンバー

12のガイドは作成済み

コメント 1 件

My Nokia 2610 dates from 2005 (or2006) and its screen was very scratched.

I bought a complete front cover replacement from vmobile.pl who were very efficient.

Andrew Wood’s instructions are crystal clear. The phone is as new now.

Many thanks. Andrew Boxall

Andrew - 返信

コメントを追加

統計データ:

過去 24時間: 0

過去 7 日: 0

過去 30 日: 5

今までの合計 3,095