はじめに
バッテリーに問題があって交換する必要がありますか?本ガイドではニンテンドー3DS XLに今すぐ新しいバッテリーを取り付けるために必要な手順を一通り紹介しています。
必要な工具と部品
-
-
-
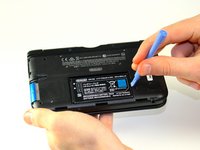
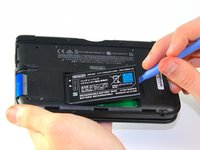
プラスチック製の開梱ツールを使い、上部の角から順に下に向かって、背面カバーを固定しているクリップをこじ開けて外します。
-
手で背面カバーを取り外してください。
-


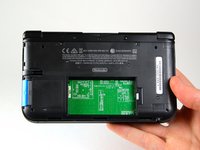
この手順を完成した後、新しいバッテリーを装着してください。
組み立て直す際は、上記の手順と逆の順番で作業を行なって下さい。
63 の人々がこのガイドを完成させました。
以下の翻訳者の皆さんにお礼を申し上げます:
100%

これらの翻訳者の方々は世界を修理する私たちのサポートをしてくれています。 あなたも貢献してみませんか?
翻訳を始める ›
チーム

Cal Poly, Team 9-13, Regan Spring 2014 Cal Poly, Team 9-13, Regan Spring 2014人のメンバー
CPSU-REGAN-S14S9G13
5 メンバー
56のガイドは作成済み
6件のガイドコメント
Time estimate: 3 - 9 hours Difficulty: Very difficult ??????
More like 30-90 seconds, and that's if you have to search for a screwdriver.
Tommy Lynch - 返信 共有
It should be noted that the bottom three clips on the bottom of the backplate can’t just be snapped in, they need to be slipped in, so when removing the backplate, it should be tiled away from the system and then pulled up from the bottom, and those three clips on the bottom should be the first clips in when you’re putting it back together, sliding them in with the backplate at an angle, and then the rest of the clips just snap in.
Cole Jackson - 返信 共有
Nice tip. Ty.
Just did this. For reasmbly I recommend putting the bottom/lower part of the case on first before you screw it back on.
Scott Vogel - 返信 共有