メインコンテンツにスキップ

Nexus One Flash Replacement

必要な工具と部品

  1. Nexus One Flash Replacement, Rear Cover: 手順 1、 2の画像 1 Nexus One Flash Replacement, Rear Cover: 手順 1、 2の画像 2
    • Using two fingers, push up on the rear cover.

  2. Nexus One Flash Replacement: 手順 2、 1の画像 1
    • The rear cover slides up and off.

  3. Nexus One Flash Replacement, Battery: 手順 3、 1の画像 1
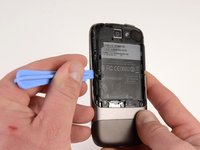
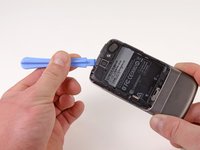
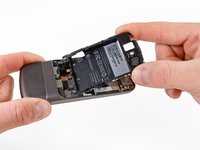
    • Using the plastic opening tools, pry the left bottom corner of the battery up.

  4. Nexus One Flash Replacement: 手順 4、 1の画像 1
    • Pull the battery up and out.

  5. Nexus One Flash Replacement, Battery Housing: 手順 5、 1の画像 1
    • Remove the two Torx T5 screws.

    • Remove the one Philips #00 screw.

  6. Nexus One Flash Replacement: 手順 6、 2の画像 1 Nexus One Flash Replacement: 手順 6、 2の画像 2
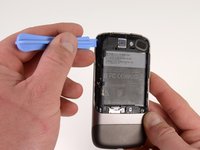
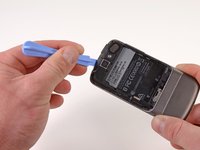
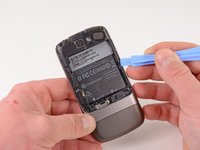
    • Using the plastic opening tool, pry up the battery housing upwards.

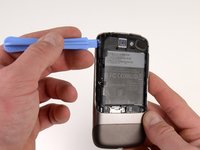
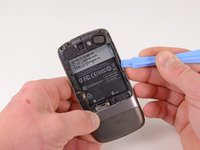
    • Push pry tool down, undoing the plastic tab.

  7. Nexus One Flash Replacement: 手順 7、 2の画像 1 Nexus One Flash Replacement: 手順 7、 2の画像 2
    • Pry the upper left tab open on the battery housing.

  8. Nexus One Flash Replacement: 手順 8、 2の画像 1 Nexus One Flash Replacement: 手順 8、 2の画像 2
    • Pry the top tab of the battery housing.

  9. Nexus One Flash Replacement: 手順 9、 2の画像 1 Nexus One Flash Replacement: 手順 9、 2の画像 2
    • Pry the right side tab of the battery housing.

  10. Nexus One Flash Replacement: 手順 10、 2の画像 1 Nexus One Flash Replacement: 手順 10、 2の画像 2
    • Pull up on the battery housing.

    • Slide the battery housing out to remove it.

  11. Nexus One Flash Replacement, Flash: 手順 11、 1の画像 1
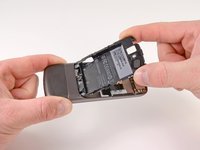
    • Insert the spudger under the bottom of the flash board

    • Twist the spudger to lift and release the flash board.

終わりに

To reassemble your device, follow these instructions in reverse order.

2 の人々がこのガイドを完成させました。

作成者

3人の作成者と共同で作成されました。

Niklas Johnson

メンバー登録日: 01/31/12

1,207 ポイント

18のガイドは作成済み

0 件のコメント

コメントを追加

統計データ:

過去 24時間: 0

過去 7 日: 1

過去 30 日: 1

今までの合計 1,823