はじめに
My 2DS XL was disassembled at the time of writing this guide, because there was no guide here yet. However, everything pertinent to removing the top screen and replacing it are listed here.
必要な工具と部品
-
-
Before starting the disassembly, remove
-
The stylus
-
Any game cartridge
-
The SD card
-
-
-
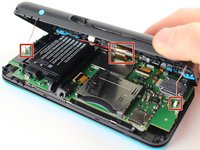
Unscrew the four 6mm tri-point screws located at the four corners of the bottom panel.
The Y0 was too big; I ended up using a Y00 and that worked fine
Would not recommend using a Y000 like I tried to do
gotta use Japanese Industry Standard YOO (blunt end)- I did not, and accidentally stripped two of the screws… still trying to figure out how to remove them -_-;
I'm using the Y-0.6 and seems to only unscrew 2 of the screws on the right side of the handheld, the other 2 aren't moving
screws are too tight
-
-
-
Using a spudger, separate the back panel from the front casing by gently prying around the panel.
-
There are many clips along the hinge of the case, so it is recommended to work your way along one short side and the two long sides before finishing the last short side.
You need to be super careful separating the top from the bottom at the rear end. I got stuck there, applied a lil more force and ripped the right shoulder button straight off the pcb!
The front headphone Jack got stuck in the bottom case and snapped when opening, didn’t notice until after replacing the battery (which is a nightmare btw) I used some floss underneath the battery to give you better leverage since the side plastic is so thin and fragile. I cannot get the headphone Jack back into position now and will have to take it to a shop for (I’m sure much more expensive) repairs. Honestly DO NOT try repair this thing, just pay someone else to repair these. Compared to the OG 2011 3DS these are a nightmare to work with. Nintendo really went out of their way to make this impossible to repair, I had an extra set of pretty capable hands too.
I also ripped off the headphone jack when taking the case apart. I never pulled hard. You need to be careful to give the headphone jack clearance before applying any force.
-
-
この手順で使用する道具:Tweezers$4.99
-
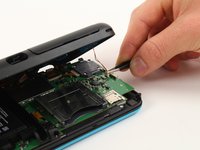
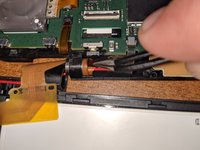
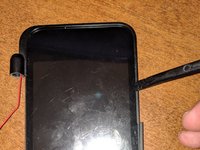
Using tweezers, disconnect the two cables that connect the rear buttons on either side to the motherboard by gently pulling them upwards.
I unfortunately took off the base of one when trying to pull apart. Is there a fix or will it not be broken?
Did you manage to fix this at all?
When you are putting these cables back, make sure to check the orientation of the cable. You have to match the cable head to the entry point, so you may have to turn the cable around. I spent a bit too much time trying to connect the cables just because I didn't realize that I had to turn the cable around.
Aren't these the speaker cables? I haven't taken any 2DS's apart in a while, but I'm pretty sure these cables connect to the speakers
-
-
-
-
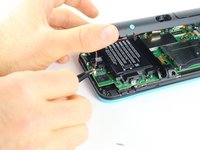
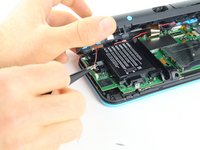
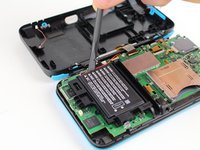
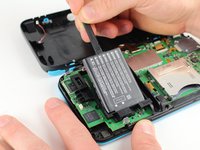
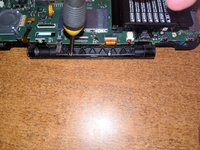
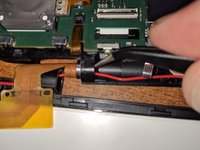
Using a spudger, lift out the battery.
-
Be aware that there is a sticky pad holding the battery into its tray. It may be necessary to use multiple tools to gently pry the battery away from the tray and motherboard.
Personally, I skipped this step and everything still works fine. I wasn't able to take the battery out because the adhesive was too strong.
Small square of adhesive. Pull up slowly and it’ll release after 10-20 seconds
Any advise for dealing with CTR-003 spicy pillow? So far in this transplant operation, both my devices batteries are okay... but... I dunno, if I were to run into a spicy pillow in the future, what would be the least awful way to pull it out?
Not sorry, when I see these repair jobs that involve the company gluing the battery into the device (or even soddering in that soon to be spicy pillow) this is just something I'm wondering about
I haven't taken my 2ds apart yet, depending on how devices are built it might work to slide a solid thread (eg fishing rope, or floss but that might rip) under it, and do a sewing motion.
-
-
この手順で使用する道具:Tweezers$4.99
-
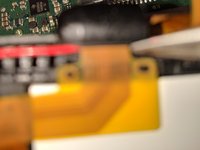
Release the top screen ribbon cable in image 1. Thread it through the rectangular slot below the tweezers.
-
Carefully coil the ribbon cable and prepare to slide it through the cylinder hinge.
How do you disassemble the hinge?
I wiggled the top screen and with a pair of tweezers, grabbed the barrel that comes out of the left hinge. There might be an easier way, but the home is essentially the same on DSi XL's and these, and I have done them both the same way many times.
Sometimes it helps to stand it up on its right side and open and close the hinge to wiggle it out
This step seems to be leaving out a crucial part: removing the other hinge, the one opposite where the ribbon cable threads through. And it is not easy! You basically have to “pick” at it with a small screwdriver or tweezers, trying to tease it out. I did a pretty poor job, mauling it terribly but eventually got it out without destroying it. (Used some WD-40 in the end which might have helped; I sprayed into a cup, then dabbed it on the hinge with a toothpick. Made sure to clean it all off when I before reassembly.) This video shows a successful hinge removal: https://www.youtube.com/watch?v=Zuu_T2ls...
I noticed that too. Was able to remove the connector by evenly grasping along the ribbon with my needle nose pliers. Came out effortlessly.
To remove the hinge pin (the one without a cable through it) it is also nice to know: the inner metal part is firmly connected to a thin black shroud. This is way easier to grab and move. I first tried just pull the metal part, that was unnecessarily difficult. Just accept the plastic mantle around it will get some stab marks and pull there.
-
-
-
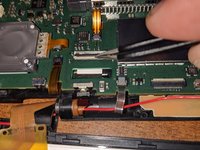
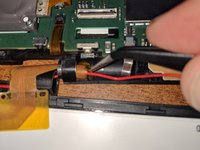
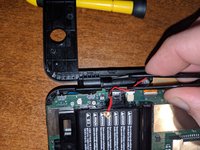
Remove the two screws holding the plastic cover plate down to reveal the red wifi wire which will come out along with the top screen and case.
-
-
-
Disconnect the wifi wire and unclip it along its path around the battery tray and under the plastic plate we removed before.
-
Slide out the cylinder that holds the other side of the hinge together.
-
On my 2DS XL, I wiggled the top half of the case and the cylinder wiggled out enough to grab it with the tweezers.
Removing the hinge is easier if you open the clamshell all the way, push it out a little bit with a spudger, then close it. It’ll fall right out.
This step is impossible for me? I'm going to try to move forward without detaching the top screen completely and hopefully it will work. The cylinder won't budge.
I was able to complete the screen replacement without completely detaching the top screen. It was a little more cumbersome, but the cylinder wouldn't come out of the hinge.
There's a certain angle that you must put the screen on so the hinge aligns and drops out by itself. You can't pull it by forcing, you just need to set the right angle.
This is correct. I opened the screen all the way and then kept banging on the 2DS with my hand so the cylinder would fall down and after a bit it came right out.
-
-
-
Finish sliding the ribbon cable through the hinge and free the red wifi wire, as well.
-
The top part of the case is now free, and you are okay to set the rest of the 2DS XL aside for reassembly.
-
I apologize for the quality of the picture, but as you can see, the cable slides through a slot on the top case's hinge body. carefully slide the cable out of the slot and free the cable from the two pins holding it down to the case frame.
-
-
-
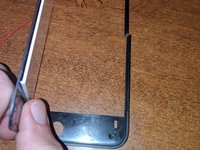
Insert a spudger along the edge of the plastic plate on the top shell. Pry up gently until the glue releases. There is a large glue pad under this plate, but there is nothing else holding it on.
-
After prying off the plate, there are four screws marked in the rings to release the back plate from the screen plate.
-
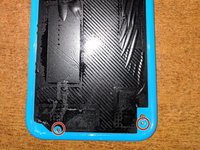
Once the screws are removed, lift off the back plate to reveal the screen and plastic trim.
I broke my case by following the teardown video. Please don’t be like me. I wanted to get this out so that other readers here are prepared to fix their top screen or some potential power-on issues (turns on and immediately shuts off) like I have.
Wow, Nintendo was not shy with the glue. I’ve been working fifteen minutes on prying off the top shell, and I’m little more than halfway done. All I can say to anyone else trying this is be patient and work slowly so nothing breaks. I had to get a credit card to put under part of the shell as I went to keep it from sticking again after I pried it up.
I found the little plastic iFixit picks to be helpful here, since it was pretty hard getting the plastic to stay up with just the spudger; that said, any piece of plastic would probably work once you get the first edge/corner up.
There is a missing step between step 5 and 6, I think. In step 5, the top case is still attached to bottom case. But in step 6, you can clearly see from the photo that the top case is already separated from the bottom case. But there is no instruction on how to do that!
The top case was already removed. It does not need to be removed to perform this specific step. Please read through the steps that follow, and the steps will make more sense. My case was already apart and I was documenting the steps in order for everyone else, although mine was already disassembled since it did not exist here yet.
I apologize for any confusion this has caused.
I rearranged the steps to hopefully alleviate the confusion. I recommend taking the top backing plate off first before removing the top screen from the device. Whether you do that first or remove the entire top screen first, the guide is still complete in its entirety.
Hopefully this helps!
DO NOT USE THE “TEARDOWN VIDEO” AS A GUIDE for this; you’ll notice in that video all four screws are broken off! Also: You do NOT need a hot gun to warm the adhesive. Just use a flat rectangular spudger-type tool: insert and work it down. (Maybe use an Exacto blade to gently start it off, then go spudger all the way.) I made a spudger out of the material used in plastic milk containers and it worked great: came off easy with no heat gun, no bending or deformation of the plastic cover.
IPA + heat can make the process or removing this and separating the LCD from the screen protector so much easier, also do not use metal tools, use a plastic screen opening tool, like the iplastix, otherwise you will damage the outer plastics and the black painted layer behind the screen protector
-
-
-
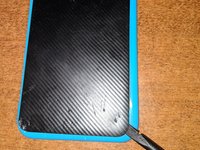
Gently pry around the top edge of the case. As you can see, my case is cracked, but not as a result of this repair. This plastic is very thin, so do be careful working your way around the case.
-
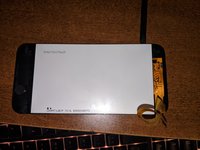
The front lens is plastic, but it is held to the frame with glue pads. Using multiple soft tools, work your way around the lens to free the lens and the screen from the frame bezel.
-
You can now set aside the bezel for reassembly.
I did not remove front plastic once screws were out of the back i separated the back and front halves and lifted out the screen slowly as it has a glue seal around it
-
-
-
Because the lens is plastic, I gently bent the lens away from the screen to release it. Using a spudger or pry tool will also be very useful here.
-
Once you have removed the screen, you are ready to replace the screen and begin reassembly.
-
Be very mindful of the ribbon cable as it goes back through the hinge during reassembly, as it can be damaged very easily.
-


To reassemble your device, follow these instructions in reverse order.
To reassemble your device, follow these instructions in reverse order.
26 の人々がこのガイドを完成させました。
14 件のコメント
I think there is a missing step between step 5 and 6. I followed the instructions until step 5, but couldn’t figure out how to separate the top case from the bottom case. In step 6, you can see the top case has been separated from the bottom case. But no instruction is given on how to do that.
The hinge only has one component holding it together from coming apart. It is on the left hi he as you look at it like you're playing. The hinge component is a small barrel that resides inside the hinge. You have to open and close it while it is on its right side and try to grab with a pair of tweezers onto the edge of the barrel.
Didn’t follow exactly how to disconnect the top section fully.
Hopefully I can assist you. Where are you getting stuck? The barrel on the left hinge is a bit difficult to remove. I opened and closed the hinge a few times with the left hinge up off the desk. While doing this, I watched for the edge of the barrel to poke out so I could grab it with angled tweezers. That was the hardest part of removing the top half for me personally, but it is almost exactly like the DSi XL, and I have disassembled many of those already. My kids are NOT gentle with electronics.
After getting the barrel out on the left hinge, coil up the ribbon cable around the wifi antenna and slide it through the right side of the hollow hinge.
Does this work with the pokeball edition of the 2ds?
They &&^&@@ up the top part disassembly, you are supposed to remove the black part in the center, then remove the screws that are below it to disasemble the lid/top lcd, and not break it like in the video, poor job.
I agree that they did. On that post, they made a mention in the comments that the teardown was not intended to be a disassembly. Unfortunately, I broke my first one following that, too. This is what prompted me to post these pictures when my kids decided to be rough on their DS’s again.
Hopefully you can find replacement parts like I did!
There is something sketchy here, in step 7 where you removed the plastic plate, you can clearly see that this plate wasn’t there in step 6, it seem you removed it before, forgotten about it, put it back together and got on with it, but the problem is that it affects how you disassemble it, please redo this but in the proper order, specially because you don’t show how the wifi cable is positioned, before removing it, how do you expect people to put it back together if you can’t tuck away properly the wifi cable?
bababooey!!!
aaaaaaaaaaaaaaaaaaaaaaaaaa
bru what is the point of literally prying the battery out and risk &&^&^$^ the plastic. you can simply just disconnect it the cable, there is no need to wrestle with it.
There is no battery cable, the terminals are soldered directly onto the board, so in order to disconnect the battery you must remove it from the system
This is a great repair instructional, but I would advise also looking at the below video link. (I used both.) Sometimes watching 2 repair guides can help when you think you think you’re stuck. For example, I had a really hard time getting the hinge off!
https://www.youtube.com/watch?v=Zuu_T2ls...
(HINT: Works best if you rotate it 180 degrees, so that you are repairing it from the same perspective as the technician)
skat1140 - 返信