メインコンテンツにスキップ

Motorola V557 Keypad Replacement

必要な工具と部品

  1. Motorola V557 Keypad Replacement, Battery: 手順 1、 3の画像 1 Motorola V557 Keypad Replacement, Battery: 手順 1、 3の画像 2 Motorola V557 Keypad Replacement, Battery: 手順 1、 3の画像 3
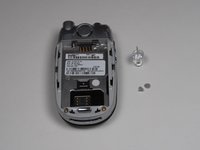
    • First, on the back of the phone find the silver button on the top left corner of the phone.

    • Simultaneously push down the button and slide the back plate down to reveal the battery.

  2. Motorola V557 Keypad Replacement: 手順 2、 2の画像 1 Motorola V557 Keypad Replacement: 手順 2、 2の画像 2
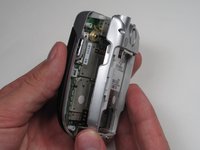
    • Grab the lower edge of the battery at the two bottom corners.

    • Pull upward on the edges to remove the battery.

  3. Motorola V557 Keypad Replacement, SIM Card: 手順 3、 3の画像 1 Motorola V557 Keypad Replacement, SIM Card: 手順 3、 3の画像 2 Motorola V557 Keypad Replacement, SIM Card: 手順 3、 3の画像 3
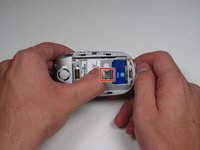
    • Push the metal slider towards the top of the phone until it clicks out of the original position.

    • Gently slide out and remove the SIM card.

  4. Motorola V557 Keypad Replacement, Antenna: 手順 4、 2の画像 1 Motorola V557 Keypad Replacement, Antenna: 手順 4、 2の画像 2
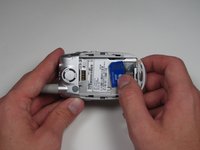
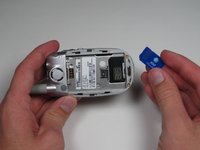
    • Grip the antenna and twist it counterclockwise to loosen it.

    • When it has been loosened all the way, pull gently to remove the antenna piece.

  5. Motorola V557 Keypad Replacement, Rear Casing: 手順 5、 3の画像 1 Motorola V557 Keypad Replacement, Rear Casing: 手順 5、 3の画像 2 Motorola V557 Keypad Replacement, Rear Casing: 手順 5、 3の画像 3
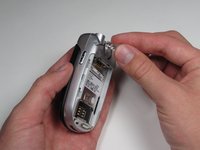
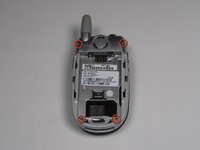
    • Using the push pin, gently pry the top two screws of the cover off.

    • The cover in the upper left of the back plate does not need to be removed.

  6. Motorola V557 Keypad Replacement: 手順 6、 3の画像 1 Motorola V557 Keypad Replacement: 手順 6、 3の画像 2 Motorola V557 Keypad Replacement: 手順 6、 3の画像 3
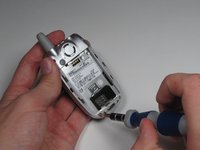
    • At the corners of the phone, remove all four 6.0 mm Torx screws, using your screwdriver.

  7. Motorola V557 Keypad Replacement: 手順 7、 3の画像 1 Motorola V557 Keypad Replacement: 手順 7、 3の画像 2 Motorola V557 Keypad Replacement: 手順 7、 3の画像 3
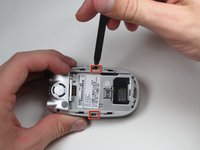
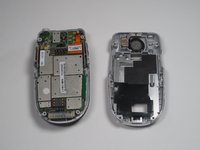
    • Next, insert a spudger into the marked holes. One at a time pry away from the phone to release the internal tabs.

    • Then, separate and detach the rear casing.

  8. Motorola V557 Keypad Replacement, Motherboard: 手順 8、 3の画像 1 Motorola V557 Keypad Replacement, Motherboard: 手順 8、 3の画像 2 Motorola V557 Keypad Replacement, Motherboard: 手順 8、 3の画像 3
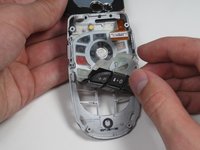
    • Separate the front ribbon cable from the board with a plastic opening tool.

  9. Motorola V557 Keypad Replacement: 手順 9、 3の画像 1 Motorola V557 Keypad Replacement: 手順 9、 3の画像 2 Motorola V557 Keypad Replacement: 手順 9、 3の画像 3
    • Make sure you don’t break the ribbon cables that attach to the side buttons when removing the motherboard.

    • Lift out the motherboard only after all cables have been disconnected. Try to touch it only from the sides.

  10. Motorola V557 Keypad Replacement, Keypad: 手順 10、 3の画像 1 Motorola V557 Keypad Replacement, Keypad: 手順 10、 3の画像 2 Motorola V557 Keypad Replacement, Keypad: 手順 10、 3の画像 3
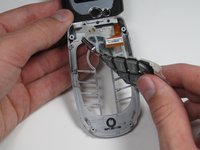
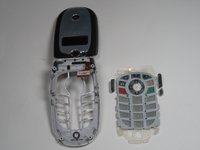
    • With the phone flipped open, peel the keypad back to remove it from the casing, starting from the bottom.

終わりに

To reassemble your device, follow these instructions in reverse order.

ある他の人がこのガイドを完成しました。

作成者

5人の作成者と共同で作成されました。

Chad Brantley

メンバー登録日: 10/06/10

32 ポイント

2のガイドは作成済み

チーム

Cal Poly, Team 7-50, Amido Fall 2010 Cal Poly, Team 7-50, Amido Fall 2010人のメンバー

CPSU-AMIDO-F10S7G50

4 メンバー

24のガイドは作成済み

0 件のコメント

コメントを追加

統計データ:

過去 24時間: 0

過去 7 日: 1

過去 30 日: 2

今までの合計 1,022