メインコンテンツにスキップ

Motorola Moto Z Play スピーカーの交換

必要な工具と部品

  1. Motorola Moto Z Play スピーカーの交換, ディスプレイアセンブリ: 手順 1、 1の画像 1
    • 作業を始める前に、デバイスの電源を切ります。

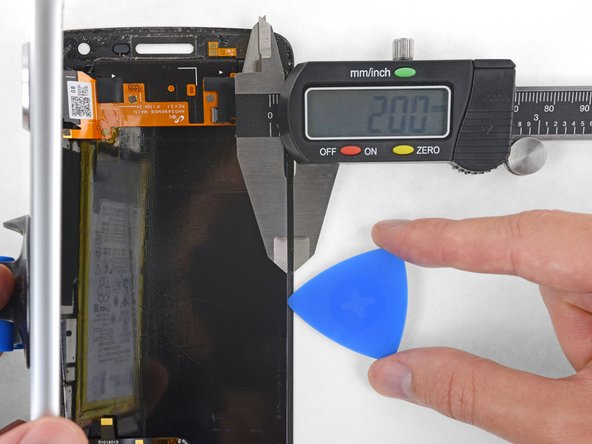
    • 解体前にバッテリーを放電してください。バッテリーが充電されてオーバーヒートしてしまうと、危険な熱を伴うアクシデントが発生することがあります。

    • ディスプレイが飛散している場合、怪我を防止するために、透明な梱包テープをガラス表面に貼って保護してください。

  2. Motorola Moto Z Play スピーカーの交換: 手順 2、 1の画像 1
    • iOpenerを準備して、デバイス前面の左端に沿って約2分間、わずかに熱くなって触れない程度まで加熱します。 これにより、ディスプレイを固定している接着剤が柔らかくなります。

    • デバイスを十分に温めるには、iOpenerを複数回に渡り再加熱してデバイス上に乗せてください。 過熱を避けるために、iOpenerの使用方法を参照してください。

    • ヘアドライヤー、ヒートガン、またはホットプレートを使用することもできます。デバイスを過熱させないようにご注意ください。ディスプレイと内蔵バッテリーはどちらも熱による損傷を受けやすいためです。

  3. Motorola Moto Z Play スピーカーの交換: 手順 3、 3の画像 1 Motorola Moto Z Play スピーカーの交換: 手順 3、 3の画像 2 Motorola Moto Z Play スピーカーの交換: 手順 3、 3の画像 3
    • 次の手順では、ディスプレイアセンブリをMoto Z Playのシャーシから分離します。

    • 参考として、デバイスから取り外した後のディスプレイアセンブリの背面画像(右)と取り外し前の画像を参照してください(左)。

    • ディスプレイアセンブリを再利用する場合は、デバイス横のエッジ部分に注意してください。 この部分を接着剤でスライスするときは、ツールを2 mm以上挿入しないでください。ツールがディスプレイパネルに接触して損傷する可能性があります。

    • トランプの使用は、ディスプレイパネルを損傷する可能性が低いためより安全ですが、はるかに時間がかかります。 トランプのような柔らかい紙のカードは、ディスプレイを再利用したい場合には最適なツールです。

  4. Motorola Moto Z Play スピーカーの交換: 手順 4、 3の画像 1 Motorola Moto Z Play スピーカーの交換: 手順 4、 3の画像 2 Motorola Moto Z Play スピーカーの交換: 手順 4、 3の画像 3
    • 吸盤カップをディスプレイの左端中央付近に取り付けます。

    • フロントパネルとリアケースの間にわずかな隙間を作るために、しっかりとした一定の力で吸盤カップを引き上げます。

    • スクリーンにひびが入っていると、吸盤が固着しないことがあります。 強力なガムテープで持ち上げるか、吸盤カップにボンドを付けて引き上げて、先の手順に進むことができます。

    • この作業では、相当な力が必要かもしれません。ただし、ツールを差し込むだけのわずかな隙間を作るだけです。

    • 作業がうまくいかない場合は、さらに熱を加えて接着剤を柔らかくしてから、作業を再開してください。 接着剤はすぐに冷却されるので、繰り返し加熱する必要があります。

  5. Motorola Moto Z Play スピーカーの交換: 手順 5、 1の画像 1
    • ディスプレイ下に生じた隙間に開口ピック(もしくはトランプカード)を差し込みます。

  6. Motorola Moto Z Play スピーカーの交換: 手順 6、 3の画像 1 Motorola Moto Z Play スピーカーの交換: 手順 6、 3の画像 2 Motorola Moto Z Play スピーカーの交換: 手順 6、 3の画像 3
    • 開口ツールをデバイスの左端に沿ってスライドさせて、ディスプレイを固定している接着剤を切開します。

  7. Motorola Moto Z Play スピーカーの交換: 手順 7、 1の画像 1
    • ディスプレイ下側端のデバイス前面を温めて、固定された接着剤を柔らかくします。

  8. Motorola Moto Z Play スピーカーの交換: 手順 8、 3の画像 1 Motorola Moto Z Play スピーカーの交換: 手順 8、 3の画像 2 Motorola Moto Z Play スピーカーの交換: 手順 8、 3の画像 3
    • 指紋センサーにダメージを与えないように注意しながら、下側ベゼルの下に固定された接着剤を切開します。

    • 開口ツールをスライドさせながら指紋センサー下端を越えて、反対側まで進みます。 センサーの真下をこじ開けないでください。

    • ディスプレイを再利用する場合は、ディスプレイパネルをスライスしたり、ダメージを与えないようご注意ください。 この画像を参考にして、ディスプレイパネルを避けながら(赤でハイライトされている)接着剤エリアを確認してください。

  9. Motorola Moto Z Play スピーカーの交換: 手順 9、 3の画像 1 Motorola Moto Z Play スピーカーの交換: 手順 9、 3の画像 2 Motorola Moto Z Play スピーカーの交換: 手順 9、 3の画像 3
    • 下側ベゼルの残りに留められた接着剤を続けて切開します。

  10. Motorola Moto Z Play スピーカーの交換: 手順 10、 1の画像 1
    • ディスプレイの右側端に固定された接着剤を柔らかくするために温めます。

  11. Motorola Moto Z Play スピーカーの交換: 手順 11、 2の画像 1 Motorola Moto Z Play スピーカーの交換: 手順 11、 2の画像 2
    • ディスプレイを固定している接着剤を切開するため、デバイス右側を開口ツールでスライドします。

  12. Motorola Moto Z Play スピーカーの交換: 手順 12、 1の画像 1
    • ディスプレイと上部端の間の接着剤を柔らかくするため、温めます。

  13. Motorola Moto Z Play スピーカーの交換: 手順 13、 3の画像 1 Motorola Moto Z Play スピーカーの交換: 手順 13、 3の画像 2 Motorola Moto Z Play スピーカーの交換: 手順 13、 3の画像 3
    • 開口ツールをデバイス右上角に挿入し、ベゼル上部の下にスライドさせて接着剤を剥がします。

    • ディスプレイパネルに触れるほどツールを挿入しないでください。

    • 開口ツールが受話口のスピーカーの左端を通過するときに、作業を止めてください。

    • このパーツにダメージを与えないように注意しながら、セルフィーカメラ用のフラッシュモジュール上部に開口ツールをスライドしてください。

  14. Motorola Moto Z Play スピーカーの交換: 手順 14、 2の画像 1 Motorola Moto Z Play スピーカーの交換: 手順 14、 2の画像 2
    • もしディスプレイが固まっていたら、必要に応じて再度温め直し、接着剤を切開します。

    • 左側端からディスプレイを持ち上げて、デバイスから解放します。

  15. Motorola Moto Z Play スピーカーの交換: 手順 15、 2の画像 1 Motorola Moto Z Play スピーカーの交換: 手順 15、 2の画像 2
    • ディスプレイを開けたまま、スパッジャーの先端を使って、指紋センサーケーブルのZIFコネクタ上のロッキングタブを跳ね上げます。

  16. Motorola Moto Z Play スピーカーの交換: 手順 16、 2の画像 1 Motorola Moto Z Play スピーカーの交換: 手順 16、 2の画像 2
    • デバイスの反対端にあるディスプレイケーブルコネクタ上のロッキングタブも、スパッジャーで跳ね上げます。

  17. Motorola Moto Z Play スピーカーの交換: 手順 17、 2の画像 1 Motorola Moto Z Play スピーカーの交換: 手順 17、 2の画像 2
    • 指紋センサーケーブルを慎重に引っ張ってソケットから引き出し、マザーボードから外します。

  18. Motorola Moto Z Play スピーカーの交換: 手順 18、 2の画像 1 Motorola Moto Z Play スピーカーの交換: 手順 18、 2の画像 2
    • ディスプレイケーブルを慎重に引っ張り、マザーボードのソケットから引き出します。

  19. Motorola Moto Z Play スピーカーの交換: 手順 19、 1の画像 1
    • ディスプレイアセンブリから取り出します。

  20. Motorola Moto Z Play スピーカーの交換, スピーカー: 手順 20、 2の画像 1 Motorola Moto Z Play スピーカーの交換, スピーカー: 手順 20、 2の画像 2
    • デバイス左上端にある0.8 SIMエジェクトツールを、SIMカードの取り出し用ホールにしっかりと押し込んで、SIMカードを取り出します。デバイスからSIMカードのスロットが飛び出します。

    • SIMカードをデバイスから完全に取り出します。

  21. Motorola Moto Z Play スピーカーの交換: 手順 21、 3の画像 1 Motorola Moto Z Play スピーカーの交換: 手順 21、 3の画像 2 Motorola Moto Z Play スピーカーの交換: 手順 21、 3の画像 3
    • デバイス上部にある黒いカメラカバーから、3mm T3ネジを5本外します。

    • 指先でカメラカバーをこじ開けて、カメラカバーのクリップを緩めます。

  22. Motorola Moto Z Play スピーカーの交換: 手順 22、 1の画像 1
    • 一番小型のプラスチック製開口ツールを使用して、カメラカバーからスピーカーユニットをこじ開けます。

終わりに

このデバイスを再組み立てするには、インストラクションを逆の順番に従って作業を進めてください。

ご注意:デバイスにスクリーン背面を装着する際は、3M VHB両面テープを使用してください。

以下の翻訳者の皆さんにお礼を申し上げます:

en jp

100%

Midori Doiさんは世界中で修理する私たちを助けてくれています! あなたも貢献してみませんか?
翻訳を始める ›

作成者

4人の作成者と共同で作成されました。

Kaitlyn Fisher

メンバー登録日: 10/01/17

2,012 ポイント

3のガイドは作成済み

チーム

Cal Poly, Team S15-G4, Livingston Fall 2017 Cal Poly, Team S15-G4, Livingston Fall 2017人のメンバー

CPSU-LIVINGSTON-F17S15G4

4 メンバー

16のガイドは作成済み

4 件のコメント

I wanted to replace it because it just wasn’t as loud as it used to be but when I put the new speaker in I noticed that it made the sound all distorted at more than about half volume so I took it out and put the old one back in and now it’s doing the same thing too!! Help!

Matthew - 返信

I found out that that happens when the glass isn’t sealed tightly to the frame. In my case I messed up the adhesive on one of the corners when reinstalling the screen and it didn’t seal tightly. The glass being properly held down is what stops the distortion. When playing back without the screen sealed it will distort and this is normal.

Matthew -

thanks exactly the same thing happened to me, i replaced the Moto Z Play 1635-03 speaker and I got distortion just like you did, however I haven’t sealed it yet as the special glue hasn’t arrived yet (B-7000 glue) and pressing on the front screen which is loose certainly reduces the sounds distortion so I will have to get it right and adjust it accordingly when the glue arrives, making sure it sets at the optimal position.

Interesting my Moto Z Play 1635 is the dual sim version (can take two) and it was one of the first generation models of this phone, the strange this is that it has a thin copper coil wound at the BACK of the sealed speaker component with two lose ends (like a speaker coil); this is not something I see in all the Youtube speaker tear down videos Moto Z Play. I would the two loose copper coil ends and tucked them into the center of the coil; which sits there like a coil for the speaker component. Dunno if I am doing this right.

Dave Dogge - 返信

I recently replaced the battery and the screen and now the speaker isn't working. I get audible alerts but no sound on a call or from any apps. I do get sound on Bluetooth connected devices. What happened and what do I need to do to correct this?

Bruce Pauley - 返信

コメントを追加

統計データ:

過去 24時間: 0

過去 7 日: 0

過去 30 日: 6

今までの合計 3,962