メインコンテンツにスキップ

このバージョンは誤った内容を含んでいる可能性があります。最新の承認済みスナップショットに切り替えてください。

Motorola Moto X4ディスプレイアセンブリの修理

必要な工具と部品

  1. Motorola Moto X4ディスプレイアセンブリの修理, スクリーンを温めます: 手順 1、 2の画像 1 Motorola Moto X4ディスプレイアセンブリの修理, スクリーンを温めます: 手順 1、 2の画像 2
    • 作業を始める前に、デバイスの電源を切ります。

    • iOpenerを温めて、

    • ここに翻訳を挿入する

    • ここに翻訳を挿入する

    • ここに翻訳を挿入する

    • ここに翻訳を挿入する

    • ここに翻訳を挿入する

  2. この手順は未翻訳です。 翻訳を手伝う。

    Motorola Moto X4ディスプレイアセンブリの修理: 手順 2、 3の画像 1 Motorola Moto X4ディスプレイアセンブリの修理: 手順 2、 3の画像 2 Motorola Moto X4ディスプレイアセンブリの修理: 手順 2、 3の画像 3
    • Apply a suction cup to the screen, as close to the heated edge as possible.

    • Pull on the suction cup with strong, steady force to create a gap in the seam.

    • Insert the point of an opening pick into the gap.

    • Depending on the age of your phone, this may be difficult. If you are having trouble, apply heat to the edge and try again.

  3. この手順は未翻訳です。 翻訳を手伝う。

    Motorola Moto X4ディスプレイアセンブリの修理: 手順 3、 3の画像 1 Motorola Moto X4ディスプレイアセンブリの修理: 手順 3、 3の画像 2 Motorola Moto X4ディスプレイアセンブリの修理: 手順 3、 3の画像 3
    • Slide the opening pick along the edge to slice through the adhesive.

    • Leave an opening pick in the seam to prevent the adhesive from re-sealing.

  4. この手順は未翻訳です。 翻訳を手伝う。

    Motorola Moto X4ディスプレイアセンブリの修理: 手順 4、 3の画像 1 Motorola Moto X4ディスプレイアセンブリの修理: 手順 4、 3の画像 2 Motorola Moto X4ディスプレイアセンブリの修理: 手順 4、 3の画像 3
    • Heat the top edge of the phone with an iOpener.

    • Carefully slice around the corner and through the top edge to separate the adhesive.

  5. この手順は未翻訳です。 翻訳を手伝う。

    Motorola Moto X4ディスプレイアセンブリの修理: 手順 5、 3の画像 1 Motorola Moto X4ディスプレイアセンブリの修理: 手順 5、 3の画像 2 Motorola Moto X4ディスプレイアセンブリの修理: 手順 5、 3の画像 3
    • Heat the screen's right edge with an iOpener.

    • Be careful not to slice too deeply near the cables to avoid damaging them.

    • Use an opening pick to slice along the right edge to separate the adhesive.

  6. この手順は未翻訳です。 翻訳を手伝う。

    Motorola Moto X4ディスプレイアセンブリの修理: 手順 6、 2の画像 1 Motorola Moto X4ディスプレイアセンブリの修理: 手順 6、 2の画像 2
    • Repeat the previous steps to heat and slice the bottom edge of the phone.

  7. この手順は未翻訳です。 翻訳を手伝う。

    Motorola Moto X4ディスプレイアセンブリの修理: 手順 7、 2の画像 1 Motorola Moto X4ディスプレイアセンブリの修理: 手順 7、 2の画像 2
    • Do not try to remove the screen yet—it is still attached to the phone by delicate flex cables.

    • Carefully lift up the left edge of the screen and cut away remaining adhesives with an opening pick.

  8. この手順は未翻訳です。 翻訳を手伝う。

    Motorola Moto X4ディスプレイアセンブリの修理: 手順 8、 1の画像 1
    • Swing open the screen and prop it up with a small box as you work on disconnecting the flex cables.

    • During reassembly, this is a good time to power on your phone and test all functions before sealing it up. Be sure to power your phone back down completely before you continue working.

  9. この手順は未翻訳です。 翻訳を手伝う。

    Motorola Moto X4ディスプレイアセンブリの修理: 手順 9、 2の画像 1 Motorola Moto X4ディスプレイアセンブリの修理: 手順 9、 2の画像 2
    • Slide the point of a spudger underneath the fingerprint sensor cable and gently pry up to loosen the cable from the phone.

    • Do not pull on the cable. It is still attached to the phone by a delicate ZIF socket.

  10. この手順は未翻訳です。 翻訳を手伝う。

    Motorola Moto X4ディスプレイアセンブリの修理: 手順 10、 3の画像 1 Motorola Moto X4ディスプレイアセンブリの修理: 手順 10、 3の画像 2 Motorola Moto X4ディスプレイアセンブリの修理: 手順 10、 3の画像 3
    この手順で使用する道具:
    Tweezers
    $4.99
    購入する
    • Use the point of a spudger to flip up the lock bar on the fingerprint sensor's ZIF socket, near the bottom right of the phone.

    • Use tweezers to carefully slide the fingerprint sensor cable out of the socket.

  11. この手順は未翻訳です。 翻訳を手伝う。

    Motorola Moto X4ディスプレイアセンブリの修理: 手順 11、 3の画像 1 Motorola Moto X4ディスプレイアセンブリの修理: 手順 11、 3の画像 2 Motorola Moto X4ディスプレイアセンブリの修理: 手順 11、 3の画像 3
    • Use an opening tool to flip up the wide lock bar on the display cable's ZIF socket, near the top right of the phone.

    • Use tweezers to carefully slide the display cable out of the ZIF socket.

  12. この手順は未翻訳です。 翻訳を手伝う。

    Motorola Moto X4ディスプレイアセンブリの修理: 手順 12、 2の画像 1 Motorola Moto X4ディスプレイアセンブリの修理: 手順 12、 2の画像 2
    • Remove the screen.

    • During reassembly, follow this guide to clean the existing adhesive off and install custom-cut adhesives for your phone.

  13. この手順は未翻訳です。 翻訳を手伝う。

    Motorola Moto X4ディスプレイアセンブリの修理: 手順 13、 1の画像 1
    • Apply a heated iOpener to the fingerprint sensor for one minute to soften the adhesive gasket.

  14. この手順は未翻訳です。 翻訳を手伝う。

    Motorola Moto X4ディスプレイアセンブリの修理: 手順 14、 2の画像 1 Motorola Moto X4ディスプレイアセンブリの修理: 手順 14、 2の画像 2
    • Slide the point of a spudger under the fingerprint sensor cable and gently pry to loosen the cable from the screen.

  15. この手順は未翻訳です。 翻訳を手伝う。

    Motorola Moto X4ディスプレイアセンブリの修理: 手順 15、 2の画像 1 Motorola Moto X4ディスプレイアセンブリの修理: 手順 15、 2の画像 2
    • Use an opening tool to pry up and loosen the fingerprint sensor from the screen.

  16. この手順は未翻訳です。 翻訳を手伝う。

    Motorola Moto X4ディスプレイアセンブリの修理: 手順 16、 1の画像 1
    • Remove the fingerprint sensor.

    • To reattach the fingerprint sensor, use a precut gasket, or apply some thin strips of Tesa adhesive to the perimeter of the sensor.

  17. この手順は未翻訳です。 翻訳を手伝う。

    Motorola Moto X4ディスプレイアセンブリの修理, ディスプレイアセンブリ: 手順 17、 3の画像 1 Motorola Moto X4ディスプレイアセンブリの修理, ディスプレイアセンブリ: 手順 17、 3の画像 2 Motorola Moto X4ディスプレイアセンブリの修理, ディスプレイアセンブリ: 手順 17、 3の画像 3
    • If your replacement screen did not come with an earpiece speaker grille, you will have to transfer it from your original screen.

    • The earpiece speaker grille consists of two small mesh pieces. Be careful not to lose them as you transfer them over.

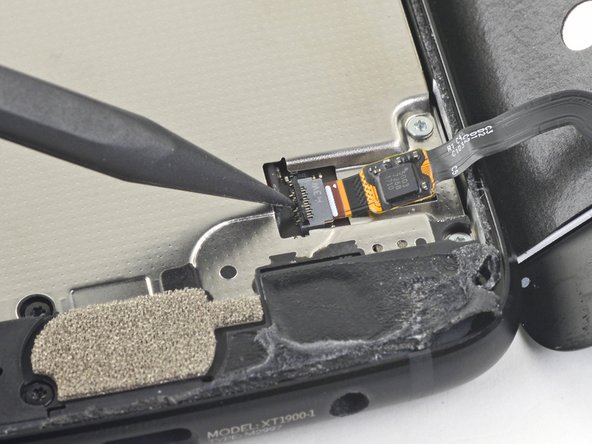
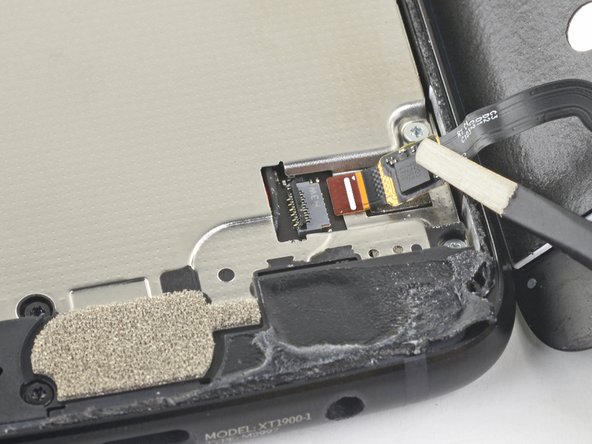
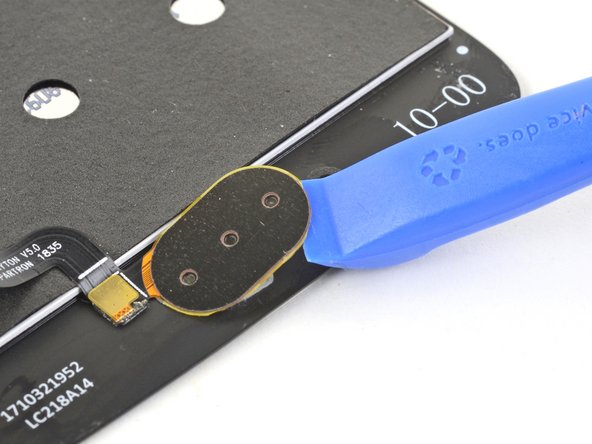
    • Use the flat edge of a spudger to push the grille from the front side of the screen to loosen it from its recess.
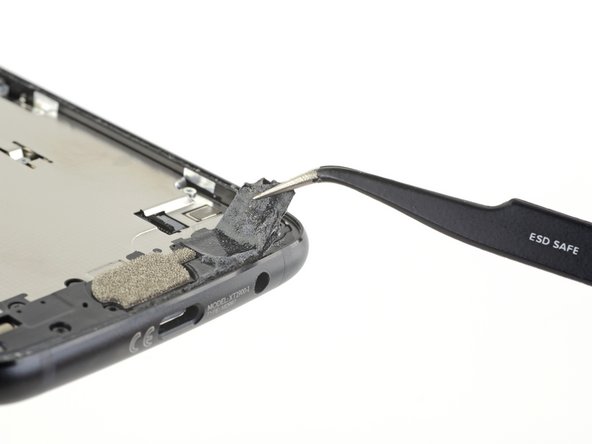
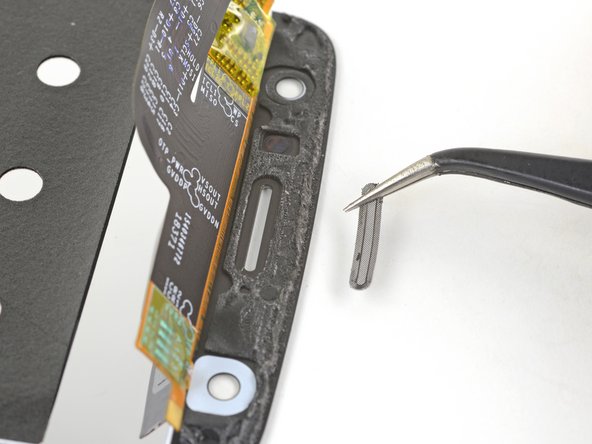
    • Remove the grille.

    • Use some thin strips of Tesa tape to affix the grille to the replacement screen.

  18. この手順は未翻訳です。 翻訳を手伝う。

    Motorola Moto X4ディスプレイアセンブリの修理: 手順 18、 1の画像 1
    この手順で使用する道具:
    Tweezers
    $4.99
    購入する
    • If your replacement part did not come with a lower microphone gasket, use tweezers to carefully peel it from your old screen and transfer it to your replacement part.

    • Compare your new replacement screen to the original part. You may need to transfer remaining components or remove adhesive backings from the new part before installing.

終わりに

デバイスを再組み立てする際は、これらのインストラクションを逆の順番に従って作業を進めてください。

23 の人々がこのガイドを完成させました。

以下の翻訳者の皆さんにお礼を申し上げます:

en jp

0%

Midori Doiさんは世界中で修理する私たちを助けてくれています! あなたも貢献してみませんか?
翻訳を始める ›

作成者

12人の作成者と共同で作成されました。

Arthur Shi

メンバー登録日: 01/03/18

254,145 ポイント

529のガイドは作成済み

チーム

iFixit iFixit人のメンバー

Staff

136 メンバー

17,299のガイドは作成済み

8 件のコメント

This guide really only covers screen removal, and should detail replacing the screen as advertised. Here are a few more steps that should be added:

1. Transferring old hardware to the new screen (seals, filters, fingerprint sensor, & the grey carbon mat.

2. Cleaning up old adhesive.

3. Applying new adhesive, whether it’s the one-piece that ifixit carries (recommended), or Tesa tape.

4. Installing the new display assembly

Andrew Parker - 返信

Is it possible to remove and replace only the glass? Can I do that without removing the whole LCD screen and avoid disconnecting/reconnecting wires?

Drew S - 返信

Hi Drew,

I haven’t tried, but I think it is possible to do a glass-only repair for this LCD screen, as long as you have the necessary tools and bonding adhesives. You would still have to deal with the fingerprint sensor, which is sealed onto the glass.

Arthur Shi -

I noticed the fingerprint sensor not being quite as low on the right edge after this. Also, I think it has a bit of “give” now when I press on it with a thumbnail. If the tips of my thumbs weren't so dry right now I might not have noticed, though.

Chris Young - 返信

Hey Chris,

Did you add adhesive to the fingerprint sensor, if you didn't add some adhesive it may have some play, as most things need to be glued in place, and you could have forgotten to add some new adhesive.

Dominik Rodriguez -

コメントを追加

統計データ:

過去 24時間: 0

過去 7 日: 10

過去 30 日: 82

今までの合計 17,153