メインコンテンツにスキップ

このバージョンは誤った内容を含んでいる可能性があります。最新の承認済みスナップショットに切り替えてください。

必要な工具と部品

  1. , SIMカード: 手順 1、 3の画像 1 , SIMカード: 手順 1、 3の画像 2 , SIMカード: 手順 1、 3の画像 3
    • SIMカードのエジェクトツールをSIMカードトレイの横にあるホールに差し込み、トレイを押し出します。

    • SIMカードトレイを取り出します。

    • SIMカードトレイが自動的に外れない場合は、指を使って取り出してください。

  2. , バックカバーアセンブリ: 手順 2、 3の画像 1 , バックカバーアセンブリ: 手順 2、 3の画像 2 , バックカバーアセンブリ: 手順 2、 3の画像 3
    • 次の手順では、デバイスのケースを固定しているクリップを解放します。 ただし、リアケースはクリップに加えて接着パッドでも固定されています。 クリップを分離した後、iOpenerで接着剤を温めてケースを完全に開いてください。 接着剤を温めずにデバイスを開口しないでください

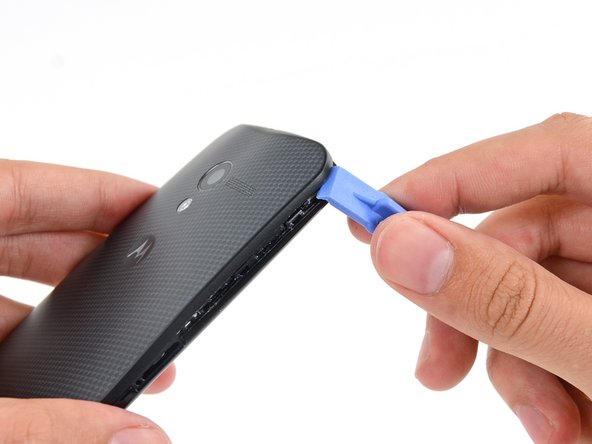
    • SIMカードスロット近くのフロントカバーとリアカバー間のシームに、プラスチック製の開口ツールを挿入します。

    • プラスチックの開口ツールをシームに沿って上部コーナーに向けてスライドさせます。

  3. : 手順 3、 2の画像 1 : 手順 3、 2の画像 2
    • プラスチック製開口ツールを慎重に、コーナー周辺をスライドして、クリップを外します。

  4. : 手順 4、 2の画像 1 : 手順 4、 2の画像 2
    • 両カバーの上部右側コーナーの間をこじ開けます。

  5. : 手順 5、 3の画像 1 : 手順 5、 3の画像 2 : 手順 5、 3の画像 3
    • カバーを固定している残りのクリップを全て外し、四方のシームに沿って開口ツールをスライドします。

    • フロントカバーのプラスチックはボタンの近くで薄くなっているため、ボタンが動くことがあります。 ボタンとフロントカバーの損傷を防ぐため、ゆっくりとスライドしてください。

    • 開口ツールをデバイス内部深くまで押し込まないでください。内部コンポーネントが損傷する可能性があります。

  6. : 手順 6、 1の画像 1
    • iOpenerを温めて、デバイス上に約90秒間載せてください。バックカバーに付けられた接着剤を緩めます。

  7. : 手順 7、 3の画像 1 : 手順 7、 3の画像 2 : 手順 7、 3の画像 3
    • SIMスロット側から、デバイスのリアカバーを慎重に剥がします。

    • リアカバーは非常に柔軟性がありますが、作業を急ぎぎて内部コンポーネントに損傷を与えないようご注意ください。

    • NFCコイルがリアカバーに付着して剥がれない可能性があります。 その場合は、カバーを剥がす作業を中断して、温めたiOpenerをリアカバー上に載せてください。

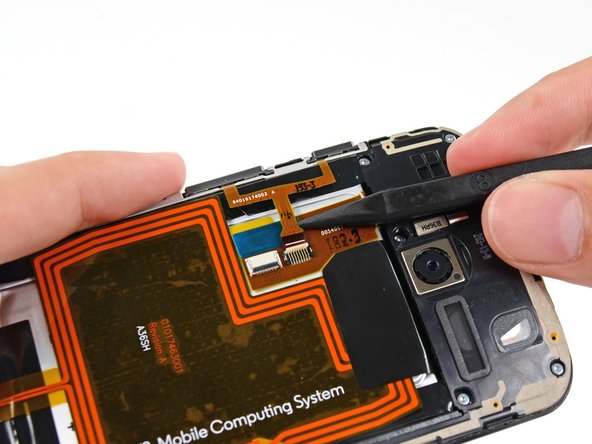
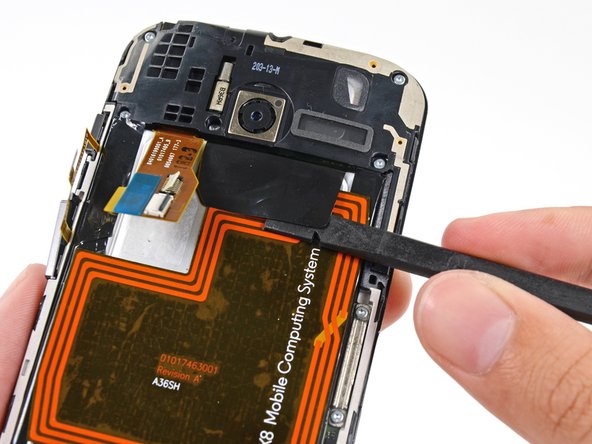
    • リアカバーを完全に外さないでください。 カメラのフラッシュケーブルがデバイスに接続されたままです。

    • フラッシュケーブルは、デバイスの電源/音量ボタン側に接続されています。

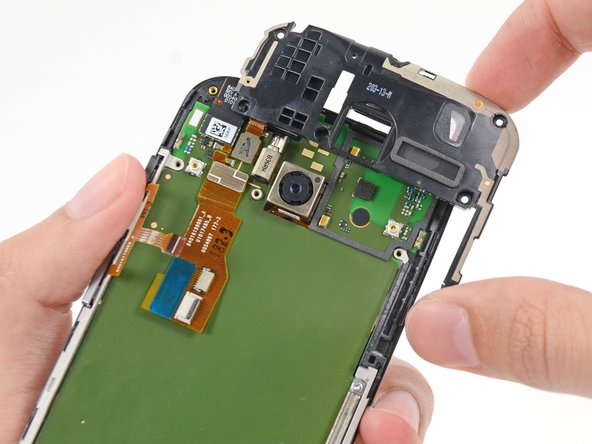
  8. : 手順 8、 1の画像 1
    • カメラのフラッシュケーブルコネクタが露出するように、リアカバーをゆっくりと開きますが、コネクタに圧力がかからないようにご注意ください。

  9. : 手順 9、 3の画像 1 : 手順 9、 3の画像 2 : 手順 9、 3の画像 3
    • スパッジャーの先端を使って、フラッシュケーブルのZIFコネクタ上の固定フラップを持ち上げます。

    • フラップのみをこじ開けてください。コネクタ自体には接触しないでください。

    • ソケットからフラッシュケーブルをまっすぐ引き抜きます。

  10. : 手順 10、 1の画像 1
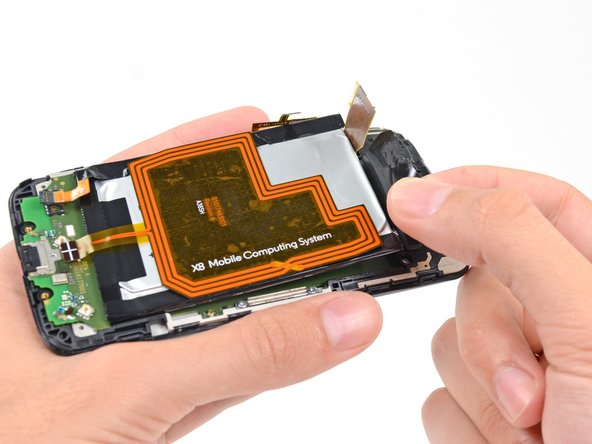
    • デバイスからバックカバーを外します。

  11. , 下側アンテナアセンブリ: 手順 11、 1の画像 1
    • デバイスに下側アンテナアセンブリを固定している、3 mm T3トルクスネジを4本外します。

  12. : 手順 12、 3の画像 1 : 手順 12、 3の画像 2 : 手順 12、 3の画像 3
    • スパッジャーの平面側先端を使って、デバイスから下側アンテナアセンブリをこじ開けて、解放します。

    • アンテナアセンブリを取り出します。

  13. , バッテリー: 手順 13、 3の画像 1 , バッテリー: 手順 13、 3の画像 2 , バッテリー: 手順 13、 3の画像 3
    • スパッジャーの先端を、コネクタ付近のバッテリーケーブルの下に差し込み、ソケットからまっすぐ持ち上げます。

    • スパッジャーの平面側先端を使って、NFCアンテナケーブルコネクタの接続を外します。

  14. : 手順 14、 3の画像 1 : 手順 14、 3の画像 2 : 手順 14、 3の画像 3
    • スパッジャーの先端を使って、ボタンアセンブリケーブルのコネクタからZIF固定フラップを持ち上げます。

    • スパッジャーの先端を、コネクタ付近のボタンアセンブリケーブルの下にスライドして、ソケットからケーブルを引き上げます。

  15. : 手順 15、 2の画像 1 : 手順 15、 2の画像 2
    • スパッジャーの平面側先端を相互接続ケーブルの下に差し込んで、バッテリーに固定している接着剤から解放します。

  16. : 手順 16、 2の画像 1 : 手順 16、 2の画像 2
    • スパッジャーの平面側先端を使って、バッテリー上部から接着剤用プルタブを剥がします。

  17. : 手順 17、 3の画像 1 : 手順 17、 3の画像 2 : 手順 17、 3の画像 3
    この手順で使用する道具:
    Tesa 61395 Tape
    $5.99
    購入する
    • 接着剤プルタブを使って、バッテリーを角から持ち上げます。

    • バッテリーは軽く接着剤でマザーボードに固定されています。ゆっくりと剥がしながら、バッテリーに穴を開けたり曲げないようにご注意ください。

    • デバイスからバッテリーを取り出します。

    • 再組み立ての際は、バッテリーを両面テーププレカットされた接着ストリップを使って固定してください。

  18. この手順は未翻訳です。 翻訳を手伝う。

    : 手順 18、 1の画像 1
    • Remove the five 3 mm T3 Torx screws from the headphone jack/speaker assembly.

  19. この手順は未翻訳です。 翻訳を手伝う。

    : 手順 19、 3の画像 1 : 手順 19、 3の画像 2 : 手順 19、 3の画像 3
    • Insert a spudger under the panhandle of the headphone jack/speaker assembly and pry it up from its recess.

    • Remove the headphone jack/speaker assembly.

  20. この手順は未翻訳です。 翻訳を手伝う。

    : 手順 20、 2の画像 1 : 手順 20、 2の画像 2
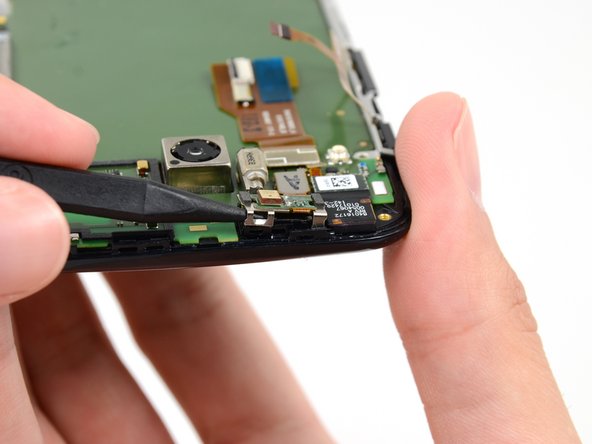
    • Push the tip of a spudger under the microphone assembly clip to free it from the earpiece speaker.

    • If the assembly clip seems to be missing, check the speaker assembly that was removed from the previous step.

  21. この手順は未翻訳です。 翻訳を手伝う。

    : 手順 21、 2の画像 1 : 手順 21、 2の画像 2
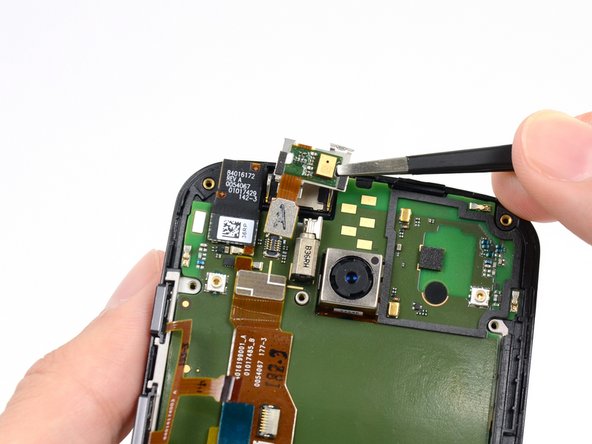
    • Use the flat end of a spudger to free the microphone assembly cable connector.

    • Use tweezers to remove the microphone assembly.

  22. この手順は未翻訳です。 翻訳を手伝う。

    : 手順 22、 2の画像 1 : 手順 22、 2の画像 2
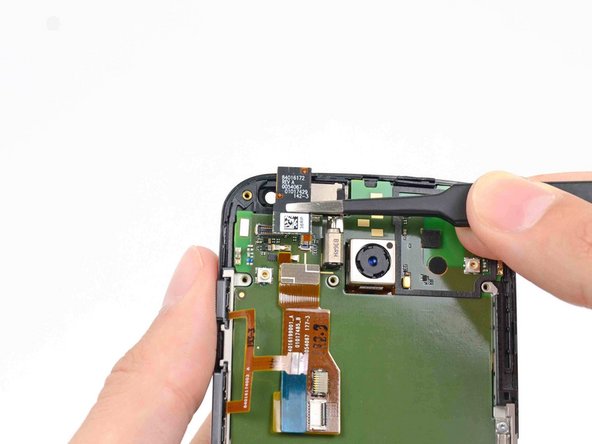
    • Disconnect the front-facing camera cable connector.

    • Remove the front-facing camera from its recess with a pair of tweezers.

  23. この手順は未翻訳です。 翻訳を手伝う。

    : 手順 23、 1の画像 1
    • Remove the final two 3 mm T3 Torx screws from the SIM slot bracket.

  24. この手順は未翻訳です。 翻訳を手伝う。

    : 手順 24、 1の画像 1
    • Remove the SIM slot bracket from the motherboard.

  25. この手順は未翻訳です。 翻訳を手伝う。

    : 手順 25、 2の画像 1 : 手順 25、 2の画像 2
    • Insert the flat end of a spudger under the motherboard above the button assembly cable, and pry it out of the phone.

    • Be careful not to snag any cables.

    • The buttons may pop out of their recesses; take care not to lose them.

  26. この手順は未翻訳です。 翻訳を手伝う。

    : 手順 26、 2の画像 1 : 手順 26、 2の画像 2
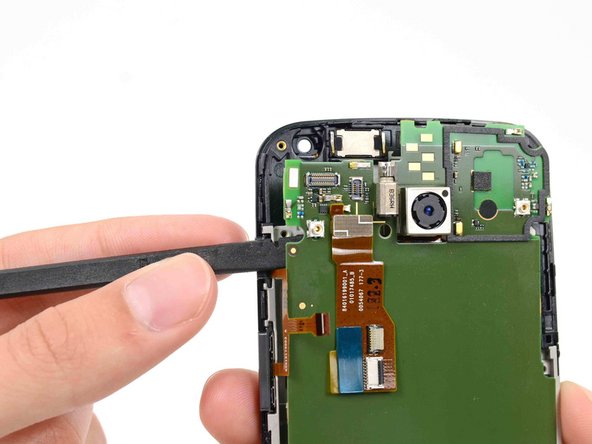
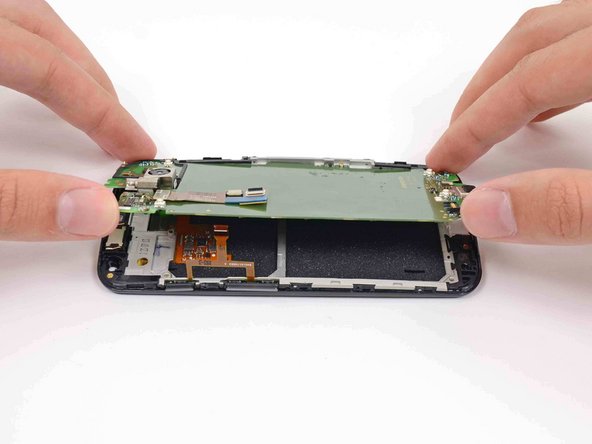
    • Gently lift the motherboard out of the phone, rotating it from the SIM slot edge of the phone.

    • Do not attempt to separate the motherboard entirely; it is still connected to the display by the display cable.

  27. この手順は未翻訳です。 翻訳を手伝う。

    : 手順 27、 3の画像 1 : 手順 27、 3の画像 2 : 手順 27、 3の画像 3
    • Lay the motherboard down to allow access to the display cable connector.

    • Use the flat end of a spudger to flip the retaining tab on the display cable ZIF connector.

    • Carefully pull the display cable out of its connector as you remove the motherboard from the display assembly.

  28. この手順は未翻訳です。 翻訳を手伝う。

    : 手順 28、 3の画像 1 : 手順 28、 3の画像 2 : 手順 28、 3の画像 3
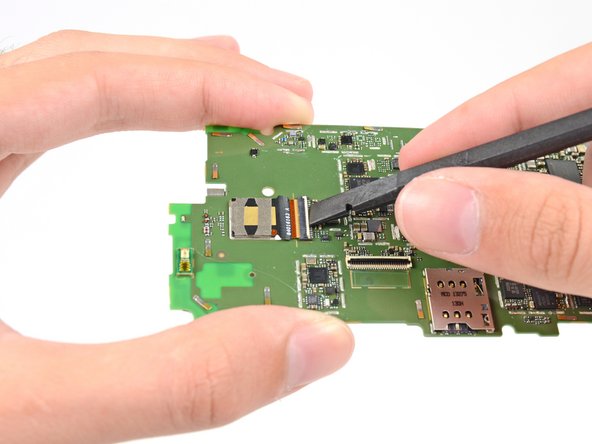
    • Use the flat end of a spudger to flip up the retaining tab on the rear-facing camera ZIF cable connector.

    • Remove the rear-facing camera from the motherboard.

ゴール

10 の人々がこのガイドを完成させました。

作成者

4人の作成者と共同で作成されました。

Sam Goldheart

メンバー登録日: 10/18/12

465,854 ポイント

538のガイドは作成済み

チーム

iFixit iFixit人のメンバー

Staff

135 メンバー

17,198のガイドは作成済み

4 件のコメント

This took me about an hour or so to do after I got the right tools. I ordered the iOpener "kit" and stupid me thinking that ifixit would directly link you from this page to a kit that works with it, so I didn't read that the kit comes with a T5 torx bit and not a T3. Also no tweezers. Other than that this guide works perfect. The only tricky parts really were getting the battery out; "mild adhesive" my !@#. I used the black tool to slowly pry the battery out. Be patient and the adhesive will give. The other tricky part was getting the motherboard plugged back in. I thought I had it in the first time but apparently didn't. If you get it all back together and all the phone does when you turn it on is do a 1-2sec vibrate every 10 sec or so then check the connection on the motherboard. Great guide for getting your phone DOD ready. Or any job that doesn't allow camera phones on site!

joeracke - 返信

I was successful replacing both my non-functioning camera, a battery getting on the weak side, and a new back cover (went for one of those colorful back covers sold on eBay). The two things that tripped me up were 1) dealing with that sticky gasket between the antenna and the noise-canceling mic (Step 20), and 2) getting the cover glass to stay put on the new back cover. For 2), I ended up fashioning my own adhesive with 2-sided scotch tape.

*ALSO* You really don't need to do Step 35. Leave the motherboard plugged in, and simply remove and re-attach the camera in place.

Rad Mod - 返信

I went through each step methodically and only had problems removing the top black cover in step #28. The assembly came off with the ear speaker attached to it, nonetheless was able to put it back. Just be wary that it might not be as easy as pictured.

When putting it all back together though I got an unwelcome surprise... somehow instead of getting the phone turning on and loading android, I got the symbol of the battery reading 80% and a large battery outline icon in the middle of the screen against white background with a light blue indicator reflecting visually that 80% charge. Anyone got a similar issue? I couldn't get android to start as it usually would. What gives? (Thanks for any help! :)

sfanara - 返信

First I just want to say thank you for putting together this wonderful guide.

I've replaced the camera and it works but the camera has a problem focusing and all the pictures are blurry. Do you think it's the new camera or a software issue. This is the second camera I got from Phone Parts USA that has done this. Any suggestions or advice would be greatly appreciated!

Robert Raney - 返信

コメントを追加

統計データ:

過去 24時間: 0

過去 7 日: 13

過去 30 日: 17

今までの合計 12,223