メインコンテンツにスキップ

このバージョンは誤った内容を含んでいる可能性があります。最新の承認済みスナップショットに切り替えてください。

必要な工具と部品

  1. , SIMカード: 手順 1、 3の画像 1 , SIMカード: 手順 1、 3の画像 2 , SIMカード: 手順 1、 3の画像 3
    • SIMカードのエジェクトツールをSIMカードトレイの横にあるホールに差し込み、トレイを押し出します。

    • SIMカードトレイを取り出します。

    • SIMカードトレイが自動的に外れない場合は、指を使って取り出してください。

  2. , バックカバーアセンブリ: 手順 2、 3の画像 1 , バックカバーアセンブリ: 手順 2、 3の画像 2 , バックカバーアセンブリ: 手順 2、 3の画像 3
    • 次の手順では、デバイスのケースを固定しているクリップを解放します。 ただし、リアケースはクリップに加えて接着パッドでも固定されています。 クリップを分離した後、iOpenerで接着剤を温めてケースを完全に開いてください。 接着剤を温めずにデバイスを開口しないでください

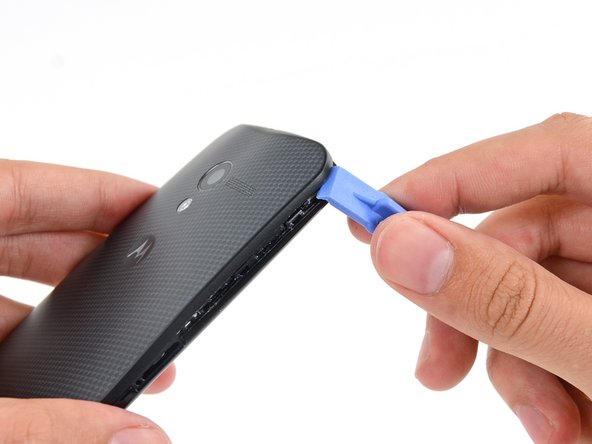
    • SIMカードスロット近くのフロントカバーとリアカバー間のシームに、プラスチック製の開口ツールを挿入します。

    • プラスチックの開口ツールをシームに沿って上部コーナーに向けてスライドさせます。

  3. : 手順 3、 2の画像 1 : 手順 3、 2の画像 2
    • プラスチック製開口ツールを慎重に、コーナー周辺をスライドして、クリップを外します。

  4. : 手順 4、 2の画像 1 : 手順 4、 2の画像 2
    • 両カバーの上部右側コーナーの間をこじ開けます。

  5. : 手順 5、 3の画像 1 : 手順 5、 3の画像 2 : 手順 5、 3の画像 3
    • カバーを固定している残りのクリップを全て外し、四方のシームに沿って開口ツールをスライドします。

    • フロントカバーのプラスチックはボタンの近くで薄くなっているため、ボタンが動くことがあります。 ボタンとフロントカバーの損傷を防ぐため、ゆっくりとスライドしてください。

    • 開口ツールをデバイス内部深くまで押し込まないでください。内部コンポーネントが損傷する可能性があります。

  6. : 手順 6、 1の画像 1
    • iOpenerを温めて、デバイス上に約90秒間載せてください。バックカバーに付けられた接着剤を緩めます。

  7. : 手順 7、 3の画像 1 : 手順 7、 3の画像 2 : 手順 7、 3の画像 3
    • SIMスロット側から、デバイスのリアカバーを慎重に剥がします。

    • リアカバーは非常に柔軟性がありますが、作業を急ぎぎて内部コンポーネントに損傷を与えないようご注意ください。

    • NFCコイルがリアカバーに付着して剥がれない可能性があります。 その場合は、カバーを剥がす作業を中断して、温めたiOpenerをリアカバー上に載せてください。

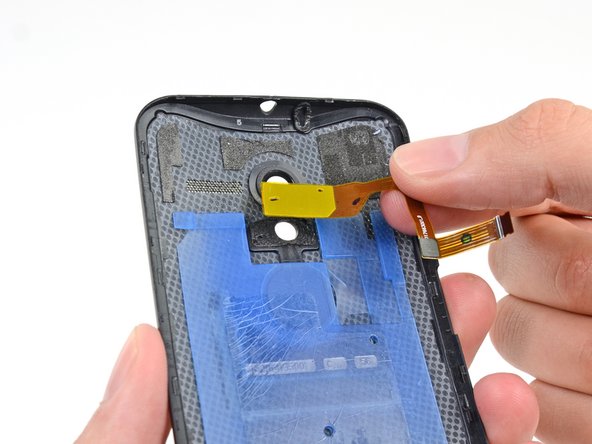
    • リアカバーを完全に外さないでください。 カメラのフラッシュケーブルがデバイスに接続されたままです。

    • フラッシュケーブルは、デバイスの電源/音量ボタン側に接続されています。

  8. : 手順 8、 1の画像 1
    • カメラのフラッシュケーブルコネクタが露出するように、リアカバーをゆっくりと開きますが、コネクタに圧力がかからないようにご注意ください。

  9. : 手順 9、 3の画像 1 : 手順 9、 3の画像 2 : 手順 9、 3の画像 3
    • スパッジャーの先端を使って、フラッシュケーブルのZIFコネクタ上の固定フラップを持ち上げます。

    • フラップのみをこじ開けてください。コネクタ自体には接触しないでください。

    • ソケットからフラッシュケーブルをまっすぐ引き抜きます。

  10. : 手順 10、 1の画像 1
    • デバイスからバックカバーを外します。

  11. この手順は未翻訳です。 翻訳を手伝う。

    : 手順 11、 3の画像 1 : 手順 11、 3の画像 2 : 手順 11、 3の画像 3
    • Use the flat end of a spudger to gently pry between the flash assembly and back cover to separate the adhesive.

    • Remove the flash assembly from the back cover.

    • You may also need to transfer the camera lens and the silicon pad from the rear case. These can be removed by prying carefully with a plastic opening tool.

    • Depending on the adhesive on the rear case, you may need to tape the flash assembly down to secure it.

ゴール

51 の人々がこのガイドを完成させました。

作成者

7人の作成者と共同で作成されました。

Sam Goldheart

メンバー登録日: 10/18/12

465,870 ポイント

538のガイドは作成済み

チーム

iFixit iFixit人のメンバー

Staff

135 メンバー

17,218のガイドは作成済み

6 件のコメント

Hey I'm looking at replacing my rear battery door cover, because white gets dirty too quick (esp. Since I work at a bike shop). Looking at replacement covers available, it seems to be that there's a lack of the camera lens protector as seen on the original battery cover. How do I go about removing this, to transfer it to the new cover?

Hunter - 返信

I used a guitar pick and my thumbnail to detach the plastic. Then I used a hair dryer gun at low temp carefully to loosen the glue (which is actually only at the top and bottom of the phone. Just be cautious removing the back since you need to detach the ribbon cable from the flash. Once it was removed, I used the case opener tool to gently lift the flash assembly loose, leaving the grey adhesive on the case back. After the flash was removed,I used an Xacto blade to start to remove the adhesive which peeled off relatively easily, and was then stuck back on to the flash. There is a clear silicon type of "gasket" on the case back that will also peel off easily, so I transferred that to my new case back and stuck the flash in its place. The lens cover was the same.. just a little adhesive on the outer ring. I just put some pressure with my finger on the front side, and it popped out, adhesive still intact. Everything checked out, so I snapped it all together again! Easy Peasy!

ozarkana -

By the way, I build bicycles too!

ozarkana -

Guide was extremely helpful in replacing my white back cover with a black one. Was a pain with that adhesive though, but got the new cover on without breaking anything, and it looks great. Thanks for the writeup.

Matt Notovitz - 返信

thanks for the guide. I’d like to substitute my back cover because it is damaged. I found the cover on parts4repair.com but it doesn’t have the adesive on the back, it’s just the cover. Is this a problem after the installation? Can I buy this cover and use it? thanks in advance for any help

Andrea Bettati - 返信

コメントを追加

統計データ:

過去 24時間: 2

過去 7 日: 14

過去 30 日: 50

今までの合計 121,975