はじめに
Motorola Moto G7 Plus (モデル XT1965)は、3000mAhのリチウムイオンバッテリーを搭載しています。ユーザーが携帯電話を長期間使用している場合、新品時よりもはるかに速い速度で充電が失われるため、バッテリーの交換が必要になることがあります。 トラブルシューティング がうまくいかない場合、このガイドを使ってMotorola Moto G7 Plusからバッテリーを取り外してください。
修理を始める前に、安全のため、デバイスの電源を切り、外部電源から切り離して、デバイスのバッテリー残量の25%まで放電していることを確認してください。以下に示す推奨ツールと新しいMotorola Moto G7 Plusバッテリーを集めます。加熱は任意ですが、接着剤の除去を容易にします。
作業を始める前に、Rescue and Smart Assistantアプリをダウンロードしてデバイスをバックアップし、問題がソフトウェアまたはハードウェアに関連しているかを診断してください。
必要な工具と部品
-
-
スクリーンの下に開口ピックを差し込み、デバイスの上部からスライドを始めます。
-
ピックをディスプレイの全ての周囲にスライドさせ、接着力を緩めます。
-
接着剤が十分に除去されたら、携帯電話の左側から画面をそっと持ち上げて分離することができるはずです。
-
-
-
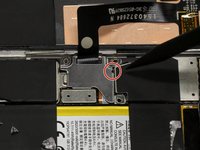
トルクスT5ドライバーを使って、ディスプレイケーブルのベース周辺に留められた2.7mmネジを3本外します。
-
ネジが外れたら、ケーブルのベースを固定しているメタルプレートをゆっくりと外します。
The plate in mine had a small strip of adhesive, so I had to gently heat the plate+strip after removal to separate them.
-
-
-
-
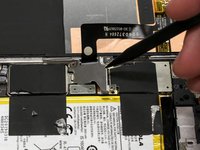
スパッジャーの先端を使って、丸印のメタルケースを持ち上げます。
In my case, the display connector was glued to the metal and came off with. Putting back the metal lid did not position it correctly. I had to pry it from the metal and plug it in directly.
-
-
この手順で使用する道具:Halberd Spudger$2.99
-
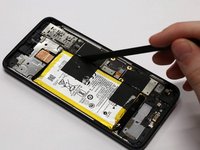
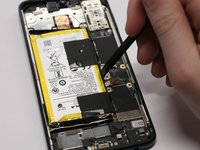
ハルバードスパッジャーのブレード側先端を使って、バッテリーに留められた黒いテープ2本のストリップを切断します。
-
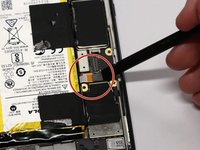
スパッジャーの平面側先端を使って、バッテリーの接続を外します。
-
-
-
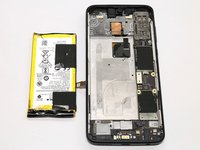
スパッジャーの平面側先端を使って、バッテリーを取り出します。
Die Batterie war bei mir stark verklebt. Beim herauslösen ist sie "gebrochen" / "geknickt". Habe durchaus Kraft aufwenden müssen, da der Kleber unterhalb sehr zäh war. Wer dieses Problem auch hat, es hilft, mit einem Föhn das Gerät von unten zu erwärmen....
1. Der Ausbau des Akkus wird wesentlich erleichtert, wenn man das Handy auf ein Gel-Pad legt, das zuvor auf 60 - 70 Grad C erwärmt wurde. Noch einfacher ist es das Handy auf die Druckplatte eines 3D Druckers zu legen und hier die Temperatur entsprechend einzustellen. Ein Gel-Pad zwischen Druckplatte und Handy sorgt für einen besseren Wärmeübergang.
2. Leider fehlt für den Zusammenbau ein Hinweis, wie das Display wieder mit dem Gehäuse am besten verklebt werden soll. 1mm oder 2mm doppelseitiges Klebeband oder Flüssigkleber?
-


デバイスを再組立する際は、これらのインストラクションを逆の順番に従って作業を進めてください。
デバイスを再組立する際は、これらのインストラクションを逆の順番に従って作業を進めてください。
15 の人々がこのガイドを完成させました。
以下の翻訳者の皆さんにお礼を申し上げます:
100%

これらの翻訳者の方々は世界を修理する私たちのサポートをしてくれています。 あなたも貢献してみませんか?
翻訳を始める ›

チーム

Cal Poly, Team S22-G5, Regan Winter 2020 Cal Poly, Team S22-G5, Regan Winter 2020人のメンバー
CPSU-REGAN-W20S22G5
5 メンバー
19のガイドは作成済み
4 件のコメント
Went as smoothly as possible, thanks very much. Only the glue under the battery was a serious pain in the butt.
Followed the steps, and now my phone is working again. Thanks for the guide.
Dont pry deeper than 3 mm. If you are deeper and just under the glass you will damage the display. The sceen are two layers. Obe witk the veru thin glass and one with a metal frame with display. Yoy want to get under both layers to lift the screen.
Magnus Tuvendal - 返信
Correcting autocorrect… Dont pry deeper than 3 mm. If you are deeper and just under the glass you will damage the display. The screen is two layers. One with the very thin glass and one with a metal frame with the lcd-display. Yoy want to get under both layers to lift the screen.
Magnus Tuvendal - 返信
I don’t have a thermal gun. Here’s what I did. I wrapped my phone in a baggie and an added an oven thermometer into a heating pad and monitored the heat that way. I left it for awhile (to allow all heat to dissipate) and the heat was 189-degrees Fahrenheit. One hour, toasty warm. So I worked with that.
Harry A - 返信
So after one hour at 180 degrees Fahrenheit the base already started buckling and removed itself from the screen. So it was easy to remove the base from the screen. There was some rubber thread that I had to remove. Because of that, I understand that now my phone is not water-tight and I need to treat it as such. But the battery replacement went fine and everything is working great after it was all placed back together. I hope to get a few more years out of my G7 plus!
Harry A - 返信
Magnus Tuvendal's tip was very helpful: between screen and body frame there are actually two gaps visible. The upper one between the glass plate and its frame is actually easier to get into. But it's the wrong one. The lower one towards the body is the one to go for.
Peter Klausner - 返信