メインコンテンツにスキップ

Motorola C168 Front Panel Replacement

必要な工具と部品

  1. Motorola C168 Front Panel Replacement, Battery: 手順 1、 2の画像 1 Motorola C168 Front Panel Replacement, Battery: 手順 1、 2の画像 2
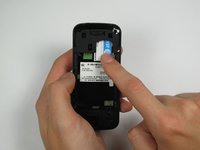
    • Turn the phone so its back is facing you.

    • Press the release button on the back cover, while simultaneously pulling the cover down.

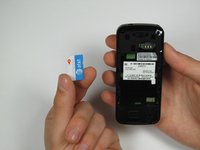
    • Remove the back cover.

  2. Motorola C168 Front Panel Replacement: 手順 2、 2の画像 1 Motorola C168 Front Panel Replacement: 手順 2、 2の画像 2
    • Pinch the sides of the bottom of the battery and pull upward.

  3. Motorola C168 Front Panel Replacement, SIM Card: 手順 3、 2の画像 1 Motorola C168 Front Panel Replacement, SIM Card: 手順 3、 2の画像 2
    • Press and slide the SIM card down.

    • Remove the SIM card.

  4. Motorola C168 Front Panel Replacement, Front Panel: 手順 4、 2の画像 1 Motorola C168 Front Panel Replacement, Front Panel: 手順 4、 2の画像 2
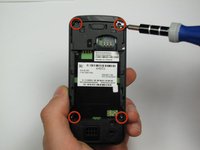
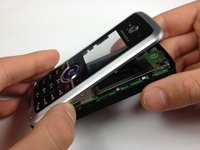
    • Orient the phone so its back is facing you.

    • Using a Torx T-4 screwdriver, carefully remove the 4 screws located at the corners of the phone.
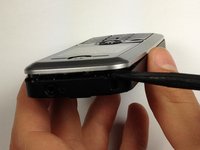
    • Note: If you are using iFixit's screwdriver toolkit, look for the smallest T-screwbit.

  5. Motorola C168 Front Panel Replacement: 手順 5、 2の画像 1 Motorola C168 Front Panel Replacement: 手順 5、 2の画像 2
    この手順で使用する道具:
    Spudger
    $3.99
    購入する
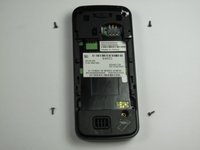
    • Lodge a spudger in between the front panel and the main frame of the phone.

    • Using a good amount of torque, pry the front panel from the phone.

終わりに

To reassemble your device, follow these instructions in reverse order.

ある他の人がこのガイドを完成しました。

作成者

5人の作成者と共同で作成されました。

Christopher Wu

メンバー登録日: 04/17/12

37 ポイント

3のガイドは作成済み

チーム

Cal Poly, Team 12-40, Regan Spring 2012 Cal Poly, Team 12-40, Regan Spring 2012人のメンバー

CPSU-REGAN-S12S12G40

4 メンバー

8のガイドは作成済み

0 件のコメント

コメントを追加

統計データ:

過去 24時間: 0

過去 7 日: 0

過去 30 日: 1

今までの合計 1,018