はじめに
このガイドを参照して、故障したロジックボードを交換しましょう。
必要な工具と部品
-
-
上部ケースとバッテリーを固定している3本のペンタローブネジを外します。このスペシャルドライバーで対応できます。
-
くぼみがドライバーの先端より大きい場合は、より大きなビットのドライバーを探してください。ドライバーを回す前に、ぴったりとくぼみにフィットするか再度確認してください。
Unfortunately, when I added a second hard drive via these instructions, all went well but Bluetooth is now MIA. Can anyone help?
I agree...
I have bought a used MacBook Pro, when problems arise, opening Corps was trying to turn the screw, but with poor quality could not turn a screwdriver, only to ruin the screw. Try to buy ifixit Screwdriver set. Good luck to all and thank you ifixit team for such assistance as ifixit.com. Thank you.
-
-
-
まずは、バッテリ上端にある2本のペンタローブネジを外します。
I have a problem with these screw. They a completly warn and I need some new ones to fix the new Battery.
Does anyone know which thread it is and which length?
-
-
-
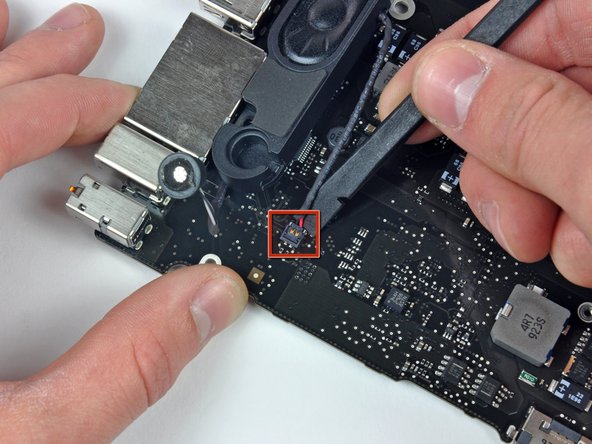
一本の指でケーブルリテイナーの先端を抑えて、スパッジャーの先端で片側のリテイナー先端をわずかに持ち上げて、回転させながらカメラケーブルコネクタから離します。
Bear in mind that the “Camera Cable” is also the cable connecting the logic board to the Wifi Airport Card, at least on the Glossy model (not sure about the Anti-Glare model). The Wifi Airport Card is located under the display’s clutch cover, and requires removing the display in order to access it.
-
-
-
-
スパッジャーの平面側先端を使って、ロジックボードからサブウーファーのコネクタをまっすぐ引き抜きます。
I can't plug the subwoofer cable back. It seems to be too big. I have no idea, what I can do? Any ideas?
Tom Pilath - 返信
-
-
-
スパッジャーの先端を使って、キーボードリボンケーブルの固定フラップを引き上げます。
-
キーボード用リボンケーブルをソケットからまっすぐ引き抜きます。
-
-
-
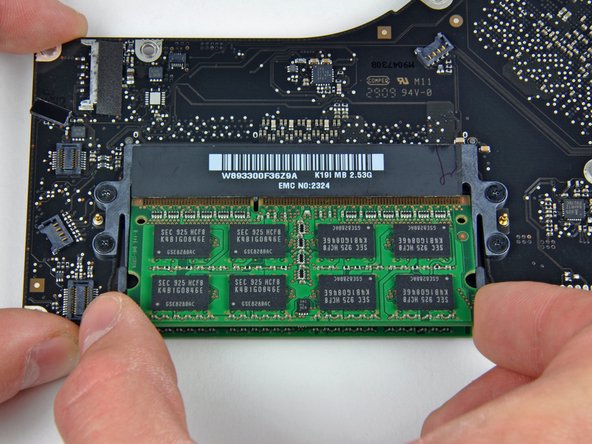
ロジックボードアセンブリの左側をゆっくりと持ち上げて、上部ケースから慎重に取り出してください。取り出す作業中、ポート側に絡まないようご注意ください。
I,ve done everything up to this step but my logic board still seems to be connected (by glue i think) to the black plastic underneath and the black frame that can't be unscrewed. Any idea how to get past this?
For step 24, the same thing happened to me as did to Josh. The heat pipe had bonded with the plastic film which protects the back of the keyboard. By using a spudger i was able to pry at the area where the two were attached. I don't think this is intentional, they just melt together.
Matt -
Same happened to me. Matt is right. I gained extra clearance by removing both RAM modules. Then used the spudger. Sounds cracky but it´s all fine.
-


デバイスを再度組み立てるには、この説明書の逆の順番で組み立ててください。
デバイスを再度組み立てるには、この説明書の逆の順番で組み立ててください。
30 の人々がこのガイドを完成させました。
以下の翻訳者の皆さんにお礼を申し上げます:
100%

これらの翻訳者の方々は世界を修理する私たちのサポートをしてくれています。 あなたも貢献してみませんか?
翻訳を始める ›

4 件のコメント
Hello,
Do you know the purpose of the component that is not welded in the lower right corner of the red square on the picture of step 12: http://d3nevzfk7ii3be.cloudfront.net/igi...
Someone tells me I can not have my backlight re-working without this component, but I think it simply does not work because of a liquid.
Any ideas ?
Thanks in advance
I just replaced the logic board, and all went fine, as far as I can tell. However, my new battery is still in transit, i.e: I do not have it at hand. My question is, how critical is it to have a battery in this model....given all the "do not remove battery or else" warnings. Is it OK to try to boot it just with the regular power supply? I do not want to fry my new logic board, so I need some informed opinion on this...
I greatly appreciated your comment in Step 11 saying: “Apple sticks a small strip of clear plastic with adhesive applied to one side to the logic board behind the camera cable connector to keep it in its socket“.
My problem was that I had an old Macbook Pro whose camera cable was out of its socket and I could not get it in because this piece of plastic was in the way. I had no idea what it was. It was not clear to me if it was an IC or some other important component. Your comment clarified what it was and its purpose.
Pushing down on it at one end did not achieve anything, so I have just lifted it up and off the board using a small scalpel blade.
I will use some tape to hold the cable connector in its socket.
Thank you
Hi,
Your article does not mention the WiFi (wireless) or Bluetooth cable connector.
Does WiFi connectivity come into the logic board via the camera cable, or some other cable?
Thank you