はじめに
Use this guide to replace an old or faulty battery and revitalize your MacBook Pro. If your battery is swollen, take appropriate precautions.
必要な工具と部品
-
-
Remove the following 10 screws securing the lower case to the MacBook Pro 13" Unibody:
-
Seven 3 mm Phillips screws.
-
Three 13.5 mm Phillips screws.
-
-
-
Slightly lift the lower case and push it toward the rear of the computer to free the mounting tabs.
-
-
-
-
Remove the following tri-point screws securing the battery to the upper case:
-
One 5.5 mm tri-point screw.
-
One 13.5 mm tri-point screw.
-
-
-
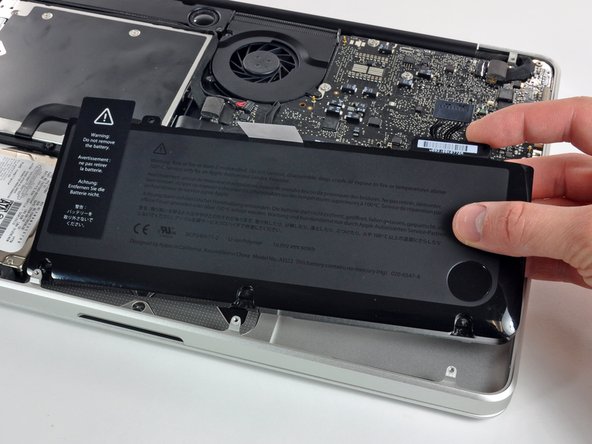
Lift the battery out of the upper case.
-
Charge it to 100%, and then keep charging it for at least 2 more hours. Next, unplug and use it normally to drain the battery. When you see the low battery warning, save your work, and keep your laptop on until it goes to sleep due to low battery. Wait at least 5 hours, then charge your laptop uninterrupted to 100%.
-
If you notice any unusual behavior or problems after installing your new battery, you may need to reset your MacBook's SMC.
-


To reassemble your device, follow these instructions in reverse order.
To reassemble your device, follow these instructions in reverse order.
727 の人々がこのガイドを完成させました。

50 件のコメント
My laptop wouldn't believe the battery was new until I reset the SMC as well ( http://support.apple.com/kb/HT3964 ).
Perfect! I didn't want to wait for the Tri-wing screwdriver to ship, so I gave it a try by wedging a FH 1 in between two of the wings. It worked well to unscrew, but you must be very careful when resetting the screws that hold the battery. If you get them started with your finger (a little pressure with your thumb pushing straight down will get the job done) then you can do a few final turns with the FH 1. If you try to start resetting the screws with the off-center-FH1-workaround, you will strip the screw! Keep the screws centered and don't force anything.
My local Apple Store wants $179 plus tax to change this battery, AND I have to leave my laptop for "a couple of days." This is one store that clearly doesn't get it (Cherry Creak Mall, Denver). Thus, a DIY fix is mandatory... but, they won't sell just the battery.
iFixit sells the battery you need for $119 ([リンクされた製品が存在しない、もしくは無効: IF163-019]), and once you get it, doing the replacement shouldn't take more than 30 minutes, even if you've never done a repair like this before.