はじめに
待ちわびてきたAppleのProレベルのラップトップが、私たちの分解テーブルに載せられています。でもTouch BarなしのMacBook Proって一体何ですか?Function Key付きのMacBook Proですって?2xThunderbolt 3ポート付きのMacBook Pro?これをどう呼んでいいいのか、誰も分かりません。でも、私たちはどうすればいいのか知っています。MacBook Pro Late 2016 (Escape Edition)の分解をご覧ください。
最新ニュースを入手するには、
FacebookやInstagram 、Twitter、Twitter日本語版をフォローしてください。メール配信(英語)は、ニュースレターを購読してください。
必要な工具と部品
-
-
MacBook Proのアップデートを待ちわびてきました。この中には何が搭載されているでしょうか?知っている技術仕様を記しましょう。
-
13.3” LED-backlit IPS “Retina” display with 2560 × 1600 resolution (227 dpi), P3 color gamut
-
2.0 GHz "Skylake" dual-core Intel Core i5 (Turbo Boost up to 3.1 GHz) with integrated Intel Iris Graphics 540
-
8 GB of 1866 MHz LPDDR3 onboard memory (16 GB configuration available)
-
256 GB, 512 GB, or 1 TB PCIe-based SSD
-
Two Thunderbolt 3 (USB-C) ports supporting charging, DisplayPort, Thunderbolt, USB 3.1 Gen 2
-
-
この手順は未翻訳です。 翻訳を手伝う。
-
Although we're dying to send emojis with a tap of the Touch Bar, this 'Book is missing the headlining feature of the 2016 MacBook Pro series—it sports physical function keys instead.
-
However, we do spy an XL (extra-long) escape key that sets this row of function keys apart.
-
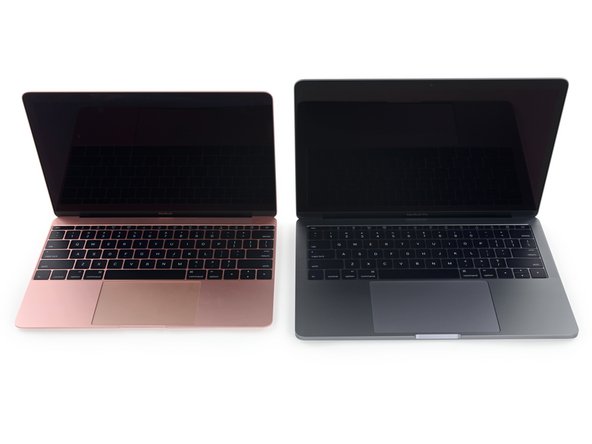
The Pro looks like a giant beside its pink sibling, sporting a significantly larger trackpad.
-
Also, the speaker grilles have migrated down from the upper edge of the keyboard to flank it on the left and right sides, now possible due to the Pro's extra half-inch of depth.
-
Here's one last X-ray preview of the internals. Time to get our hands dirty!
-
-
この手順は未翻訳です。 翻訳を手伝う。
-
After six years of removing proprietary pentalobe screws from MacBook laptops, we can remove the six of them from the back of this laptop with our eyes closed.
-
We also happen to sell the prettiest pentalobe screwdriver you'll ever see, useful for all of your MacBook opening needs.
-
Six screws! That's the fewest we've seen on a unibody MacBook of any vintage, with 8 on the 2015 MacBook and 10 on most MacBooks Pro.
-
-
この手順は未翻訳です。 翻訳を手伝う。
-
Well, this is new. We're momentarily stumped by the new, extra-secure lower case, before we crack the code to remove it.
-
A suction cup helps lift the lower edge enough to get an opening pick in, to pop hidden clips on each side. After that, you slide the entire lower case down and you're home free.
-
-
この手順は未翻訳です。 翻訳を手伝う。
-
Code cracked and panel removed, we move on to disconnect the battery and realize things are strange.
-
This wide-headed T5 screw serves as a super-secure press connector for the battery.
-
Folding the connector back reveals some copper pads. Two large ones for positive and ground from the battery, and several smaller points. Perhaps... Test Points?
-
-
この手順は未翻訳です。 翻訳を手伝う。
-
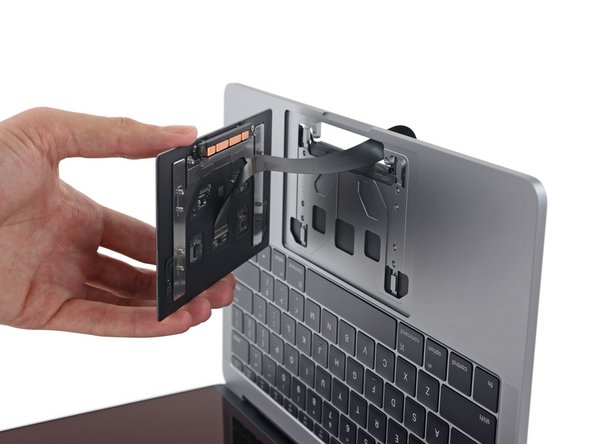
Following our intuition, we try for the trackpad next, and are pleasantly surprised at the ease of its removal.
-
This represents a huge improvement over the previous 13" MacBook Pro, where the trackpad was trapped under the battery.
-
STMicroelectronics STM32F103VB ARM Cortex-M3 MCU
-
Broadcom BCM5976C1KUFBG Touch Controller
-
Bosch Sensortec BMA282 accelerometer
-
Texas Instruments TMP421 remote/local temperature sensor
-
We also find the Taptic Engine, AKA the
magicelectromagnet behind Force Touch, to be simply secured with screws and spring contacts.
-
-
この手順は未翻訳です。 翻訳を手伝う。
-
Emboldened by our trackpad success, we tackle the battery next.
-
Our confidence is quickly crushed by tenacious adhesive. Bring on the frustration and flashbacks.
-
Good thing we're armed to deal with tacky-battery warfare at iFixit. We charge into battle with heat and plastic cards.
-
Also a good thing, with the trackpad out first we're finally able to pry at that super-annoying center cell, a common source of repair annoyance.
-
Through perseverance we liberate the battery. Let us continue the good fight!
-
-
-
この手順は未翻訳です。 翻訳を手伝う。
-
At 54.5 Wh, this battery doles out ~27% less power between charges than last year's edition—although with just three cells instead of six, it might be a tad easier to remove.
-
That said, this Pro actually packs more oomph than its Touch Bar-equipped sibling, whose battery clocks in at 49.2 Wh.
-
Up top, we find this battery control board which — unlike the impeccably manicured components surrounding it — is coated in thick epoxy à la Apple's Lightning-to-headphone dongle.
-
-
この手順は未翻訳です。 翻訳を手伝う。
-
We stumble upon another familiarity in this MacBook as we begin speaker extraction: vibration dampening screw gaskets, similar to those found in the iMac.
-
These speakers supposedly deliver more oomph than previous gens', and clearly need a more robust mounting system to keep from shaking your laptop off your lap.
-
One speaker, two speaker, black speaker, black speaker. This teardown is starting to have a nice rhyme to it.
-
-
この手順は未翻訳です。 翻訳を手伝う。
-
Given our excitement surrounding the logic board removal (and the amount of ornaments and wrapping paper just unleashed in stores everywhere), you might think Christmas came 54 days early.
-
We begin to look for the "advanced thermal architecture" Apple boasted in its press release the way a child might rifle through her stocking on Christmas morning.
-
...We're a little disappointed that advanced architecture really meant "relocation of the heat sink screws to the backside of the logic board."
-
-
この手順は未翻訳です。 翻訳を手伝う。
-
We tackle the front side of the logic board:
-
Intel Core i5-6360U processor with Intel Iris Graphics 540
-
SKhynix H9CCNNNBJTML LPDDR3 high-speed synchronous DRAM
-
Universal Scientific Industrial 339S0251 Wi-Fi Module
-
Intel JHL6540 Thunderbolt 3 controller
-
Texas Instruments CSD87350Q5D Synchronous Buck NexFET Power Block MOSFET Pair (and some other MOSFETs are found on this PCB)
-
Broadcom BCM15700A2 camera processor
-
Micron MT41K256M16TW-107 512 MB DDR3L SDRAM
-
-
この手順は未翻訳です。 翻訳を手伝う。
-
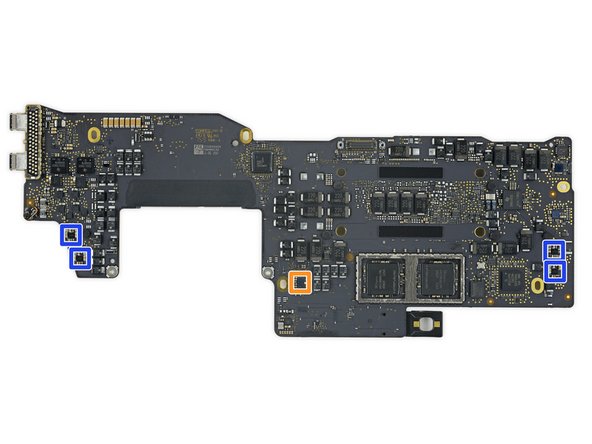
We flip the logic board over to the reverse side and keep scouring:
-
Making a second appearance, SK Hynix H9CCNNNBJTMLAR-NUD LPDDR3 high-speed synchronous DRAM
-
Texas Instruments SN650839 (as seen in the 2016 Retina MacBook) Skylake CPU power management
-
2x Texas Instruments CD3215B03 USB type-C controller
-
Winbond W25Q64FV 64 Mb serial NOR flash memory
-
Texas Instruments TM4EA231 system management controller
-
Cirrus Logic CS42L63A Audio Codec
-
Intersil ISL95828HRTZ Intel CPU PWM controller
-
-
この手順は未翻訳です。 翻訳を手伝う。
-
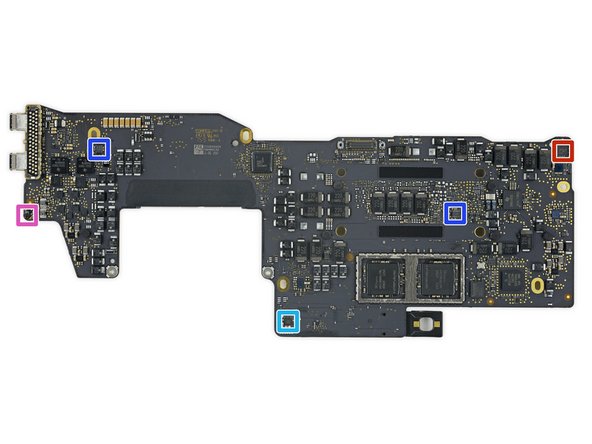
IC identification, pt. 2:
-
Texas Instruments TPS51980A 2-phase step-down controller
-
Renesas (formerly Intersil) ISL9239 battery charger
-
Texas Instruments TPS51916 DDR memory power management
-
Vishay SiC635 power stage
-
Vishay SiC532 30 A power stage
-
Analog Devices SSM3515B 31 W Class-D audio amplifier
-
Texas Instruments (formerly National Semiconductor) LP8548B1 backlight driver
-
-
この手順は未翻訳です。 翻訳を手伝う。
-
IC identification, pt. 3:
-
Texas Instruments TMP513A triple remote/local temperature sensor
-
Winbond W25Q80DVUXIE 8 Mb serial NOR flash memory
-
Winbond W25X20CLUXIG 2 Mb serial NOR flash memory
-
Microchip (formerly Atmel) AT93C66B 4 Kb serial EEPROM memory
-
Maxim Integrated MAX77596 300 mA buck converter
-
Texas Instruments TPS22966 6 A load switch
-
Likely hall sensor
-
-
この手順は未翻訳です。 翻訳を手伝う。
-
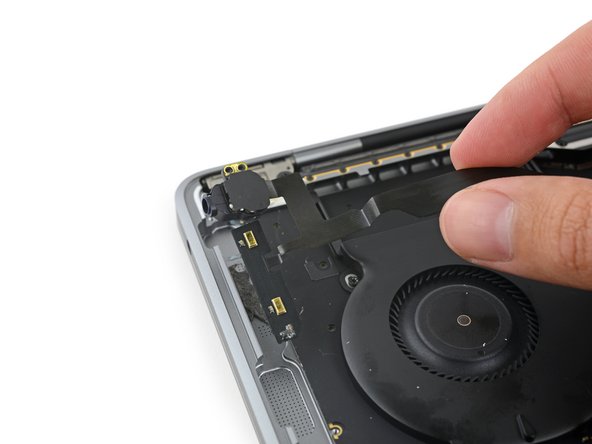
Given Apple's renowned port-removing courage, it wasn't unreasonable to think the headphone jack would find itself getting voted off the island prior to this round of MacBook Pros.
-
Miraculously, the headphone jack survived... but given that it's a single modular unit (with two attached microphones) taped to the bottom of the fan, it could easily be dropped in favor of a Lightning or USB-C connector at the next
Tribal CouncilMacBook release. -
Next, we take a closer look at the speaker grilles: Most of the holes are actually just dents posing as holes. The only through-holes are dedicated to the four speaker drivers and the two microphones.
-
-
この手順は未翻訳です。 翻訳を手伝う。
-
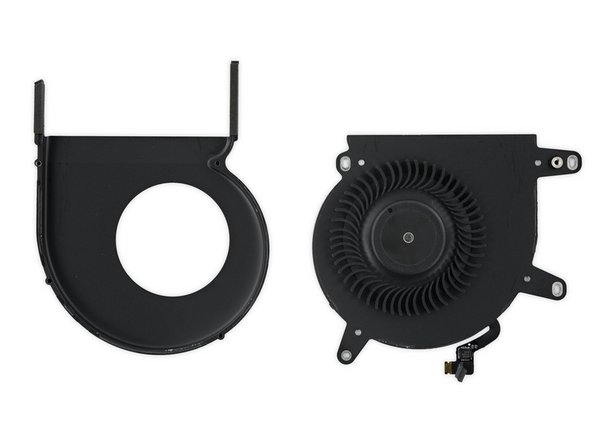
Before we hit Retina, we scrape out a fancy fan. These blades are supposedly super quiet due to their asymmetrically spaced blades.
-
There's also a significant amount of space not taken up by blades—that's probably another sick thermal system feature. Plus it looks nice in the video.
-
-
この手順は未翻訳です。 翻訳を手伝う。
-
Time to mosey on down to display town, we decap some shields and take a peek at the hardware powering those pixels:
-
Parade Technologies DP805 DisplayPort timing controller (likely)
-
Texas Instruments (formerly National Semiconductor) LP8549B1 backlight driver
-
Texas Instruments TPS65157 display power management
-
NXP Semiconductor LPC812 ARM Cortex M0+ 32-bit MCU
-
Texas Instruments TPS65158 High Resolution LCD Bias IC for TV
-
Texas Instruments TCA9406YZPR 2-bit SMBus voltage-level translator
-
-
この手順は未翻訳です。 翻訳を手伝う。
-
At MacBook's edge we come across a shiny bar (held in by 12 P2 Pentalobe screws) that also serves as an antenna.
-
Behind the antenna bracket, we spy some fancy tech along the Pro's spine.
-
A spring mechanism rolls a flat cable up when the display is closed, and unravels when the display opens. This seems to make it a bit easier to close the lid.
-
-
この手順は未翻訳です。 翻訳を手伝う。
-
We'll skip tearing down the display itself—we've been down that road before—so how about a lovely X-ray instead? Here you can see the camera board with its long data cable, the solid metal Apple logo, and even the little magnets embedded in the lid for sleep/wake functionality.
-
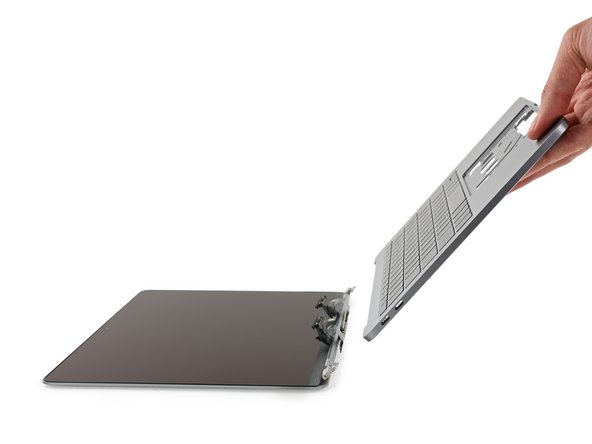
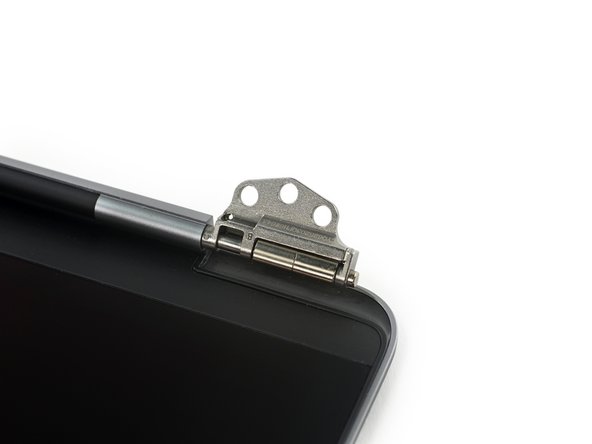
We gently detach the gutted shell of the keyboard/upper case from the display, and take a closer look at the fancy new hinge system.
-
Sometimes seemingly standard hardware deserves an Ooh and an Ahh: These small, precision hinges are likely injection molded, allowing for thinner and more precise parts.
-
-
この手順は未翻訳です。 翻訳を手伝う。
-
The Butterfly 2.0 keys are indeed updated! Check this sweet MacBook/MacBook Pro (with function keys) rollover!
-
The Pro's keycaps (first image) are a little taller at the edges, making keys easier to find with your fingers.
-
The dome switch under the butterfly mechanism also appears to be heftier and better mated to the keycap than the ones in the MacBook (second image).
-
-
この手順は未翻訳です。 翻訳を手伝う。
-
And for the grand finale: All those beautiful bits all in one place!
-
Don't forget: Apple had some slick computer-generated imagery of their new machines' internals, but we got the real thing! Today's hi-res X-ray images were brought to you by the amazing team at Creative Electron.
-
- The trackpad can be removed without first removing the battery.
- Proprietary pentalobe screws continue to make opening the device unnecessarily difficult.
- The battery assembly is entirely, and very solidly, glued into the case, thus complicating replacement.
- The RAM is soldered to the logic board. Pay for the upgrade now, or be stuck with 8 GB forever. There is no chance of upgrade.
- The proprietary PCIe SSD still isn't a standard drive. Cross your fingers for future compatible drives; for now, you're stuck with what you've got.


まとめ
リペアビリティのスコア


(10点が最も修理しやすい指標です)
以下の翻訳者の皆さんにお礼を申し上げます:
20%

これらの翻訳者の方々は世界を修理する私たちのサポートをしてくれています。 あなたも貢献してみませんか?
翻訳を始める ›
66 件のコメント
This version (non touchbar) is also using TDP 15W CPUs. The 13" one with touchbar is using TDP 28W CPUs (and has probably two fans).
@chenyu apple's press renders and product site show the 13 inch mb pro with 2 fans
Dual fan is found on the 13" MacBook pro with a touch bar becuase the TDP on the CPU is much higher. (28W). It's also in the 15" MacBook Pro with an 80W TDP, and bigger heat pipes.
Finally, It's a bit sad that you guys didn't compare this year's heat sinks to last years. Do some flow rate testing on the fans, and give us dimensions and weight of the heat sinks from last year to this year. Without making any proper measurements, you cannot make *any* claims about the thermal system being "advanced" or not.
It seems, like the version with the Touchbar will have redesigned speakers and up to 2.5x louder bass. This version without Touchbar has definitely no subwoofers shown on the MacBook Pro web page at apple.com.
Niko Millo - 返信