この翻訳は機械によって生成されたものであり、まだ人間による校正は行われていません。 日本語を話せますか? レビューはこちらから。
はじめに
画面のバックライトが点灯しませんか?インバーターを交換してください。
必要な工具と部品
-
-
-
-
-
以下の3本のネジを外します:
-
下部ケース中央のプラスネジ(11 mm):1本(頭部直径:5 mm、厚さ:0.75 mm)
-
プラスネジ(14.5 mm):2本(頭部直径:5 mm、厚さ:0.75 mm)
-
-
-
バッテリー筐体の背面にある次の3本のネジを取り外します。
-
プラスネジ #0:3 mm(頭部径:2.75 mm)× 1本
-
プラスネジ #0:4 mm(頭部径:2.75 mm)× 両側2本
-
-
-
バッテリー筐体の右側の壁の両端にある2本のプラスネジを取り外します(バッテリーコネクタに近いネジではありません)。
-
6.25 mm プラスネジ #000 × 2本(頭部:直径 4 mm × 厚さ 0.5 mm)
-
-
-
バッテリー筐体の前壁にある、示された4本のプラスネジを外す。左側から作業する場合、2番目、4番目、7番目、9番目のネジを外す。
-
3.25 mm プラスネジ #000 4本(頭部:直径4 mm × 厚さ4 mm)
-
-
-
コンピューターの背面から以下のネジを4本外します:
-
11 mm プラスネジ #00(シャンク部:直径2.2 mm × 長さ2 mm)(頭部:直径3.2 mm × 厚さ0.5 mm)を2本
-
7.25 mm プラスネジ #00(シャンク部:直径2 mm × 長さ3.75 mm)(頭部:直径3.2 mm × 厚さ0.5 mm)を2本
-
-
-
光学ドライブ(右)側のプラスネジ2本を外します。
-
5.2mmプラス#00ネジが2本、シャンク付き(直径2.3mm x 長さ3.25mmの長さ)(ネジ頭:直径3.2mm x 厚さ0.5mmの厚み)
-
-
この手順で使用する道具:Plastic Cards$2.99
-
オープニングツールや使用済みのプラスチック製クレジットカード、あるいは同程度の厚さのカードを使用して、左上隅からコンピュータ前面に向かってアッパーケースを上にこじ開けます。
-
-
-
-
-
-
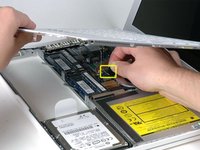
ファンと光学ドライブの間のアルミテープを剥がします。テープは光学ドライブに付けたまま、ファン側から持ち上げます。
-
再組み立ての際は、テープを貼り直す前にケーブルをテープの下に通すようにしてください。
-
-
-
光学ドライブのリアコーナーを固定している2 mmのプラスネジを取り外します。
-
銀色のジャケットで覆われたBluetoothケーブルがネジを覆っている場合があります。その場合は、慎重に横へどかしてください。Bluetoothケーブルを十分にどかすには、近くにある2本のケーブルのグランドシールドラグを固定しているネジを先に取り外す必要があるかもしれません。このネジは初期のモデルでは7 mmですが、Santa Rosa/Penrynおよび2009年モデルでは4.2 mmである場合があります。
-
-
-
光学ドライブの自分に近い側の側面を持ち上げ、ドライブを自分の方へスライドさせてから、コンピューターの外へ持ち上げます。
-
まず、光学ドライブのMacBookの後部側に近い側面を、ヒンジの左側にあるリアフレームの端の下に差し込みます。同時に、光学ドライブの左上隅にある取り付けタブを、その場所にあるケーブルの下に差し込みます。
-
ドライブをロアハウジングの中へ途中まで下げます。ハードドライブケーブルが光学ドライブベイに触れないようにしてください。
-
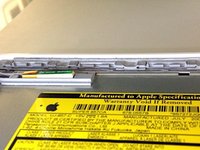
ドライブを完全にはめ込む前に、スパッジャーを使用して、ドライブの取り付けタブにあるネジ穴を前方(ドライブの前面に向かって)へ押し込みます。
-
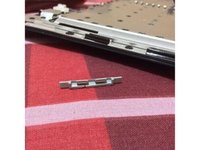
ドライブの奥側に沿って伸びているスライダーを前方に押し、スライダーの端をロアケースフレームの小さな溝に差し込みます。これにより、ドライブを所定の位置に固定できます。
-
-
-
-
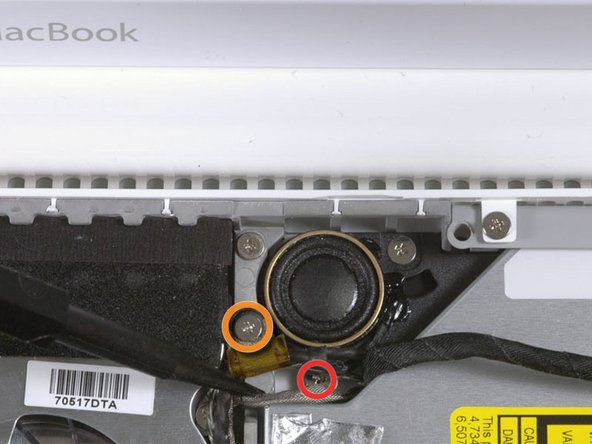
オリジナルモデルのMacBook Core DuoおよびCore 2 Duoでは、以下のネジ3本を取り外します。
-
右スピーカー付近の3 mmプラスネジ2本。
-
サブウーファー上のプラスチックの突起にある穴を通っている6 mmプラスネジ1本。
-
CチャンネルがないSanta Rosa/Penrynモデルおよび2009年モデルの場合:
-
右スピーカーの3 mmプラスネジ1本のみを取り外し、手順26はスキップします。
-
-
-
-
-
スパッジャーを使用して、マイクケーブルをロジックボードから慎重に取り外します。左右に少しずつ動かしながら、コネクタをソケットからゆっくりと引き抜いてください。
-
-
-
手順20でアースラグ固定ネジを取り外していない場合は、今すぐ取り外します。これは、右スピーカーケーブルとマイクケーブルのアースラグを金属製フレームに固定している7mm(Santa Rosa/Penrynおよび2009年モデルでは4mmまたは3mmの場合があります)のプラスネジです。
-
-
-
Bluetoothボードのすぐ上にあるディスプレイケーブルの接地ラグを固定している3 mmのプラスネジを1本取り外す。このネジは、スピーカーケーブルの接地ラグも同時に固定している場合がある。
-
-
-
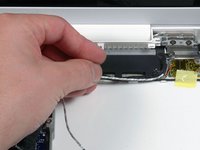
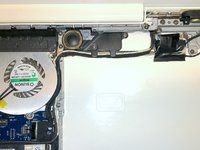
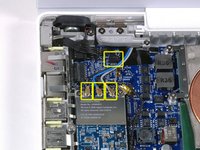
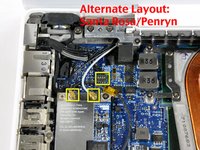
AirMacカードからアンテナケーブルを取り外します。
-
オリジナルのMacBook Core DuoまたはCore 2 Duoモデルの場合は、1枚目の写真を参照してください。アンテナケーブルが3本あることがわかります。
-
MacBook Core 2 Duo Santa Rosa / Penrynまたは2009モデルの場合は、アンテナケーブルは2本のみで、黒いインバーターケーブル用のプラグ/ソケットの位置が異なります。インバーターボードコネクタのプラグ/ソケットの上に四角いスポンジ状のパーツが貼られている場合があります。
-
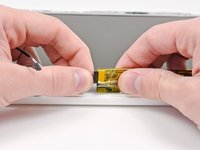
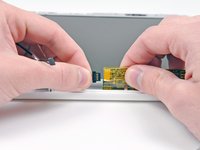
プラグとソケットの左右の端の間にスパッジャーを差し込み、垂直に優しく上にこじ開けて、ソケットからインバーターケーブルを取り外します。ソケットを上にこじ開けないでください。必ずプラグだけを垂直に引き上げ、ソケットから抜く必要があります。ケーブルの配線方向に引っ張ると、ロジックボードからソケットが剥がれるおそれがあります。
-
-
-
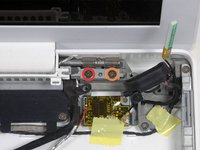
オリジナルモデルのMacBook Core DuoおよびCore 2 Duoは、1枚目の写真を参照し、右ヒンジマウントから以下のネジ2本を外します:
-
ヒンジマウント左側の6 mmプラスネジ1本。
-
ヒンジマウント右側の10 mmプラスネジ1本。
-
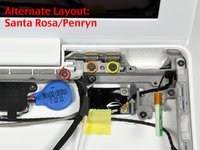
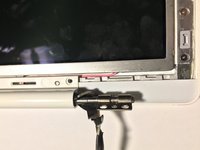
Santa Rosa/Penrynモデルおよび2009年モデルは、2枚目の写真を参照し、右ヒンジマウントから以下のネジ3本を外します:
-
左端の径が小さい3 mmプラスネジ1本。
-
中央の径が大きい5.2 mm(頭部4.2 mm)プラスネジ1本。
-
右端の径が大きい10 mm(頭部4.2 mm)プラスネジ1本。
-
右ヒンジマウントを外す前に、小さな白いプラスチック部品を含め、各パーツがどのように組み合わさっているかを確認してください。パーツの噛み合わせを把握しておくと、再組み立ての際に役立ちます。右ヒンジマウントを小さな白いプラスチック部品ごとコンピュータから持ち上げて外します。
-
-
-
ディスプレイを片手で支えながら、左ヒンジマウントから以下のネジ3本を外します:
-
右側のプラスネジ(直径が小さい、7.2 mm)1本。
-
中央のプラスネジ(直径が大きい、5.2 mm)1本。
-
左側のプラスネジ(直径が大きい、10 mm)1本。
-
左ヒンジマウントを、白いプラスチック部品と一緒にコンピュータから取り外します。
-
左ヒンジの右端から出ているケーブルが、他のケーブルの下に挟まっていないことを確認してください。
-
-
-
ディスプレイアセンブリの両端をつかみ、コンピュータから持ち上げて取り出します。その際、ディスプレイに接続されているケーブルがボトムケース内の部品に引っかからないよう注意してください。
-
-
-
-
-
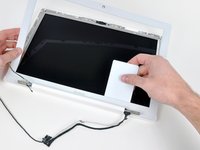
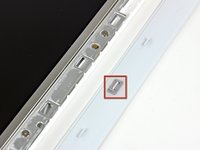
Use a thin plastic card to release the tabs holding the front display bezel to the display assembly. There are five tabs along the left side of the display bezel.
-
-
-
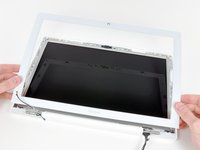
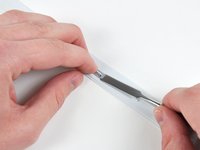
フロントディスプレイベゼルの上部を持ち上げ、プラスチックカードを使ってベゼルの下端に沿ったタブを外します。
-
すべての固定タブを外した後、フロントディスプレイベゼルをディスプレイアセンブリから取り外します。
-
-
-
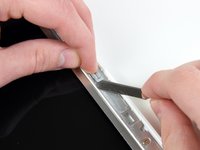
金属製スパッジャーなどの薄い工具を使って、フロントディスプレイベゼルに成形されたタブから灰色のプラスチック製クリップを慎重にこじ開けます。この手順では、0.8mmのマイナスドライバーが役立つ場合があります。クリップの長い側面を上にこじ開けると、取り外しやすくなることがあります。
-
-
-
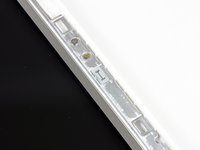
保持クリップの端を1つ、LCDブラケットの切り欠きの下に差し込みます。
-
スパッジャーの先端を使って、保持クリップのもう一方の端の裏側にある短いフック状のタブを、LCDブラケットの切り欠きに押し込みます。
-
-
-
-
-
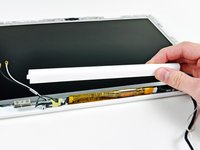
片手でディスプレイを押さえながら、もう片方の手でクラッチカバーの左端をクラッチヒンジから持ち上げ、インバーターケーブルとAirPortケーブルをクラッチカバーの隙間から引き出します。ケーブルがクラッチカバーの内側にある2つのフック状のタブに引っかかった場合は、慎重に外してください。
-
-
-
ディスプレイケーブルとiSightケーブルを隙間とクラッチカバー右端の2つのフック付きタブに通しながら、クラッチカバーの右端を持ち上げます。ケーブルが2つのフック付きタブに引っかかる場合は、慎重に外してください。
-
クラッチカバーをディスプレイアセンブリから取り外します。
-
-

 FixBotに聞いてみる






















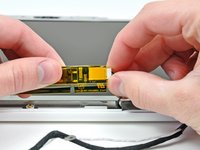
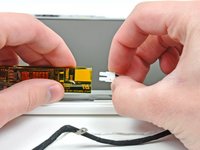

デバイスを再組み立てするには、これらのインストラクションを逆の順番に従って作業を進めてください。
152 の人々がこのガイドを完成させました。

8件のガイドコメント
Awesome site and awesome guide. This exteneded the life of my MacBook. I can't thank you enough!!!!
For about 3 years I had been dealing with my screen backlight shuting off. I would then dim the screen up and down until I could get it to stay. Sometimes it would work the first time other times I would be doing it for 10 minutes and other times I would give up for a few hours and come back and the screen would be on again. It would also do this sometimes when I opened the laptop at a certain angle or bumped the computer.
Well after these years very annoying behavior, my screen wont turn back on. I can see my desktop when I shine a light on the screen and hear the fan running so I know the computer works fine.
I've tried unpluging the inverter board to see if it was a loose connection, but that didn't work. I tried wiggling it around until the screen turned on and nothing.... Please help!
Is this a problem with my inverter or the inverter cable? Or the backlight cable?
What parts should I buy?
Hi everybody! Last year bought a new inverter, new cable and other stuff and replaced. Problem not solved, screen still turning black. Thinking to get a new display, but today bought spray electronic cleaner, sprayed over the display data cable (https://d3nevzfk7ii3be.cloudfront.net/ig...). Problem &&^&^$^ solved! :) Time: 15 mins, money: 5$. Good tutorial tho! :P
These are a very comprehensive set of instructions and give a really good grand tour of the innards of a MacBook 8. They are also useful for replacing the hard drive or the optical drive.
Couple of hints:
1. Have on hand some canned compressed air - the inside of a laptop is generally quite full of dust and fluff.
2. Also have on hand some contact cleaner spray (do NOT use degreasers/lubricants/anti rust sprays such as RP 7 or WD 50). Contact cleaner sprays generally only contact isopropyl alchohol. It's good to give exposed contacts a bit of a clean - even grease from fingertips can affect conductivity and hence performance. (If possible, use powder free surgical gloves).
3. Make sure you have the right tools (don't skimp - buy the tools set from iFixit). Not using the right spudger on a plug could be the cause of irreparable damage to the circuit board.
(continued next posting)
