メインコンテンツにスキップ

MacBook Air 13" Early 2015 Right Speaker Replacement

必要な工具と部品

  1. MacBook Air 13" Early 2015 Right Speaker Replacement, Lower Case: 手順 1、 1の画像 1
    この手順で使用する道具:
    P5 Pentalobe Screwdriver Retina MacBook Pro and Air
    $5.99
    購入する
    • Before proceeding, power down your MacBook. Close the display and lay it on a soft surface, top-side down.

    • Use a P5 Pentalobe driver to remove ten screws securing the lower case, of the following lengths:

    • Two 9 mm screws

    • Eight 2.6 mm screws

  2. MacBook Air 13" Early 2015 Right Speaker Replacement: 手順 2、 1の画像 1
    • Wedge your fingers between the display and the lower case and pull upward to pop the lower case off the Air.

    • Remove the lower case and set it aside.

  3. MacBook Air 13" Early 2015 Right Speaker Replacement, Battery Connector: 手順 3、 2の画像 1 MacBook Air 13" Early 2015 Right Speaker Replacement, Battery Connector: 手順 3、 2の画像 2
    • To ensure that everything is de-energized and won't turn on while you're working, it is recommended that you disconnect the battery.

    • Grab the clear plastic pull tab attached to the battery connector and pull it parallel to the board toward the front edge of the Air.

    • Do not lift upward on the connector as you disconnect it or you risk damage to the connector socket.

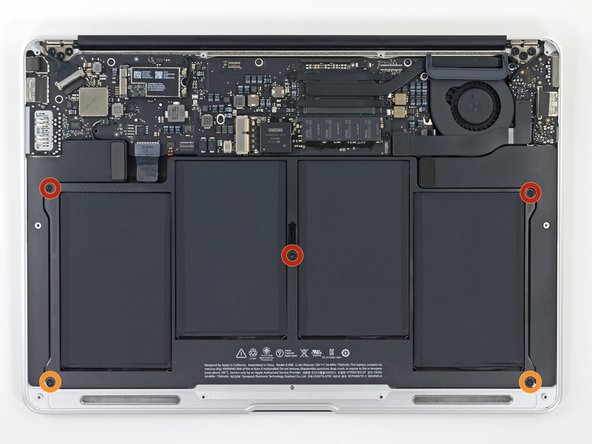
  4. MacBook Air 13" Early 2015 Right Speaker Replacement, Battery: 手順 4、 1の画像 1
    • Remove the following five screws securing the battery to the upper case:

    • Three 6.9 mm T5 Torx screws

    • Two 3.0 mm T5 Torx screws

  5. MacBook Air 13" Early 2015 Right Speaker Replacement: 手順 5、 1の画像 1
    • When handling the battery, avoid squeezing or touching the four exposed lithium polymer cells.

    • Lift the battery from its edge nearest the logic board and remove it from the upper case.

    • Your replacement battery may arrive with a plastic film lightly adhered to the top surface. Remove this film when you install the battery. However, if the film is glued on and is difficult to remove, you should leave the film in place.

    • If you're installing a new battery, you should calibrate it after installation:

    • Charge it to 100%, and then keep charging it for at least 2 more hours. Then, unplug and use it normally to drain the battery. When you see the low battery warning, save your work, and keep your laptop on until it goes to sleep due to low battery. Wait at least 5 hours, then charge your laptop uninterrupted to 100%.

    • If you notice any unusual behavior or problems after installing your new battery, you may need to reset your MacBook's SMC.

  6. MacBook Air 13" Early 2015 Right Speaker Replacement, Right Speaker: 手順 6、 1の画像 1
    • Use the flat end of a spudger to pry the right speaker connector up and out of its socket on the logic board.

    • Pry up from beneath the wires.

  7. MacBook Air 13" Early 2015 Right Speaker Replacement: 手順 7、 3の画像 1 MacBook Air 13" Early 2015 Right Speaker Replacement: 手順 7、 3の画像 2 MacBook Air 13" Early 2015 Right Speaker Replacement: 手順 7、 3の画像 3
    • Use the flat end of a spudger to pry the right speaker off the adhesive securing it to the upper case.

    • Remove the right speaker from the upper case.

終わりに

To reassemble your device, follow these instructions in reverse order.

Take your e-waste to an R2 or e-Stewards certified recycler.

Repair didn’t go as planned? Try some basic troubleshooting, or ask our Answers community for help.

7 の人々がこのガイドを完成させました。

作成者

6人の作成者と共同で作成されました。

Sam Goldheart

メンバー登録日: 10/18/12

465,777 ポイント

538のガイドは作成済み

チーム

iFixit iFixit人のメンバー

Staff

135 メンバー

16,817のガイドは作成済み

コメント 1 件

Anleitung ist perfekt. Läuft einwandfrei.

Lediglich beim Lösen des angeklebten Lautsprechers muss man etwas aufpassen. Sonst erste Sahne!

BenZ78 - 返信

コメントを追加

統計データ:

過去 24時間: 5

過去 7 日: 19

過去 30 日: 47

今までの合計 8,236