はじめに
このガイドを参照して、MacBook Air 13インチ Retina Display 2019 Touch IDセンサーを交換します。
Touch IDセンサーを交換後、Touch IDは機能しなくなります。ご注意ください。 MacBookのオリジナルTouch IDセンサーは工場生産時にロジックボードのT2チップとペアで製造されています。Appleの独占キャリブレーション手続きを経なければ回復できません。他モデルのMacBook Airから取り出した正規品Touch IDを移植しても同様です。
Touch IDセンサーを交換するには、Touch ID機能を保持するために、ペアで製造されたロジックボードをインストールする必要があります。
必要な工具と部品
-
-
MacBookにBig Sur v11.1以降がインストールされている場合、自動起動を無効にするとうまくいかないことがあります。通常通りに作業を進めることができますが、開口できたらすぐにバッテリーを外してください。
-
P5ドライバーを使って、次のネジを外します。
-
7.9mmネジー2本
-
7.1mmネジー2本
-
2.6mmネジー6本
-
-
-
指先をディスプレイと下部ケースの間に挟んで、Airから下部ケースを上向きに引き上げます。
-
下部ケースを取り出します。
Are there any suggestions to removing the pressure fasteners more easily?
-
-
-
スパッジャーを使って、バッテリーコネクタの下に差し込み、ロジックボードと並行にスライドして、ロジックボード上のソケットからコネクタを外します。
Before the battery can be fully disconnected, the battery disconnect button needs to be held down. There is a gold button just above the battery socket, along with a small LED much like the 12” machines. Once this has been held down and the LED has switched off it is safe to remove the battery.
This seems like an important step?
Also, seems like this should be done after the battery is disconnected, not before? Otherwise, wouldn’t the battery re-charge it?
What if the white LED dosent light up after pressing the yellow button again?
Iron05 -
I just performed this repair on my late 2018 mac air. I did click the gold button but saw no LED illuminated or otherwise. Question- after reassembly does the button get pressed again to connect the battery? Please clarify if this button is to be pressed and if it needs pressing again after the repair.
All said - I pressed again after the battery connector clicked, assembled the back and all worked perfectly. The original issue was one dead port (no charge, no communication). The battery charge lightening bold icon was acting funny too. Genuis bar guy in Naperville said it was likely a logic board too. But it was not. The port was apparently confusing the logic board with regards to the charge function. Thanks Adam for saving me $440 and sending my computer back to Apple. I am 71 yrs young - who says an old dog can’t learn new tricks with good training!!
I didn't see Aaron's comment before completing the battery replacement. Afterwards, the computer would not turn on despite multiple SMC reset procedures. Upon double-checking the comments I see the importance of pressing the gold button. I pressed the gold button before disconnecting the new battery, then pressed it again after reconnecting for good measure. Computer booted!
It would be good of iFixit to add this important step as most people probably don't open up every single comment on (seemingly) simple steps.
Seconding Corey's comment. If paid more attention to the comment section, I would have avoided 15-30 minutes of panic. (BTW I did not notice any LED, but the golden button was easy to find).
Where is the gold button? I replaced my battery and my laptop will not start
-
-
-
スパッジャーの先端をスピーカーケーブルの下に差し込み、まっすぐ持ち上げて、スピーカーの接続を外します。
-
-
-
-
T4トルクスドライバーを使って、オーディオボードのケーブルブラケットを固定している1.4mmネジを3本外します。
-
ケーブルブラケットを取り出します。
-
-
-
次のネジを取り出します。
-
4.3mm T5トルクスネジー2本
-
2.4mm T4トルクスネジー1本
-
-
-
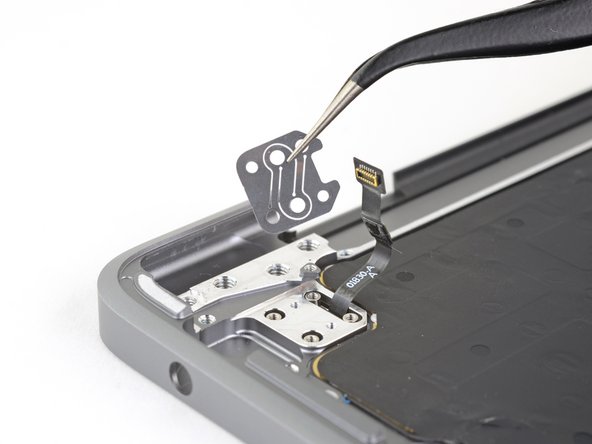
T3トルクスドライバーを使って、Touch IDセンサーとブラケットを固定している1.6mmネジを6本外します。
-
Touch IDブラケットを取り出します。
-


オリジナルのパーツと交換用パーツをよく見比べてください。交換用パーツに付いていない残りのコンポーネントや接着シールなどは、インストールする前に新パーツに移植する必要があります。
デバイスを再組み立てする際は、これらの手順を逆の順番に従って作業を進めてください。
e-wasteを処理する場合は、認可済みリサイクルセンターR2を通じて廃棄してください。
修理が上手く進みませんか?まずはベーシックなトラブルシューティングを試してみるか、このモデルのアンサーコミュニティに尋ねてみましょう。
オリジナルのパーツと交換用パーツをよく見比べてください。交換用パーツに付いていない残りのコンポーネントや接着シールなどは、インストールする前に新パーツに移植する必要があります。
デバイスを再組み立てする際は、これらの手順を逆の順番に従って作業を進めてください。
e-wasteを処理する場合は、認可済みリサイクルセンターR2を通じて廃棄してください。
修理が上手く進みませんか?まずはベーシックなトラブルシューティングを試してみるか、このモデルのアンサーコミュニティに尋ねてみましょう。
6 の人々がこのガイドを完成させました。
以下の翻訳者の皆さんにお礼を申し上げます:
100%

Midori Doiさんは世界中で修理する私たちを助けてくれています! あなたも貢献してみませんか?
翻訳を始める ›

4 件のコメント
Hold on so you can replace the touch id but you wont be able to use it? lol kind of redundant if you ask me.
Can you still use the power button with a touch id replacement?
yes, it will power the machine up!
If the first thing you do is disconnect the battery, is it really an issue if you don’t (or can’t) disable auto-boot?
maccentric - 返信
I agree, why disable Auto-Boot when the lid is closed and the battery is disconnected immediately? – I've never had an issue since 2016 when the feature was introduced.
stevebsiegel - 返信
On my machine, the longest two screws were in the corners, while the other two long screws were in the middle. Perhaps previous service in the past had them replaced into the wrong place? In any case, the longest screws do seem to fit in either place. I guess 0.8mm is not very much of a difference. Seems like poor design if they could have used one size of screw.
johann beda - 返信
Just did one, and it also had longest screws in the corners.
maccentric -
Just did another, and the long ones were in the middle. Definitely poor design and quality control.
maccentric -