必要な工具と部品
-
-
Open the latch that accesses the charging port.
-
Remove the black sticker and remove the screw with the indicated screwdriver.
-
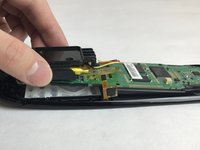
Take the plastic opening tool and run it down the side of the remote to pop the case open.
-
Detach the white clamp to partially disconnect the case from the motherboard.
 FixBotに聞いてみる
-
-
-
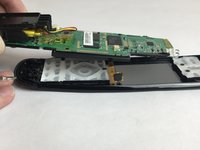
Peel back the thin yellow plastic film and detach the clip found underneath.
-
Remove the screws that connect the motherboard to the case with the suggested screwdriver.
-
-
-
-
Next, carefully remove the motherboard from the top piece of the case by lifting the bottom first, then pulling.
-
-
-
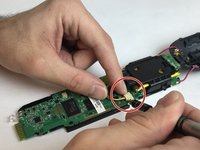
Disconnect the clip that connects the battery to the motherboard.
-
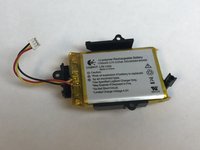
Remove the plastic covering over the battery from the motherboard.
-
If glued to the back of the guard, use the metal spudger to carefully pry the battery off.
-


To reassemble your device, follow these instructions in reverse order.
6 の人々がこのガイドを完成させました。
チーム

USF Tampa, Team S4-G2, Eyestone Fall 2017 USF Tampa, Team S4-G2, Eyestone Fall 2017人のメンバー
USFT-EYESTONE-F17S4G2
4 メンバー
10のガイドは作成済み
3件のガイドコメント
I got it done. It was not clear from the instructions what was supposed to happen with the small circuit board with the USB connector that is also holding the battery case in place. Turns out you need to remove yet another screw and then carefully work the battery case out from under that circuit board, which remains in place.
I spent quite a while looking for the “white clamp” at the end of step 1, I never found it and don’t think it existed on my remote.
I managed to break one of the red wires connected to the charging contact on the bank case, and then managed to break the other one while trying to fix the first one. Fortunately, I hauled out my trusty soldering iron — probably hadn’t used it in 20 years — and soldered both wires back into place.
The battery is charging now and seems to be working! Thanks for the guide.
David Troup - 返信 共有
Is this battery any different from the Logitech Harmony Ultimate One?
bruno kebran - 返信 共有
I think the “white clamp” that David is referring to is the “white connector” that the red arrow is pointing to. My battery was not glued in place but was held in place by double adhesive tape. Of course I reused it. Thank you for the guide.