この修理ガイドは変更されています。最新の未承認バージョンに切り替えます。
はじめに
Lenovoのスクリーンがロードされない場合、ホイールが問題なく回転しているか、ラップトップに”コンピューターに問題が発生ししているため、再起動する必要があります。”のようなエラーメッセージが表示されるブルースクリーンが表示されます。この場合、ハードドライブが損傷している可能性があります。 このガイドでは、損傷または誤動作しているハードドライブの交換方法について説明します。
必要な工具と部品
-
-
次にスパッジャーの先端もしくは指先を使って、キーボードケーブルをコンタクトポートからリボンを押し出して外します。
-
下部アセンブリからキーボードを完全に外します。
Die zwei Schrauben auf der Unterseite müssen vorher gelöst werden. Wer dieser Anleitung folgt, bekommt die Tastatur zwar mit Gewalt raus, hat aber dann sie von der verschraubten Halterung abgerissen.
Danke! Ich hab’s angepasst!
Do not pull on the cable. This is a ZIF connector. You will have to unlock the connector before pulling or prying on the cable. Click on the link for instructions on unlocking ZIF connectors .
Jeff Moore - 返信
-
-
-
#1プラスドライバーを使って、バックパネルに留められた1本の5.0mmネジを外します。
This doesn’t disconnect the optical drive, as that’s located on the other side of the laptop. It disconnects the fan assembly.
yes the correct screw to remove for freeing up the optical drive is on the underside of the laptop, not the one shown which is on the wrong side and is under the keyboard?
-
-
-
ラップトップを裏返して、左上コーナーに搭載された光学ドライバーを確認します。
-
光学CD DVDドライブを軽く引っ張り、デバイス本体から外します。
When you remove the optical drive, you will find two small screws you need to remove as well, in the lip of the optical drive bay
Before removing the optical drive you will need to remove one of the screws on the bottom of the laptop. Assuming you’ve gotten this far, you probably already did that in order to remove the keyboard. If not, then you should just remove all screws from the bottom of the laptop.
-
-
-
-
ラップトップの底面を上向きにします。
-
#1プラスドライバーを使って、バックパネル上の6.0mmネジを10本外します。
-
コンピューターを裏返して、上部が上向きになるようにします。
There are actually 11 of these screws (there are 3 on the right side of the picture, not just 2). Also, there are 2 smaller, flatter screws underneath the optical drive on the left that will need to be removed as well.
-
-
-
ラップトップを裏返して、下部ケースから上部ケースをゆっくりとこじ開けて外します。
Don’t forget to actually remove the Battery cable…
I have difficulty in separating the connection cable from the battery to the motherboard, in the connector of this. Please, I would need some advice to do it without having any problems. Thanks a lot.
-
-
-
バッテリーはラップトップの下部ケースに装着されています。
-
4.0mmネジを2本外します。
-
バッテリーコンポーネントを押し出して、バッテリーを完全に取り出します。
-
-
-
#1ドライバーを使って、本体にハードドライブ アセンブリを固定している4.0mmネジを4本外します。
-
ハードドライブが外れるまで左にスライドさせて、背面パネルからハードドライブを取り出します。
-
ハードドライブ をバックパネルから完全に持ち上げて、取り出します。
-
-
-
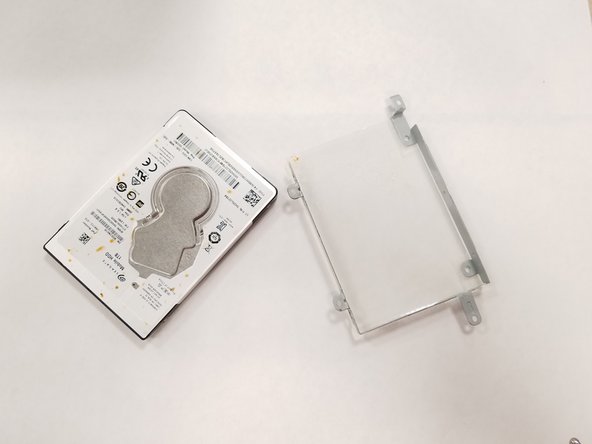
#1プラスドライバーを使って、ハードドライブ のキャディーから3.0mmネジを4本外します。
-
ハードドライブからプラスチックキャディを取り出します。
-


このデバイスを再組み立てするには、インストラクションを逆の順番に従って作業を進めてください。
このデバイスを再組み立てするには、インストラクションを逆の順番に従って作業を進めてください。
6 の人々がこのガイドを完成させました。
以下の翻訳者の皆さんにお礼を申し上げます:
100%

Midori Doiさんは世界中で修理する私たちを助けてくれています! あなたも貢献してみませんか?
翻訳を始める ›

チーム

UW Tacoma, Team S1-G5, Rose Fall 2018 UW Tacoma, Team S1-G5, Rose Fall 2018人のメンバー
UWT-ROSE-F18S1G5
4 メンバー
39のガイドは作成済み
4 件のコメント
I found that two of the screws on the bottom hold down the keyboard, so they need to be unscrewed before the keyboard will come up. Also, there are two “shallow” screws (that become visible after the DVD drive is removed) which need to be removed, and the battery doesn’t really need to be removed to replace the hard drive.
I’ve posted these comments on their associated steps, but it doesn’t hurt to repeat them here: There are 3 screws on the bottom of the laptop holding certain parts in place (keyboard & optical drive). These will need to be removed before doing anything else in this guide, so it’s best to just remove all 11 screws (yes, there are 11, not 10 as stated) from the bottom of the laptop. After removing the optical drive, there will be 2 more screws to remove. The screw underneath the keyboard holds the fan assembly in place, not the optical drive, as they are on opposite sides of the laptop.
Cannot remove optical hard drive following instructions. Does not appear to be removable on my Lenovo Ideapad 110.
There’s a screw which is fixed behind the laptop which is fixed to keyboard.
So first remove all screws on the back panel in step 5.
Suyama Madushan - 返信
There are actually 2 screws on the bottom of the laptop that secure the keyboard. Removing all screws from the bottom of the laptop is still the best thing to do before beginning.
Michael Wiseman - 返信