メインコンテンツにスキップ
リペアコミュニティに参加 - アカウントの作成

LG L1200 External Housing Replacement

必要な工具と部品

  1. LG L1200 External Housing Replacement, Inner LCD Screen: 手順 1、 1の画像 1
    • Make sure you remove the battery by lifting the tab on the back of the phone before opening the case.

    • Flip open the phone and locate the four screw covers.

    FixBotに聞いてみる

    コメントを追加

  2. LG L1200 External Housing Replacement: 手順 2、 1の画像 1
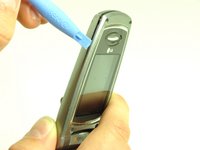
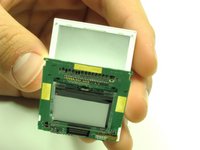
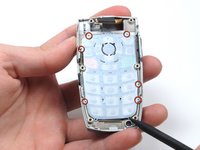
    • Remove all four screw covers by using an IPod opening tool. They should come off relatively easy.

    FixBotに聞いてみる

    コメントを追加

  3. LG L1200 External Housing Replacement: 手順 3、 1の画像 1
    • Using a T6 Torx screwdriver, remove all four screws.

    FixBotに聞いてみる

    コメントを追加

  4. LG L1200 External Housing Replacement: 手順 4、 3の画像 1 LG L1200 External Housing Replacement: 手順 4、 3の画像 2 LG L1200 External Housing Replacement: 手順 4、 3の画像 3
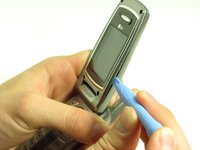
    • Once the screws are removed, use an IPod opening tool to separate the front cover from the inner screen cover.

    • Run the Ipod opening tool down both sides,disconnecting the tabs that hold the covers together.

    FixBotに聞いてみる

    コメントを追加

  5. LG L1200 External Housing Replacement: 手順 5、 2の画像 1 LG L1200 External Housing Replacement: 手順 5、 2の画像 2
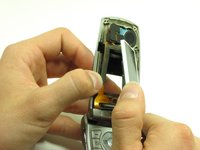
    • Pull the inner screen cover towards you and up in order to separate it from the front cover.

    FixBotに聞いてみる

    コメントを追加

  6. LG L1200 External Housing Replacement: 手順 6、 1の画像 1
    • Remove the tape from the bottom of the LCD screen.

    FixBotに聞いてみる

    コメントを追加

  7. LG L1200 External Housing Replacement: 手順 7、 3の画像 1 LG L1200 External Housing Replacement: 手順 7、 3の画像 2 LG L1200 External Housing Replacement: 手順 7、 3の画像 3
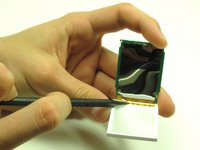
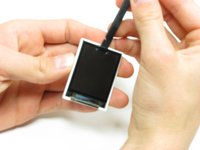
    • Carefully lift the LCD screen and peel it from the gold ribbon. The sticky connection runs all the way around the LCD screen.

    FixBotに聞いてみる

    コメントを追加

  8. LG L1200 External Housing Replacement: 手順 8、 3の画像 1 LG L1200 External Housing Replacement: 手順 8、 3の画像 2 LG L1200 External Housing Replacement: 手順 8、 3の画像 3
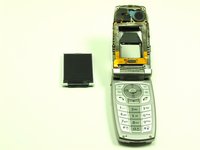
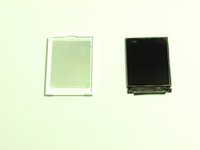
    • Flip the screen over so that you can see the outer LCD screen and the circuit board.

    • Insert spudger in the bottom right corner.

    • Lift up and move the spudger across the bottom.

    • The third photo is rotated 180 degrees.

    FixBotに聞いてみる

    コメントを追加

  9. LG L1200 External Housing Replacement: 手順 9、 2の画像 1 LG L1200 External Housing Replacement: 手順 9、 2の画像 2
    • Use the pointy side of the spudger to peel off the interior tape.

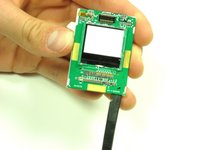
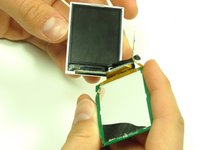
    • Flip the assembly over and peel the circuit board from the screen.

    FixBotに聞いてみる

    コメントを追加

  10. LG L1200 External Housing Replacement: 手順 10、 2の画像 1 LG L1200 External Housing Replacement: 手順 10、 2の画像 2
    • Use the spudger to remove the LCD screen from its backing.

    FixBotに聞いてみる

    コメントを追加

  11. LG L1200 External Housing Replacement, Camera: 手順 11、 1の画像 1
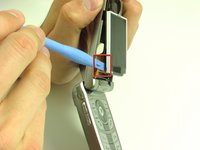
    • Carefully slide the spudger behind the main ribbon in order to separate it from the inside cover of the phone.

    FixBotに聞いてみる

    コメントを追加

  12. LG L1200 External Housing Replacement: 手順 12、 2の画像 1 LG L1200 External Housing Replacement: 手順 12、 2の画像 2
    • Use a spudger to pop off the camera ribbon from the main ribbon. The camera component should separate entirely.

    FixBotに聞いてみる

    コメントを追加

  13. LG L1200 External Housing Replacement, Logic Board: 手順 13、 1の画像 1
    • Make sure you remove the battery by lifting the tab on the back of the phone before opening the case.

    • Poke out rubber covers using a spudger or pointy object, such as a thumb tack.

    FixBotに聞いてみる

    コメントを追加

  14. LG L1200 External Housing Replacement: 手順 14、 1の画像 1
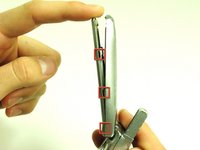
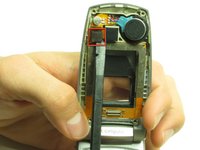
    • Use a T6 torx screwdriver to unscrew the 6 screws that hold the back casing on.

    FixBotに聞いてみる

    コメントを追加

  15. LG L1200 External Housing Replacement: 手順 15、 1の画像 1
    • Use IPod opening tool to separate back housing.

    • There are two tabs located on either side of the phone.

    FixBotに聞いてみる

    コメントを追加

  16. LG L1200 External Housing Replacement: 手順 16、 1の画像 1
    • Separate the back housing from the phone.

    • Be careful not to rip out the wire (highlighted in yellow) when separating the back housing.

    FixBotに聞いてみる

    コメントを追加

  17. LG L1200 External Housing Replacement: 手順 17、 1の画像 1
    • Use a spudger to disconnect antenna wire.

    FixBotに聞いてみる

    コメントを追加

  18. LG L1200 External Housing Replacement: 手順 18、 1の画像 1
    • Use the IPod opening tool to pop out the logic board.

    FixBotに聞いてみる

    コメントを追加

  19. LG L1200 External Housing Replacement: 手順 19、 1の画像 1
    • Use the IPod opening tool to disconnect the main ribbon.

    FixBotに聞いてみる

    コメントを追加

  20. LG L1200 External Housing Replacement: 手順 20、 1の画像 1
    • Once the ribbon is detached, remove the logic board and replace if necessary.

    FixBotに聞いてみる

    コメントを追加

  21. LG L1200 External Housing Replacement, Keypad: 手順 21、 1の画像 1
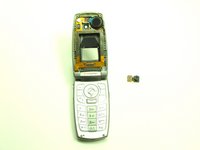
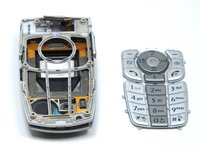
    • The back of the keypad is shown here, next to the logic board (the logic board is turned over to expose the buttons).

    FixBotに聞いてみる

    コメントを追加

  22. LG L1200 External Housing Replacement: 手順 22、 2の画像 1 LG L1200 External Housing Replacement: 手順 22、 2の画像 2
    • Using a spudger, lift the keypad off of the tabs.

    FixBotに聞いてみる

    コメントを追加

  23. LG L1200 External Housing Replacement, External Housing: 手順 23、 1の画像 1
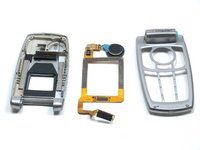
    • Wedge a spudger or another harder prying tool in the connection between the top cover and the bottom cover on the right side.

    • Use a large amount of force to push the top cover off the bottom cover's blue extrusion.

    • Too much force may break the plastic of the top cover

    • When separating the top cover from the bottom cover, be careful not to tear the ribbon as you pull it out from the hinge.

    FixBotに聞いてみる

    コメントを追加

  24. LG L1200 External Housing Replacement: 手順 24、 2の画像 1 LG L1200 External Housing Replacement: 手順 24、 2の画像 2
    • Slide the ribbon out of the slot in the joint on the left side.

    • Pull the ribbon out of the top cover with your hand.

    • Once the ribbon is removed, you can replace the covers.

    FixBotに聞いてみる

    コメントを追加

終わりに

To reassemble your device, follow these instructions in reverse order.

キャンセル: このガイドを終了できませんでした。

作成者

4人の作成者と共同で作成されました。

Joshua Herrmann

メンバー登録日: 04/16/10

8 ポイント

8のガイドは作成済み

チーム

Cal Poly, Team 6-14, Maness Spring 2010 Cal Poly, Team 6-14, Maness Spring 2010人のメンバー

CPSU-MANESS-S10S6G14

4 メンバー

16のガイドは作成済み

0件のガイドコメント

コメントを追加

統計データ:

過去 24時間: 0

過去 7 日: 8

過去 30 日: 46

今までの合計 1,486