はじめに
The hinges on the headset are there to keep the speakers in place. If these hinges break, it can cause the speakers to not stay on your ears and this can be quite annoying. To replace a broken hinge, follow our guide.
必要な工具と部品
-
-
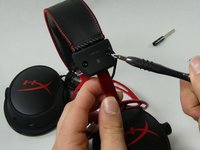
Remove the two screws attaching the hinge to the back side of the speakers with a Philips #1 screwdriver.
 FixBotに聞いてみる
-
-
-
-
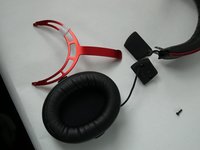
Remove the two screws from the clips attaching the hinges to the headband. This will free the hinge.
-
To replace the other hinge, repeat Steps 1-3 on the other side.
-


To reassemble your device, follow these instructions in reverse order.
3 の人々がこのガイドを完成させました。

チーム

UMass Dartmouth, Team 5-4, Sinclaire Fall 2022 UMass Dartmouth, Team 5-4, Sinclaire Fall 2022人のメンバー
UMASSD-SINCLAIRE-F22S5G4
5 メンバー
8のガイドは作成済み
2件のガイドコメント
you went and posted the screwdriver in the part we need but you didnt include the most important thing the replacement hinge to replace the broken hinge...
I need to change them on my headset. How do i deal with the wire that goes through the plastic part ? Is there some soldering needed ?