はじめに
Use this guide to replace a worn-out or dead battery in your Huawei Watch 3.
If your battery is swollen, take appropriate precautions. For your safety, discharge your battery below 25% before disassembling your device. This reduces the risk of a dangerous thermal event if the battery is accidentally damaged during the repair.
You may need replacement adhesive to reattach components when reassembling the device.
必要な工具と部品
-
-
User your fingernail to pull the small metal pin on each wrist band towards the inside. This unlocks the wrist bands from the body of the watch.
-
Remove the wrist bands.
-
-
-
Use a Torx T3 screwdriver to remove the four 4 mm-long screws on the back of the Huawei Watch 3.
-
-
-
Locate the small notch at the top of the back cover.
-
Use a Jimmy to pry open the back cover by twisting it.
-
-
-
Insert the tip of an opening pick between the back cover and the case.
-
Slide the opening pick around the back cover to loosen the gasket from the back cover.
-
-
-
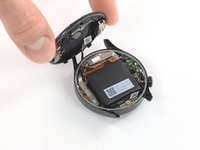
Use an opening pick or your fingers to carefully lift the back cover open.
-
Flip the back cover open away from the crown.
-
-
-
-
Use a Phillips screwdriver to remove the 2.9 mm-long screw from the battery bracket.
-
-
この手順で使用する道具:Tweezers$4.99
-
User a pair of tweezers to lift the top of the battery bracket free from its screw socket.
-
Unhook the opposite side of the bracket and remove it.
-
-
-
Use the tip of a spudger to pry up and disconnect the battery connector.
-
-
-
Use a Phillips screwdriver to remove the 2.9 mm-long screw from the sensor bracket.
-
-
-
User a pair of tweezers to move the top of the sensor bracket free from a small latch near the case by rotating in inwards.
-
Unhook the opposite side of the bracket and remove it.
-
-
-
Use the tip of a spudger to pry up and disconnect the sensor connector.
-
Remove the back cover.
-
-
-
Insert the tip of an opening pick between the battery and the plastic frame opposite to the cables.
-
Use the opening pick to lift the battery up.
-


If possible, turn on your device and test your repair before installing new adhesive and resealing.
Secure the new battery with pre-cut adhesive or double-sided adhesive tape. In order to position it correctly, apply the new adhesive into the device at the places where the old adhesive was located, not directly onto the battery. Press the new battery firmly into place.
To reassemble your device, follow these instructions in reverse order. Apply new adhesive where necessary after cleaning the relevant areas with isopropyl alcohol (>90%).
For optimal performance, calibrate your newly installed battery: Charge it to 100% and keep charging it for at least 2 more hours. Then use your device until it shuts off due to low battery. Finally, charge it uninterrupted to 100%.
Take your e-waste to an R2 or e-Stewards certified recycler.
Repair didn’t go as planned? Try some basic troubleshooting, or ask our Answers community for help.
3 の人々がこのガイドを完成させました。

チーム

Tobias Isakeit - Repairability Engineer Tobias Isakeit - Repairability Engineer人のメンバー
Business
1 メンバー
1,131のガイドは作成済み
4 件のコメント
do you know where can i find the back cover for huawei gt3 pro?
I want to now //
Beste Tobias ik heb een watch 3 waarvan de batterij sneller leegloopt, inmiddels werken de sensors niet meer, dus nieuwe batterij besteld met een toolkit, dat de sensors niet meer werken hoop ik dat door dikker wordende defecte batterij de sensorkabeltje is los gaan zitten, dus duim met me mee dat batterijvervanging de oplossing is en dat het horloge dat in augustus 3 jaar wordt weer leven in wordt geblazen, ik durf zekf vervangen wel aan, prijsopgave Eur 329,00 voor Mediamarkt servicecentrum die motherboard gemujk wil vervangen wegens risico uitnemen batterij
You can do it, Peter–I believe in you.
As long as you are careful with the short cables when opening. Those brackets inside have nifty little hooks, look closely at the images and read the text, this way you’ll be safe.
Keep my fingers crossed for you :)