メインコンテンツにスキップ

Huawei Mate 20 Pro Charging Port with Main Flex Cable Replacement

必要な工具と部品

  1. Huawei Mate 20 Pro Charging Port with Main Flex Cable Replacement, Rear Glass: 手順 1、 1の画像 1
    • Before you begin, switch off your phone.

    • Apply a heated iOpener to the back of the phone to loosen the adhesive beneath the back cover. Apply the iOpener for at least two minutes.

  2. Huawei Mate 20 Pro Charging Port with Main Flex Cable Replacement: 手順 2、 3の画像 1 Huawei Mate 20 Pro Charging Port with Main Flex Cable Replacement: 手順 2、 3の画像 2 Huawei Mate 20 Pro Charging Port with Main Flex Cable Replacement: 手順 2、 3の画像 3
    • Secure a suction handle to the bottom of the back cover, as close to the edge as possible.

    • If the phone's rear glass is cracked, the suction handle may not stick. Try lifting it with strong tape, or superglue the suction handle in place and allow it to cure so you can proceed.

    • Lift the back cover with the suction handle to create a small gap between the cover and the frame.

    • Insert an opening pick into the gap.

    • If you have trouble, apply more heat to further soften the adhesive. Follow the iOpener instructions to avoid overheating.

    • Slide the opening pick to the bottom right corner.

  3. Huawei Mate 20 Pro Charging Port with Main Flex Cable Replacement: 手順 3、 2の画像 1 Huawei Mate 20 Pro Charging Port with Main Flex Cable Replacement: 手順 3、 2の画像 2
    • Insert a second opening pick and slide it to the bottom left corner to cut the adhesive.

    • Leave the opening picks in place to prevent the adhesive from resealing.

  4. Huawei Mate 20 Pro Charging Port with Main Flex Cable Replacement: 手順 4、 3の画像 1 Huawei Mate 20 Pro Charging Port with Main Flex Cable Replacement: 手順 4、 3の画像 2 Huawei Mate 20 Pro Charging Port with Main Flex Cable Replacement: 手順 4、 3の画像 3
    • Insert a third opening pick at the bottom left corner.

    • Slide the tip of the opening pick from the bottom left corner along the side of the phone to cut the adhesive.

    • Leave the opening pick in its place at the top left corner to prevent the adhesive from resealing.

  5. Huawei Mate 20 Pro Charging Port with Main Flex Cable Replacement: 手順 5、 2の画像 1 Huawei Mate 20 Pro Charging Port with Main Flex Cable Replacement: 手順 5、 2の画像 2
    • If the adhesive becomes hard to cut, it has most likely cooled down. Use your iOpener to reheat it.

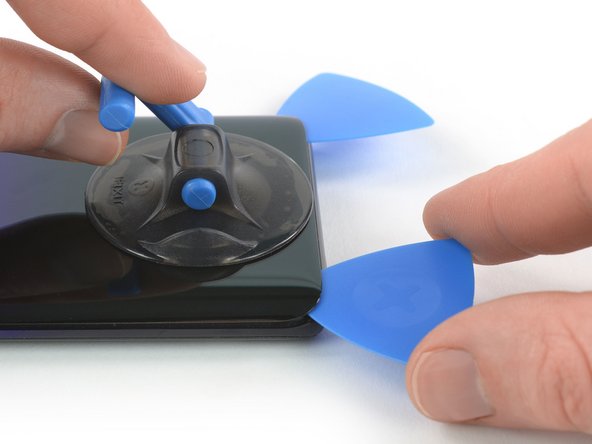
    • Insert a fourth opening pick under the top left corner of the back cover.

    • Slide the opening pick along the top edge of the phone to cut the adhesive.

    • Leave the opening pick in the top right corner to prevent the adhesive from resealing.

  6. Huawei Mate 20 Pro Charging Port with Main Flex Cable Replacement: 手順 6、 2の画像 1 Huawei Mate 20 Pro Charging Port with Main Flex Cable Replacement: 手順 6、 2の画像 2
    • Insert a fifth opening pick at the top right corner of the phone.

    • Slide the opening pick along the right side to cut the remaining adhesive.

  7. Huawei Mate 20 Pro Charging Port with Main Flex Cable Replacement: 手順 7、 2の画像 1 Huawei Mate 20 Pro Charging Port with Main Flex Cable Replacement: 手順 7、 2の画像 2
    • Lift and remove the back cover.

    • Before installing fresh adhesive and reassembling, remove any remaining adhesive from the phone, and clean the glued areas with isopropyl alcohol and a lint-free cloth.

    • During reassembly, this is a good point to power on your phone and test all functions before sealing it up. Be sure to power your phone back down completely before you continue working.

    • Secure the new back cover with pre-cut adhesive or double-sided adhesive tape. After installing the rear glass, apply pressure for several minutes to help the adhesive form a good bond, such as by placing it under a stack of heavy books.

  8. Huawei Mate 20 Pro Charging Port with Main Flex Cable Replacement, Motherboard Cover with NFC & Charging Coil: 手順 8、 1の画像 1
    • Remove the eight Phillips #00 screws (4.3 mm length).

  9. Huawei Mate 20 Pro Charging Port with Main Flex Cable Replacement: 手順 9、 3の画像 1 Huawei Mate 20 Pro Charging Port with Main Flex Cable Replacement: 手順 9、 3の画像 2 Huawei Mate 20 Pro Charging Port with Main Flex Cable Replacement: 手順 9、 3の画像 3
    • Slide an opening pick under the black adhesive at the bottom left of the charging coil.

    • Carefully slide the opening from the left to the right side to loosen the adhesive.

  10. Huawei Mate 20 Pro Charging Port with Main Flex Cable Replacement: 手順 10、 2の画像 1 Huawei Mate 20 Pro Charging Port with Main Flex Cable Replacement: 手順 10、 2の画像 2
    • Insert an opening pick under the bottom left corner of the motherboard cover.

    • Use the opening pick to pry up the motherboard cover.

    • Do not try to remove the motherboard cover all the way yet. The flex cable of the flash assembly is still connected to the motherboard.

  11. Huawei Mate 20 Pro Charging Port with Main Flex Cable Replacement: 手順 11、 2の画像 1 Huawei Mate 20 Pro Charging Port with Main Flex Cable Replacement: 手順 11、 2の画像 2
    • Carefully fold the motherboard cover in the direction of the battery.

    • Take special care to avoid ripping the flash assembly flex cable as it is still connected to the motherboard.

  12. Huawei Mate 20 Pro Charging Port with Main Flex Cable Replacement: 手順 12、 3の画像 1 Huawei Mate 20 Pro Charging Port with Main Flex Cable Replacement: 手順 12、 3の画像 2 Huawei Mate 20 Pro Charging Port with Main Flex Cable Replacement: 手順 12、 3の画像 3
    • Use a spudger to pry up and disconnect the flash assembly flex cable.

    • When you disconnect connectors like these, be careful not to dislodge the small surface-mounted components surrounding the socket.

    • Remove the motherboard cover including the NFC and charging coil.

  13. Huawei Mate 20 Pro Charging Port with Main Flex Cable Replacement, Battery Disconnect: 手順 13、 2の画像 1 Huawei Mate 20 Pro Charging Port with Main Flex Cable Replacement, Battery Disconnect: 手順 13、 2の画像 2
    • Use a spudger to pry up and disconnect the battery connector.

  14. Huawei Mate 20 Pro Charging Port with Main Flex Cable Replacement, Daughterboard Cover: 手順 14、 1の画像 1
    • Remove the three Phillips #00 screws (4.3 mm length).

    • If you want to remove or replace the loudspeaker, daughterboard, battery, or the OLED screen, remove the four Phillips #00 screws (4.3 mm length) which hold down the loudspeaker assembly.

  15. Huawei Mate 20 Pro Charging Port with Main Flex Cable Replacement: 手順 15、 3の画像 1 Huawei Mate 20 Pro Charging Port with Main Flex Cable Replacement: 手順 15、 3の画像 2 Huawei Mate 20 Pro Charging Port with Main Flex Cable Replacement: 手順 15、 3の画像 3
    • Slide an opening pick under the top right corner of the daughterboard cover.

    • Use the opening pick to pry up the daughterboard cover. Remove the daughterboard cover with tweezers.

  16. Huawei Mate 20 Pro Charging Port with Main Flex Cable Replacement, Loudspeaker & Daughterboard: 手順 16、 2の画像 1 Huawei Mate 20 Pro Charging Port with Main Flex Cable Replacement, Loudspeaker & Daughterboard: 手順 16、 2の画像 2
    • Use a Spudger to pry up and disconnect the interconnect flex cable from the daughterboard.

  17. Huawei Mate 20 Pro Charging Port with Main Flex Cable Replacement: 手順 17、 2の画像 1 Huawei Mate 20 Pro Charging Port with Main Flex Cable Replacement: 手順 17、 2の画像 2
    • Use a Spudger to pry up and disconnect the interconnect flex cable from the motherboard.

    • Remove the interconnect flex cable.

  18. Huawei Mate 20 Pro Charging Port with Main Flex Cable Replacement: 手順 18、 2の画像 1 Huawei Mate 20 Pro Charging Port with Main Flex Cable Replacement: 手順 18、 2の画像 2
    • Use a pair of tweezers to pry up and disconnect the connector of the black coax cable from the daughterboard.

    • Unroute the black coax cable from the metal clip on the daughterboard and fold it to the side.

  19. Huawei Mate 20 Pro Charging Port with Main Flex Cable Replacement: 手順 19、 2の画像 1 Huawei Mate 20 Pro Charging Port with Main Flex Cable Replacement: 手順 19、 2の画像 2
    • Slide an opening underneath the top left corner of the loudspeaker cover.

    • Use the opening pick to pry up the loudspeaker and daughterboard assembly.

  20. Huawei Mate 20 Pro Charging Port with Main Flex Cable Replacement: 手順 20、 2の画像 1 Huawei Mate 20 Pro Charging Port with Main Flex Cable Replacement: 手順 20、 2の画像 2
    • Remove the loudspeaker and daughterboard assembly.

  21. Huawei Mate 20 Pro Charging Port with Main Flex Cable Replacement, Charging Port with Main Flex Cable: 手順 21、 2の画像 1 Huawei Mate 20 Pro Charging Port with Main Flex Cable Replacement, Charging Port with Main Flex Cable: 手順 21、 2の画像 2
    • Use a spudger to pry up and disconnect the main flex cable from the motherboard.

  22. Huawei Mate 20 Pro Charging Port with Main Flex Cable Replacement: 手順 22、 2の画像 1 Huawei Mate 20 Pro Charging Port with Main Flex Cable Replacement: 手順 22、 2の画像 2
    • Use a spudger to pry up and disconnect the main flex cable from the left daughterboard.

  23. Huawei Mate 20 Pro Charging Port with Main Flex Cable Replacement: 手順 23、 2の画像 1 Huawei Mate 20 Pro Charging Port with Main Flex Cable Replacement: 手順 23、 2の画像 2
    • Slide the flat end of a spudger under the right side of the main flex cable next to the charging port.

    • Use the spudger to pry up the main flex cable and to lever the charging port out of its recess.

  24. Huawei Mate 20 Pro Charging Port with Main Flex Cable Replacement: 手順 24、 2の画像 1 Huawei Mate 20 Pro Charging Port with Main Flex Cable Replacement: 手順 24、 2の画像 2
    • Remove the main flex cable including the charging port by lifting it upwards and then pulling it in the direction of the motherboard.

終わりに

If possible, turn on your device and test your repair before installing new adhesive and resealing.

To reassemble your device, follow these instructions in reverse order. Apply new adhesive where necessary after cleaning the relevant areas with isopropyl alcohol (>90%).

Take your e-waste to an R2 or e-Stewards certified recycler.

Repair didn’t go as planned? Check out our Answers community for troubleshooting help.

3 の人々がこのガイドを完成させました。

作成者

1人の作成者と共同作成されました。

Dominik Schnabelrauch

メンバー登録日: 11/23/16

201,069 ポイント

682のガイドは作成済み

チーム

iFixit iFixit人のメンバー

Staff

136 メンバー

16,573のガイドは作成済み

3 件のコメント

What width of the Tesa 61395 tape should you use for this phone?

isakmolster - 返信

Hi sar I'm using Huawei mate 20 pro my mobile phone slow charging

haroon ali - 返信

Replaced both battery and USB port. Went well but I cracked the corner of the back case, non issue because I’m using a case but be careful

phillip4x - 返信

コメントを追加

統計データ:

過去 24時間: 18

過去 7 日: 37

過去 30 日: 117

今までの合計 6,239