メインコンテンツにスキップ

Huawei Honor 10 Loudspeaker Unit Removal

必要な工具と部品

  1. Huawei Honor 10 Loudspeaker Unit Removal, Rear Glass: 手順 1、 1の画像 1
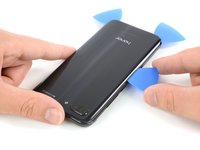
    • Before you begin, switch off your phone.

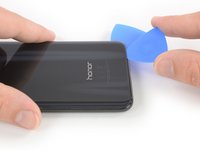
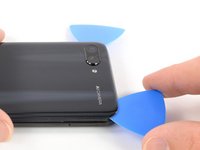
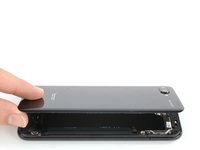
    • Apply a heated iOpener to a long edge of the phone to loosen the adhesive beneath the rear glass. Apply the iOpener for at least two minutes.

  2. Huawei Honor 10 Loudspeaker Unit Removal: 手順 2、 3の画像 1 Huawei Honor 10 Loudspeaker Unit Removal: 手順 2、 3の画像 2 Huawei Honor 10 Loudspeaker Unit Removal: 手順 2、 3の画像 3
    • If the phone's rear glass is cracked, the suction cup may not stick. Try lifting it with strong tape, or superglue the suction cup in place and allow it to cure so you can proceed.

    • Press a suction cup onto the back cover.

    • Lift the back cover's right edge with your suction cup, opening a slight gap between the back cover and the frame.

    • Insert the tip of an opening pick in the gap you created and slide it to the bottom right corner.

  3. Huawei Honor 10 Loudspeaker Unit Removal: 手順 3、 2の画像 1 Huawei Honor 10 Loudspeaker Unit Removal: 手順 3、 2の画像 2
    • Apply more heat if the adhesive becomes hard to cut. During the removal process, the back cover is under tension all the time and is likely to break if the adhesive isn't softened enough.

    • Insert a second opening pick at the bottom right corner of the rear glass.

    • Slide the opening pick along the bottom edge of the rear glass to cut the adhesive and leave it in the bottom left corner.

  4. Huawei Honor 10 Loudspeaker Unit Removal: 手順 4、 3の画像 1 Huawei Honor 10 Loudspeaker Unit Removal: 手順 4、 3の画像 2 Huawei Honor 10 Loudspeaker Unit Removal: 手順 4、 3の画像 3
    • Insert a third opening pick at the bottom left corner of the rear glass.

    • Slide the opening pick along the left edge of the rear glass to cut the adhesive.

    • Leave the opening pick at the top left corner of the rear glass.

  5. Huawei Honor 10 Loudspeaker Unit Removal: 手順 5、 2の画像 1 Huawei Honor 10 Loudspeaker Unit Removal: 手順 5、 2の画像 2
    • Insert a fourth opening pick at the top left corner of the rear glass.

    • Slide the opening along the top edge of the rear glass and cut the remaining adhesive with it.

  6. Huawei Honor 10 Loudspeaker Unit Removal: 手順 6、 2の画像 1 Huawei Honor 10 Loudspeaker Unit Removal: 手順 6、 2の画像 2
    • Carefully lift the rear glass of the Huawei Honor 10 and remove it.

  7. Huawei Honor 10 Loudspeaker Unit Removal, Battery disconnect: 手順 7、 3の画像 1 Huawei Honor 10 Loudspeaker Unit Removal, Battery disconnect: 手順 7、 3の画像 2 Huawei Honor 10 Loudspeaker Unit Removal, Battery disconnect: 手順 7、 3の画像 3
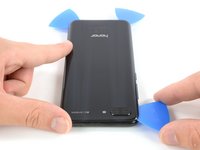
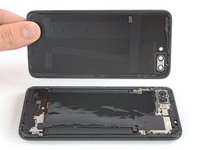
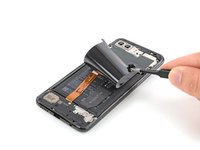
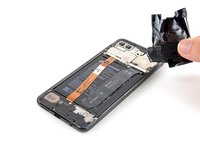
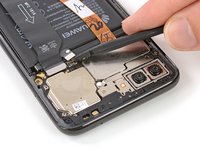
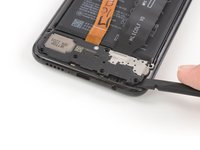
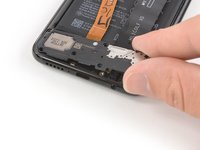
    • Use a pair of tweezer to carefully peel the black foil off the loudspeaker and daughterboard cover.

    • Remove the foil completely.

  8. Huawei Honor 10 Loudspeaker Unit Removal: 手順 8、 1の画像 1
    • Remove the three Phillips #00 screws (2.9 mm length) that secure the metal bracket on top of the battery, interconnect, and display flex cable.

  9. Huawei Honor 10 Loudspeaker Unit Removal: 手順 9、 2の画像 1 Huawei Honor 10 Loudspeaker Unit Removal: 手順 9、 2の画像 2
    • Use a pair of tweezers to remove the metal shield that covers the connectors of the interconnect cable, the battery and the display flex cable.

  10. Huawei Honor 10 Loudspeaker Unit Removal: 手順 10、 2の画像 1 Huawei Honor 10 Loudspeaker Unit Removal: 手順 10、 2の画像 2
    • Use a spudger to pry up and disconnect the battery flex cable.

  11. Huawei Honor 10 Loudspeaker Unit Removal, Loudspeaker Unit: 手順 11、 1の画像 1
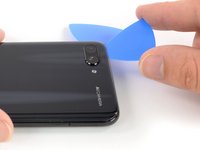
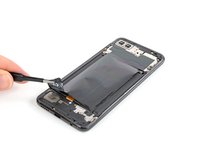
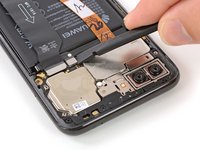
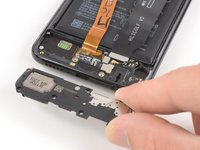
    • Remove the seven Phillips screws securing the loudspeaker unit:

    • Three silver 2.9 mm long screws

    • Four black 3.4 mm long screws

  12. Huawei Honor 10 Loudspeaker Unit Removal: 手順 12、 3の画像 1 Huawei Honor 10 Loudspeaker Unit Removal: 手順 12、 3の画像 2 Huawei Honor 10 Loudspeaker Unit Removal: 手順 12、 3の画像 3
    • There's a little bit of adhesive under the loudspeaker. It's possible to remove the loudspeaker without heating the adhesive but if you're having a hard time removing it, you can use an iOpener to soften the adhesive.

    • Slide the flat end of a spudger under the right side of the loudspeaker unit.

    • Pry up the loudspeaker unit until you can get a good grip.

    • Remove the loudspeaker unit.

終わりに

To reassemble your device, follow these instructions in reverse order.

4 の人々がこのガイドを完成させました。

作成者

3人の作成者と共同で作成されました。

Dominik Schnabelrauch

メンバー登録日: 11/23/16

203,632 ポイント

682のガイドは作成済み

チーム

iFixit iFixit人のメンバー

Staff

135 メンバー

17,153のガイドは作成済み

0 件のコメント

コメントを追加

統計データ:

過去 24時間: 2

過去 7 日: 9

過去 30 日: 21

今までの合計 3,580