メインコンテンツにスキップ

この翻訳は、ソースガイドの最新の更新を反映していない可能性があります。 翻訳の更新に協力してください。 または ソースガイドを参照してください

外付けハードディスク「WD Elements」をシャックする方法

必要な工具と部品

  1. 外付けハードディスク「WD Elements」をシャックする方法, エンクロージャークリップの位置を特定します: 手順 1、 2の画像 1 外付けハードディスク「WD Elements」をシャックする方法, エンクロージャークリップの位置を特定します: 手順 1、 2の画像 2
    • 分解する前に、必ずドライブの電源を切り、プラグを抜いてください

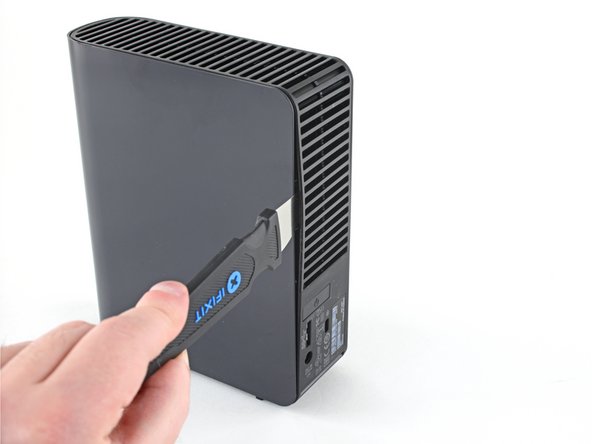
    • 外部エンクロージャーカバーは、内側から4つのプラスチッククリップでベントフレームに取り付けられています。次のステップに進む前に、その位置をメモしておいてください。

  2. この手順は未翻訳です。 翻訳を手伝う。

    外付けハードディスク「WD Elements」をシャックする方法: 手順 2、 2の画像 1 外付けハードディスク「WD Elements」をシャックする方法: 手順 2、 2の画像 2
    • Insert a Jimmy into the seam between the frame and the cover on one side of the drive, roughly halfway between the top and bottom.

    • You may need to wiggle the Jimmy in order to slide it in between the frame and the cover.

  3. この手順は未翻訳です。 翻訳を手伝う。

    外付けハードディスク「WD Elements」をシャックする方法: 手順 3、 3の画像 1 外付けハードディスク「WD Elements」をシャックする方法: 手順 3、 3の画像 2 外付けハードディスク「WD Elements」をシャックする方法: 手順 3、 3の画像 3
    • With the Jimmy inserted in between the frame and cover, pry the frame outward to release the bottom clip.

    • Take care not to pry too forcefully, as that may break the enclosure.

    • If you're having trouble releasing the clips, slide the Jimmy closer to the clip and try again.

  4. この手順は未翻訳です。 翻訳を手伝う。

    外付けハードディスク「WD Elements」をシャックする方法: 手順 4、 2の画像 1 外付けハードディスク「WD Elements」をシャックする方法: 手順 4、 2の画像 2
    • Slide the Jimmy up along the seam and pry the frame outward to release the top plastic clip.

  5. この手順は未翻訳です。 翻訳を手伝う。

    外付けハードディスク「WD Elements」をシャックする方法: 手順 5、 2の画像 1 外付けハードディスク「WD Elements」をシャックする方法: 手順 5、 2の画像 2
    • Repeat steps 2-4 on the other side of the enclosure.

    • Take care not to pry too forcefully, as that may break the enclosure.

    • If you're having trouble releasing the clips, slide the Jimmy closer to the clip and try again.

  6. この手順は未翻訳です。 翻訳を手伝う。

    外付けハードディスク「WD Elements」をシャックする方法: 手順 6、 3の画像 1 外付けハードディスク「WD Elements」をシャックする方法: 手順 6、 3の画像 2 外付けハードディスク「WD Elements」をシャックする方法: 手順 6、 3の画像 3
    • Slide the cover straight off the frame to remove it.

  7. この手順は未翻訳です。 翻訳を手伝う。

    外付けハードディスク「WD Elements」をシャックする方法: 手順 7、 2の画像 1 外付けハードディスク「WD Elements」をシャックする方法: 手順 7、 2の画像 2
    • Slide the LED light guide out of the LED slot on the drive's controller board.

  8. この手順は未翻訳です。 翻訳を手伝う。

    外付けハードディスク「WD Elements」をシャックする方法: 手順 8、 3の画像 1 外付けハードディスク「WD Elements」をシャックする方法: 手順 8、 3の画像 2 外付けハードディスク「WD Elements」をシャックする方法: 手順 8、 3の画像 3
    • Grab the end of the LED light guide and slide it completely out of the frame to remove it.

  9. この手順は未翻訳です。 翻訳を手伝う。

    外付けハードディスク「WD Elements」をシャックする方法: 手順 9、 3の画像 1 外付けハードディスク「WD Elements」をシャックする方法: 手順 9、 3の画像 2 外付けハードディスク「WD Elements」をシャックする方法: 手順 9、 3の画像 3
    • Use your hands to push on the four rubber blocks in the corners to unseat the hard drive from the frame.

    • Slowly push one or two blocks out at a time until the hard drive is completely unseated from the frame.

  10. この手順は未翻訳です。 翻訳を手伝う。

    外付けハードディスク「WD Elements」をシャックする方法: 手順 10、 2の画像 1 外付けハードディスク「WD Elements」をシャックする方法: 手順 10、 2の画像 2
    • Remove the hard drive from the frame.

  11. この手順は未翻訳です。 翻訳を手伝う。

    外付けハードディスク「WD Elements」をシャックする方法: 手順 11、 2の画像 1 外付けハードディスク「WD Elements」をシャックする方法: 手順 11、 2の画像 2
    • Remove the rubber blocks from the hard drive if they're still attached—some of them may have already fallen off when you removed the hard drive.

  12. この手順は未翻訳です。 翻訳を手伝う。

    外付けハードディスク「WD Elements」をシャックする方法: 手順 12、 3の画像 1 外付けハードディスク「WD Elements」をシャックする方法: 手順 12、 3の画像 2 外付けハードディスク「WD Elements」をシャックする方法: 手順 12、 3の画像 3
    • Use a Phillips screwdriver to remove the 8.5 mm-long screw securing the small controller board metal bracket to the hard drive.

    • Remove the metal bracket.

  13. この手順は未翻訳です。 翻訳を手伝う。

    外付けハードディスク「WD Elements」をシャックする方法: 手順 13、 3の画像 1 外付けハードディスク「WD Elements」をシャックする方法: 手順 13、 3の画像 2 外付けハードディスク「WD Elements」をシャックする方法: 手順 13、 3の画像 3
    • Use a Phillips screwdriver to remove the 8.5 mm-long screw securing the controller board to the hard drive.

    • Slide the controller board straight off the end of the hard drive to remove it.

    • There will be a bit of resistance when removing this board, since it's connected to the hard drive's SATA and power connectors.

  14. この手順は未翻訳です。 翻訳を手伝う。

    外付けハードディスク「WD Elements」をシャックする方法: 手順 14、 2の画像 1 外付けハードディスク「WD Elements」をシャックする方法: 手順 14、 2の画像 2
終わりに

筐体および付属の部品やネジ類は、保証期間が終了するまで必ず保管してください。その後、R2またはe-Stewards認定リサイクル業者に持ち込んでください。また、r/DataHoarderの人たちに再利用のために提供することもできます。

ドライブとエンクロージャを再組み立てするには、以下の手順に従います(逆順)。

52 の人々がこのガイドを完成させました。

以下の翻訳者の皆さんにお礼を申し上げます:

en jp

18%

これらの翻訳者の方々は世界を修理する私たちのサポートをしてくれています。 あなたも貢献してみませんか?
翻訳を始める ›

Craig Lloyd

メンバー登録日: 02/10/16

35,519 ポイント

82のガイドは作成済み

15 件のコメント

Can you recommend a Mac program for running a deep scan to check for bad sectors?

This article only gives two recommendations and they’re both for Windows :(

Martin - 返信

Disk drill (not free but hey... works well)

JeanJean -

I have a question. Is it possible to take a similar drive but smaller capacity like this about and turn it into a portable drive from it having to have a power supply?

Louis Wilson - 返信

It is not possible. The problem is that a 3.5” disk drive (as used in the Elements drive) needs 12 V as well as 5 V, and they need more power than a USB socket can typically deliver. 2.5” disk drives operate from just a 5 V supply, and, having smaller disks inside, they use less power to start up, so they can be run completely through USB.

Andrew Morton -

Hi Craig! My PC sees it as Local Disc (E:) and wants to format it. Can’t do that! Is there a workaround? This was due to a power surge and I think it was just the adaptor power supply that got damaged. Running W10Home21H1 on Lenovo DESKTOP-699CIMO. Intel(R) Core(TM) i7-4790 CPU @ 3.60GHz 3.60 GHz 16,0GB 64bits Any ideas would be greatly appreciated! Cheers, Marco

Marco66 - 返信

コメントを追加

統計データ:

過去 24時間: 59

過去 7 日: 451

過去 30 日: 2,247

今までの合計 141,248