メインコンテンツにスキップ
リペアコミュニティに参加 - アカウントの作成

Hard Drive

必要な工具と部品

  1. Hard Drive, Battery: 手順 1、 1の画像 1
    • Before proceeding, power down your Laptop and remove the power cable.

    • Close the display and lay it on a flat surface, top-side down.

  2. Hard Drive: 手順 2、 1の画像 1
    • Unlock the battery by sliding the battery lock to the unlock part.

  3. Hard Drive: 手順 3、 1の画像 1
    • Slide the middle lock to the right and the battery will pop up.

  4. Hard Drive: 手順 4、 1の画像 1
    • If you want to replace the battery and nothing else then now is the time to do so.

    • Once the battery hatch is unlocked you can now safely remove the battery.

  5. Hard Drive, Hard Drive: 手順 5、 1の画像 1
    • Use a Philips J1 driver to remove two screws securing the hard drive cover.

  6. Hard Drive: 手順 6、 1の画像 1
    • If the hard drive is not located here, then it will be located in the next step.

    • Now you can remove, replace or upgrade the hard drive to an SSD if you need to.

  7. Hard Drive: 手順 7、 1の画像 1
    • If your hard drive was not located in the previous spot or you have two drives then this one is located here.

    • Use a Philips J1 driver to remove eight screws securing the bottom case.

  8. Hard Drive: 手順 8、 1の画像 1
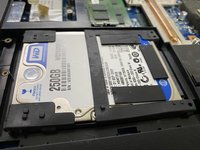
    • After removing the bottom panel cover, then you should spot the hard drive right here.

  9. Hard Drive: 手順 9、 2の画像 1 Hard Drive: 手順 9、 2の画像 2
    • While removing the hard drive, try to be gentle.

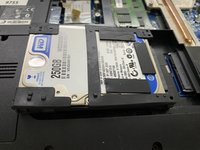
    • Now you can simply upgrade, replace or remove the hard drive right here. To remove it, push it from the two corners and it should come off like in the next picture.

終わりに

To reassemble your device, follow these instructions in reverse order.

ある他の人がこのガイドを完成しました。

作成者

1人の作成者と共同作成されました。

Regome

メンバー登録日: 01/20/23

794 ポイント

7のガイドは作成済み

0件のガイドコメント

コメントを追加

統計データ:

過去 24時間: 1

過去 7 日: 7

過去 30 日: 33

今までの合計 265