メインコンテンツにスキップ
リペアコミュニティに参加 - アカウントの作成

HTC One Mini 2 Back Plate Replacement

必要な工具と部品

    1. HTC One Mini 2 Back Plate Replacement, Sim and MicroSD Card: 手順 1、 3の画像 1 HTC One Mini 2 Back Plate Replacement, Sim and MicroSD Card: 手順 1、 3の画像 2 HTC One Mini 2 Back Plate Replacement, Sim and MicroSD Card: 手順 1、 3の画像 3
      • Insert the end of a paper clip into the holes on each side of the phone to eject the SIM card and Micro SD card.

      • Set the cardholders aside.

      FixBotに聞いてみる

      コメントを追加

    2. HTC One Mini 2 Back Plate Replacement: 手順 2、 1の画像 1
      • Heat up the top grey speaker plate with the iFixit iOpener for two minutes.

      FixBotに聞いてみる

      コメントを追加

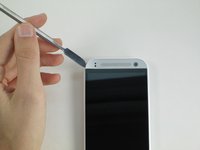
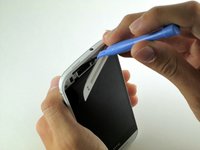
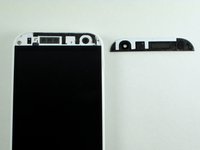
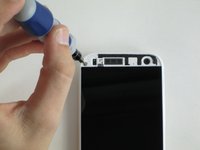
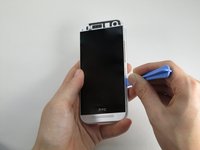
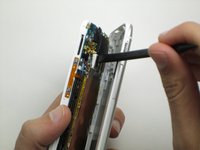
    3. HTC One Mini 2 Back Plate Replacement, Front Plate: 手順 3、 3の画像 1 HTC One Mini 2 Back Plate Replacement, Front Plate: 手順 3、 3の画像 2 HTC One Mini 2 Back Plate Replacement, Front Plate: 手順 3、 3の画像 3
      • Use a metal spudger to pry up the left edge of the upper grey front plate.

      • Place the spudger between the inside white plastic edge and the grey plate. Do not pry between the two white plastic frames.

      • Don’t pry against the glass. Pry against only the left side as there is a delicate antenna under the plate.

      • Use the narrow plastic pry tool to carefully separate the black ribbon antenna from the grey plate.

      FixBotに聞いてみる

      コメントを追加

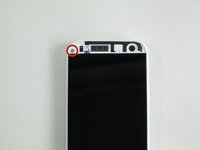
    4. HTC One Mini 2 Back Plate Replacement: 手順 4、 2の画像 1 HTC One Mini 2 Back Plate Replacement: 手順 4、 2の画像 2
      • Remove the 2mm screw with a T5 torx screwdriver head from the iFixit tool kit.

      FixBotに聞いてみる

      コメントを追加

    5. HTC One Mini 2 Back Plate Replacement: 手順 5、 2の画像 1 HTC One Mini 2 Back Plate Replacement: 手順 5、 2の画像 2
      • Use the plastic pry tool to pry around the edge of the phone.

      • Pry carefully around the card slots.

      • Slowly pull up from the right side of the screen like opening a book.

      • The plastic piece for the power button may fall out. Set it aside for reassembly.

      • Use the plastic spudger to peel the foam adhesive around the camera away from the back plate.

      FixBotに聞いてみる

      コメントを追加

終わりに

To reassemble your device, follow these instructions in reverse order.

キャンセル: このガイドを終了できませんでした。

5 の人々がこのガイドを完成させました。

作成者

4人の作成者と共同で作成されました。

Caleb Kelsay

メンバー登録日: 10/14/14

590 ポイント

1ガイドが承認済み

チーム

Cal Poly, Team 4-48, Amido Fall 2014 Cal Poly, Team 4-48, Amido Fall 2014人のメンバー

CPSU-AMIDO-F14S4G48

5 メンバー

84のガイドは作成済み

1件のガイドコメント

what is the black ribbon antenna on the front

deancvijic90 - 返信 共有

コメントを追加

統計データ:

過去 24時間: 1

過去 7 日: 8

過去 30 日: 38

今までの合計 10,857