メインコンテンツにスキップ

HP Pavilion 15-cc123cl Keyboard Replacement

必要な工具と部品

  1. HP Pavilion 15-cc123cl Keyboard Replacement, Back Cover: 手順 1、 1の画像 1
    • Make sure to power off the laptop before proceeding with the guide.

    • Turn the laptop over so the back is facing up. Use a Phillips #0 screwdriver to remove the 11 screws from the bottom cover. Rotate the screws counter-clockwise.

    • Eight 5mm screws.

    • Three 10mm screws.

  2. HP Pavilion 15-cc123cl Keyboard Replacement: 手順 2、 3の画像 1 HP Pavilion 15-cc123cl Keyboard Replacement: 手順 2、 3の画像 2 HP Pavilion 15-cc123cl Keyboard Replacement: 手順 2、 3の画像 3
    • Gently remove the CD-ROM drive by using a plastic opening tool and sliding it out of the laptop housing.

    • Using the opening tool, gently pry open the back panel of the laptop. Slowly work around the edge of the laptop with gentle pressure.

    • Remove the back cover from the laptop.

  3. HP Pavilion 15-cc123cl Keyboard Replacement, Battery: 手順 3、 3の画像 1 HP Pavilion 15-cc123cl Keyboard Replacement, Battery: 手順 3、 3の画像 2 HP Pavilion 15-cc123cl Keyboard Replacement, Battery: 手順 3、 3の画像 3
    • Remove the six 5mm screws securing the battery using the Phillips #0 screwdriver.

    • Gently disconnect the battery from the motherboard with a plastic opening tool and remove it from the device.

    • If you're installing a new battery, you should calibrate it after installation.

    • Charge it to 100% and continue to charge it for an additional two hours. Next, unplug the charger and use the laptop normally to completely drain the battery. Wait at least five hours and recharge the battery to 100%.

  4. HP Pavilion 15-cc123cl Keyboard Replacement, Hard Drive: 手順 4、 2の画像 1 HP Pavilion 15-cc123cl Keyboard Replacement, Hard Drive: 手順 4、 2の画像 2
    • Use the iFixit opening tool to pry out the hard drive.

    • Do not completely remove the hard drive yet since it is still connected to the ribbon.

  5. HP Pavilion 15-cc123cl Keyboard Replacement: 手順 5、 3の画像 1 HP Pavilion 15-cc123cl Keyboard Replacement: 手順 5、 3の画像 2 HP Pavilion 15-cc123cl Keyboard Replacement: 手順 5、 3の画像 3
    • Disconnect the ribbon cable connecting the hard drive to the motherboard.

    • Remove the hard drive from the device.

  6. HP Pavilion 15-cc123cl Keyboard Replacement, RAM: 手順 6、 2の画像 1 HP Pavilion 15-cc123cl Keyboard Replacement, RAM: 手順 6、 2の画像 2
    • Release the metal tabs on each side of the RAM module by pushing each tab away from the module simultaneously .

    • The metal tabs secure the RAM stick in place and will allow you to pull the RAM stick up.

  7. HP Pavilion 15-cc123cl Keyboard Replacement: 手順 7、 2の画像 1 HP Pavilion 15-cc123cl Keyboard Replacement: 手順 7、 2の画像 2
    • Once the metal tabs are released, it'll cause the RAM module to "pop" up.

    • Pull the RAM module directly out of its connector.

    • If there are two RAM modules installed, repeat the above procedure for the second module.

  8. HP Pavilion 15-cc123cl Keyboard Replacement, Keyboard: 手順 8、 1の画像 1
    • Remove the four screws securing the motherboard using the Phillips #0 screwdriver.

  9. HP Pavilion 15-cc123cl Keyboard Replacement: 手順 9、 3の画像 1 HP Pavilion 15-cc123cl Keyboard Replacement: 手順 9、 3の画像 2 HP Pavilion 15-cc123cl Keyboard Replacement: 手順 9、 3の画像 3
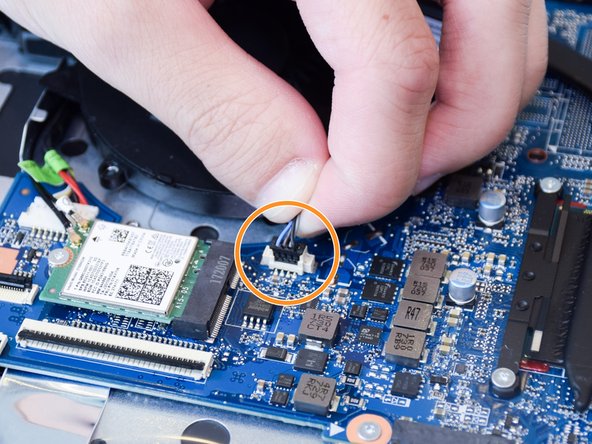
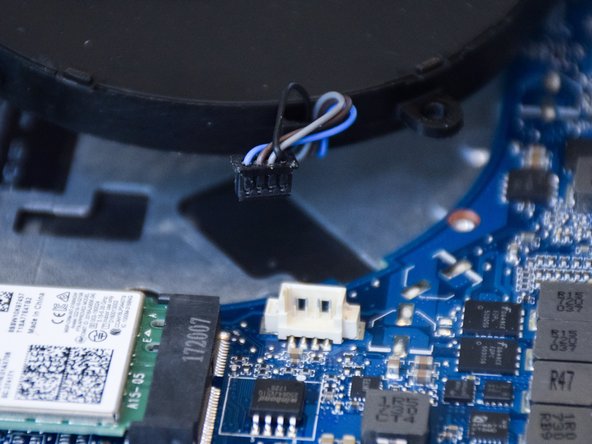
    • Remove the three screws securing the fan to the motherboard using the Phillips #0 screwdriver.

    • Unplug the cables that run from the fan to the motherboard and remove the fan.

  10. HP Pavilion 15-cc123cl Keyboard Replacement: 手順 10、 3の画像 1 HP Pavilion 15-cc123cl Keyboard Replacement: 手順 10、 3の画像 2 HP Pavilion 15-cc123cl Keyboard Replacement: 手順 10、 3の画像 3
    • Remove the four ribbon cables attached to the motherboard by lifting the black clip.

  11. HP Pavilion 15-cc123cl Keyboard Replacement: 手順 11、 3の画像 1 HP Pavilion 15-cc123cl Keyboard Replacement: 手順 11、 3の画像 2 HP Pavilion 15-cc123cl Keyboard Replacement: 手順 11、 3の画像 3
    • Remove the wires attached to the WiFi card.

    • Pull the wires straight and directly parallel to the motherboard.

  12. HP Pavilion 15-cc123cl Keyboard Replacement: 手順 12、 1の画像 1
    • Pull the motherboard back and up in order to remove it without it getting caught by the innards of the outlets on the side of the laptop.

  13. HP Pavilion 15-cc123cl Keyboard Replacement: 手順 13、 1の画像 1
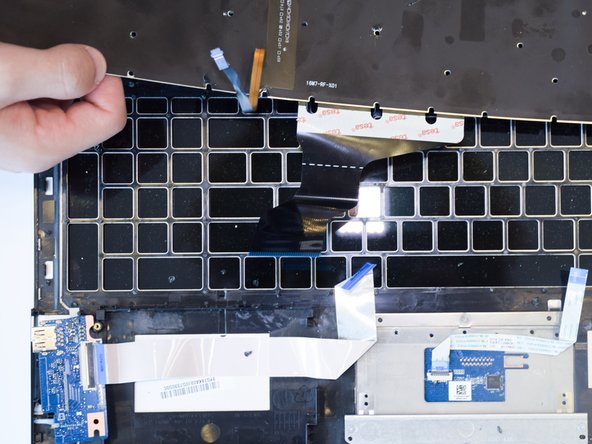
    • Lift the silver plating from the back of the keyboard enough so that the keyboard is visible.

    • It does not need to be completely removed from the hinges of the computer.

  14. HP Pavilion 15-cc123cl Keyboard Replacement: 手順 14、 2の画像 1 HP Pavilion 15-cc123cl Keyboard Replacement: 手順 14、 2の画像 2
    • Grab the corner of the keyboard, then lift and remove the keyboard from the computer.

終わりに

To reassemble your device, follow these instructions in reverse order.

ある他の人がこのガイドを完成しました。

作成者

3人の作成者と共同で作成されました。

Josiah Soto

メンバー登録日: 09/16/19

169 ポイント

1ガイドが承認済み

チーム

0 件のコメント

コメントを追加

統計データ:

過去 24時間: 0

過去 7 日: 7

過去 30 日: 28

今までの合計 1,824