メインコンテンツにスキップ

HP Chromebook 11 G4 Keyboard Replacement

必要な工具と部品

  1. HP Chromebook 11 G4 Keyboard Replacement, Keyboard: 手順 1、 1の画像 1
    • Position the closed Chromebook with the rubber pads are facing up.

  2. HP Chromebook 11 G4 Keyboard Replacement: 手順 2、 2の画像 1 HP Chromebook 11 G4 Keyboard Replacement: 手順 2、 2の画像 2
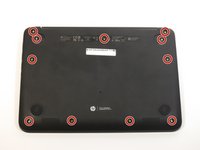
    • Slide the flat end of the spudger under the rubber pads at the upper right-hand and the upper left-hand corners.

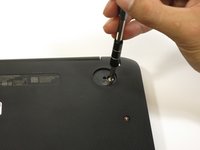
    • Pry off the rubber pads to reveal a screw under each pad.

    • The rubber pads are attached with a strong adhesive. The force applied may damage the pads.

  3. HP Chromebook 11 G4 Keyboard Replacement: 手順 3、 2の画像 1 HP Chromebook 11 G4 Keyboard Replacement: 手順 3、 2の画像 2
    • Remove the eleven 6mm Phillips #1 screws.

  4. HP Chromebook 11 G4 Keyboard Replacement: 手順 4、 1の画像 1
    • Flip over the Chromebook and open it.

  5. HP Chromebook 11 G4 Keyboard Replacement: 手順 5、 2の画像 1 HP Chromebook 11 G4 Keyboard Replacement: 手順 5、 2の画像 2
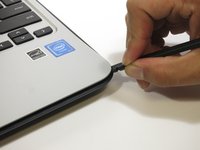
    • Insert the flat end of the spudger between the bottom body of the Chromebook and keyboard body.

    • Slide the spudger along the gap, applying downward pressure to separate the two components.

    • You should hear popping sounds as you slide the spudger along the edge.

    • If the spudger gets stuck while sliding, simply slide the spudger back for a bit, and continue sliding forward.

  6. HP Chromebook 11 G4 Keyboard Replacement: 手順 6、 1の画像 1
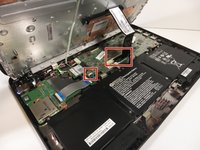
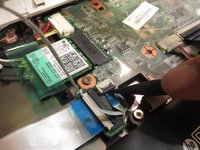
    • Lift the bottom of the keyboard assembly to reveal the internal components of the device.

  7. HP Chromebook 11 G4 Keyboard Replacement: 手順 7、 3の画像 1 HP Chromebook 11 G4 Keyboard Replacement: 手順 7、 3の画像 2 HP Chromebook 11 G4 Keyboard Replacement: 手順 7、 3の画像 3
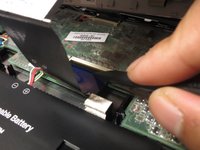
    • Use the pointed end of the spudger to flip up the black tabs on the two ZIF connectors located on the motherboard.

    • Disconnect the ribbon cables from the motherboard by gently sliding them out of their sockets.

  8. HP Chromebook 11 G4 Keyboard Replacement: 手順 8、 1の画像 1
    • Remove the keyboard assembly by lifting it off the laptop base.

終わりに

To reassemble your device, follow these instructions in reverse order.

3 の人々がこのガイドを完成させました。

作成者

5人の作成者と共同で作成されました。

Jair Herrera

メンバー登録日: 04/26/17

694 ポイント

4のガイドは作成済み

チーム

Cal Poly, Team S16-G5, Banghart Winter 2018 Cal Poly, Team S16-G5, Banghart Winter 2018人のメンバー

CPSU-BANGHART-W18S16G5

5 メンバー

15のガイドは作成済み

3 件のコメント

How do you remove the keyboard from the assembly though? And I wish there was a mention of the fact that the heat sink is attached to the keyboard assembly.

Kyle B - 返信

Same question as the person above. I need to remove the keyboard from the assembly.

Stephen Mason - 返信

If you look up the parts you'll see that the entire top panel and keyboard are one assembly.

Nacho Biniz - 返信

コメントを追加

統計データ:

過去 24時間: 0

過去 7 日: 3

過去 30 日: 20

今までの合計 9,126