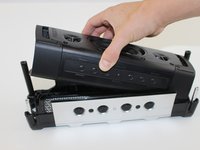
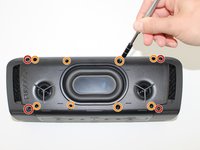
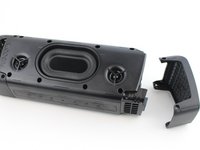
メインコンテンツにスキップ

Fugoo Tough XL Case Replacement

必要な工具と部品

  1. Fugoo Tough XL Case Replacement, Case: 手順 1、 1の画像 1
    • Remove the four 3 mm screws located in each corner using a 3 mm Hex screwdriver.

  2. Fugoo Tough XL Case Replacement: 手順 2、 2の画像 1 Fugoo Tough XL Case Replacement: 手順 2、 2の画像 2
    • Gently pull up and off the outer casing.

    • Do not feel afraid to use a bit of force if necessary.

  3. Fugoo Tough XL Case Replacement: 手順 3、 2の画像 1 Fugoo Tough XL Case Replacement: 手順 3、 2の画像 2
    • Remove the internal device from the outer casing.

    • Remove the four 12 mm screws on each corner using a T10 Torx screwdriver.

    • Remove the eight 6 mm screws on the top and bottom using a T10 Torx screwdriver.

  4. Fugoo Tough XL Case Replacement: 手順 4、 3の画像 1 Fugoo Tough XL Case Replacement: 手順 4、 3の画像 2 Fugoo Tough XL Case Replacement: 手順 4、 3の画像 3
    • Use your hands to gently remove the side plates.

    • Use an opening tool to pry off the back plate with the Fugoo trademark.

  5. Fugoo Tough XL Case Replacement: 手順 5、 1の画像 1
    • Slowly pull the front casing from the back casing. Avoid putting any tension on the connected cables.

    • Separate the two slowly and consistently to avoid damaging the speaker cables.

終わりに

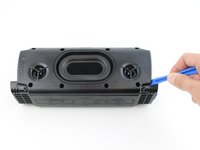
To reassemble your device, follow these instructions in reverse order.

ある他の人がこのガイドを完成しました。

作成者

8人の作成者と共同で作成されました。

Abdul

メンバー登録日: 02/17/17

527 ポイント

4のガイドは作成済み

チーム

USF Tampa, Team S19-G1, Hoffman Spring 2017 USF Tampa, Team S19-G1, Hoffman Spring 2017人のメンバー

USFT-HOFFMAN-S17S19G1

4 メンバー

5のガイドは作成済み

0 件のコメント

コメントを追加

統計データ:

過去 24時間: 2

過去 7 日: 4

過去 30 日: 7

今までの合計 937