この翻訳は機械によって生成されたものであり、まだ人間による校正は行われていません。 日本語を話せますか? レビューはこちらから。
はじめに
この詳細なガイドでは、Flip Mino HDのバッテリーを交換するための具体的な手順を説明します。バッテリーにアクセスするために必要なロジックボードの取り外しには、はんだ付けステーションの使用が推奨されますが、ピンセットを慎重かつ繊細に扱うことで代用も可能です。注意深く進め、すべての部品を安全な場所に保管してください。修理を楽しんでください。
必要な工具と部品
-
-
この手順で使用する道具:Tweezers$4.99
-
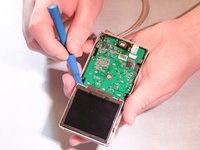
プラスチック製オープニングツールを使い、各縁に沿って慎重にツールをスライドさせて持ち上げ、フロントケースをデバイスから優しくこじ開けて外します。
-
ケースが外れたら、デバイスの上側にひっくり返します。ケースはまだデバイスに接続されていることに注意してください。
-
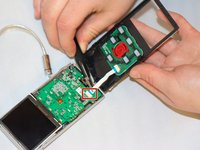
ピンセットを使い、接続ストリップを引っ張ってロジックボードのソケットから外します。
-
-
-
-
-
オープニングツールを使用して、ディスプレイ画面の各角を優しく持ち上げ、ソケットから取り外します。ディスプレイ画面をマザーボード側に折り返しますが、まだ接続されている状態にします。
-
スパッジャーを使用して、ディスプレイブラケットの下にあるフィルムを優しく持ち上げて剥がします。剥がしたフィルムは脇に置いておきます。
-
オープニングツールを使用して、金属製のディスプレイブラケットを優しくこじ開けて外します。
-
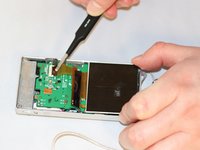
爪を使用して、ZIFソケットの黒いテープを上にこじ開け、部分的に取り付けられているディスプレイ画面を取り外します。
-
-
この手順で使用する道具:Tweezers$4.99
-
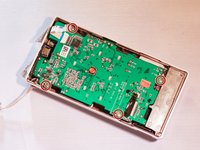
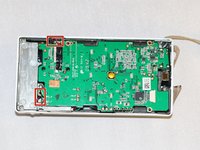
プラスドライバー 000 を使用して、マザーボードを外側のケースに固定している4本のネジを外し、安全な場所に置いてください。
-
はんだ付けステーションを準備します。ステーションで、マザーボードから両方のマイクのリード線をはんだ除去してください。
-
ピンセットでリード線を優しく引きながら、はんだごて先で接合部を加熱します。4本すべてのマイクのリード線に対してこれを行ってください。
-
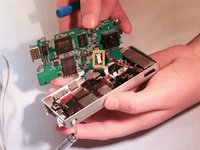
ケースとマザーボードがまだコードでつながっていることに注意しながら、マザーボードをケースからゆっくりとこじ開けます。USBケーブルをバッテリーに固定している小さな黒いテープを剥がしてください。
-
ピンセットを使って、USBリボンケーブルのコネクタをソケットから引き抜きます。ロジックボードのソケットからバッテリーコネクタを引き抜いてください。これでマザーボードが外れ、取り外せるようになります。
-
-
-
-
-
プラスドライバー 000 を使い、バッテリーを外ケースに固定している2本の小さなネジを外して安全な場所に保管します。
-
オープニングツールを使い、バッテリーをこじ開けて外します。これでバッテリーの取り外しが完了です。
-
-


 FixBotに聞いてみる






デバイスを再組み立てするには、これらのインストラクションを逆の順番に従って作業を進めてください。
9 の人々がこのガイドを完成させました。

チーム

Eastern Washington University, Team 2-1, Andersen Winter 2016 Eastern Washington University, Team 2-1, Andersen Winter 2016人のメンバー
EWU-ANDERSEN-W16S2G1
4 メンバー
60のガイドは作成済み
5件のガイドコメント
Hello ! I want to ask a question that my flip mino hd turns on properly but when i press the recording button to record video my flip mino hd turns off suddenly..and it also recharges normally...please help me ..if any one has a solution must tell me!
In Step 3, the 2nd photo is wrong - it's the same as the 2nd photo in Step 2!
In the 2nd bullet, the black film should remain attached to the back of the screen, not the metal plate beneath.
In the 3rd bullet it's not very clear how the metal plate is meant to be released. It's secured by 3 plastic clips which I think are supposed to just pull off though one on mine has broken in the process. Some more double sided tape underneath the plate doesn't help.
Thank you for the guide! I used this to fix my Flip MinoHD 3rd Generation model. The model pictured in these instructions appears to be the 2nd Generation model, so everyone PLEASE NOTE this before proceeding with your repair. Here is some feedback after we completed these instructions:
1. Says the process should take 15 minutes. It takes MUCH longer than that (around 2 hours for us).
2. If you're going to use a #000 Phillips screwdriver, make sure it has a really good grip. The screws on this camera were in there super tight.
3. An extra pair of hands helps!
4. There's a part in the article that talks about de-soldering wires. You do NOT have to do this. Just be very careful!
5. You WILL need electrical tape to stick the new battery into the metal housing that holds the battery in the camera.
6. You need very flat tweezers for this, so we used eyebrow tweezers to handle the ribbon cables. Pocket knife tweezers are NOT recommended.
Hope this feedback helps!
Sam Lisker - 返信 共有
I was successful with the disassembly, battery replacement and reassembly up to where I reassembled the circuit board. Here I discovered that the thin red cable on the upper left hand corner of the board was only attached on top and not on the bottom. From another battery replacement video I can see that the other end of that cable is attached somewhere on the underside of the board. However, I cannot determine exactly where that end was attached (i.e. no evidence of a solder connection). Can anyone identify where and how that is to be reconnected.
WAYNE SEDEN - 返信 共有
