メインコンテンツにスキップ
リペアコミュニティに参加 - アカウントの作成

Dyson DC58 Main Body Replacement

必要な工具と部品

ビデオの概要

  1. Dyson DC58 Main Body Replacement, Bin: 手順 1、 1の画像 1
    • Make sure your vacuum is unplugged.

    • Avoid pressing the red trigger on the vacuum handle; this will power on the vacuum.

    FixBotに聞いてみる

    コメントを追加

  2. Dyson DC58 Main Body Replacement: 手順 2、 1の画像 1
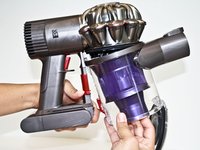
    • Locate the red lever parallel to the red trigger and on the side of the clear bin.

    FixBotに聞いてみる

    コメントを追加

  3. Dyson DC58 Main Body Replacement: 手順 3、 1の画像 1
    • Push the red lever downward to open the clear bin. You may need to do this over a trash bin if there is debris in the clear bin.

    FixBotに聞いてみる

    コメントを追加

  4. Dyson DC58 Main Body Replacement: 手順 4、 2の画像 1 Dyson DC58 Main Body Replacement: 手順 4、 2の画像 2
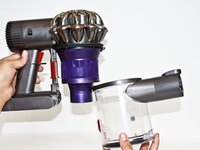
    • Push the red lever downward again while pulling the clear bin away from the main body of the Dyson vacuum.

    FixBotに聞いてみる

    コメントを追加

  5. Dyson DC58 Main Body Replacement, Main Body: 手順 5、 1の画像 1
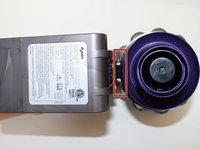
    • Flip the vacuum over so that the silver cyclone part of the vacuum is now at the base.

    FixBotに聞いてみる

    コメントを追加

  6. Dyson DC58 Main Body Replacement: 手順 6、 2の画像 1 Dyson DC58 Main Body Replacement: 手順 6、 2の画像 2
    この手順で使用する道具:
    Tweezers
    $4.99
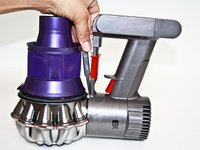
    • Locate the two visible white clips seen between the main body and the purple cyclone of the vacuum.

    • Use tweezers to pinch the two visible white clips together.

    • It may require a few tries to pinch the clips since the space between the main body and cyclone is small.

    FixBotに聞いてみる

    コメントを追加

  7. Dyson DC58 Main Body Replacement: 手順 7、 1の画像 1
    • Tilt and pull the main body away from the purple cyclone of the vacuum.

    • You may hear a loud snap when the cyclone is released from the main body, this is to be expected.

    FixBotに聞いてみる

    コメントを追加

終わりに

To reassemble your device, follow these instructions in reverse order.

キャンセル: このガイドを終了できませんでした。

12 の人々がこのガイドを完成させました。

作成者

7人の作成者と共同で作成されました。

Krista St Onge

メンバー登録日: 09/17/15

2,260 ポイント

2のガイドは作成済み

チーム

CSU Fullerton, Team 2-4, Bruce Fall 2015 CSU Fullerton, Team 2-4, Bruce Fall 2015人のメンバー

CSUF-BRUCE-F15S2G4

4 メンバー

19のガイドは作成済み

4件のガイドコメント

Mine ended up dismantled after it had been dropped. Couldn't get it back together until I read the bit about the tweezers /(pliers) and the white clips. It does not push in with out squeezing them first

Jason - 返信 共有

Has anyone replaced the red release catch?

chrisashton1 - 返信 共有

The white C-ring with clips must be pushed down in order to reassemble device. Takes some time to practice.

Anton Simonov - 返信 共有

I'm trying to figure out how to put spring and plastic pieces back in on the inside of red lever on motor body?? Any help I'd really appreciate ?

t_picano - 返信 共有

コメントを追加

統計データ:

過去 24時間: 3

過去 7 日: 11

過去 30 日: 91

今までの合計 14,532