はじめに
この手順を使用して、DualShock 3コントローラのリアカバーを取り外します。
必要な工具と部品
-
-
-
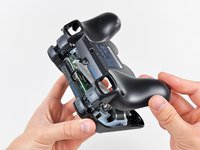
アナログスティックの間にあるリアカバーを押し、その下端をコントローラーの残りの部分からわずかに持ち上げます。
it’s not very clear but for this step you need to push where the yellow dot is shown on the picture. it’s rather tough. you kind of have to move the whole back plate a bit for it to work.
I’m stuck at this step because I can’t for the life of me undo the clip
Yeah I’m lost here too. I’m pushing where the dot is but nothing is happening. What am I trying to accomplish by pushing there? Is there a clasp on the inside I’m trying to undo or something? I really don’t want to break the controller by using too much force or opening it the wrong way.
Could it be that the sixaxis I have is constructed differently? Or is this just a difficult step?
Adding: I ended up getting the shell off but ended up breaking off a small piece which I'm guessing was securing the front and back shells together. The trigger buttons and pieces remained intact on one of my two controllers which is what I was worried about, though I did have to fit the small trigger pieces back in.
The one controller seemed to fit back together just fine without the small piece that broke off, and buttons seemed to feel and work fine too.Joe -
-
-
-
リアカバーをコントローラーの上端に向かって少し押して、2番目のトリガーのフロントエッジを出します。
-
2番目のトリガーが飛び出さないように、コントローラーの残りの部分から背面カバーを引き離してください。
the "trigger button guide" link links back to this page :o
I accidentally popped a trigger off, and both L1 and R1, because I skimmed and didn't read this step. Fortunately it's not hard. The tricky part with the triggers is that there's a little spring on them. You have to press the side of the spring that's pointing away from the trigger against the sloped surface of the controller (look at the other trigger for reference, if you only popped one off). Then you just slide the trigger on until the "handlebar" bits near the center click into place.
The reset button – a small mostly-rectangular rubberized piece – fell out as I removed the rear cover. It covers the hole near the middle screw and has a post that presses SW1 on the motherboard.
-


デバイスを再組み立てする際は、以下の手順を逆の順序で実行してください。
デバイスを再組み立てする際は、以下の手順を逆の順序で実行してください。
26 の人々がこのガイドを完成させました。
以下の翻訳者の皆さんにお礼を申し上げます:
100%

これらの翻訳者の方々は世界を修理する私たちのサポートをしてくれています。 あなたも貢献してみませんか?
翻訳を始める ›

3 件のコメント
i have a different dualshock 3 than yours. mine is built in a different way and has a different battery
Sony did that throughout the Dualshock 3’s production as they found out what would cause them to malfunction and fixed the issue. It should be alright as long as you are able to replace the battery when needed.
iran:
نحوهی تعویض طلق دسته پلی سه هم بذارین. لطفان
مجید محمدی - 返信
I have 2 controllers I'd like to fix, and both have at least one stripped screw in them. Any tips for removing them?
Joe - 返信
For me the PH #0 had too much play. I ended up using the PH #1 which was a perfect fit.
Yokocapolo - 返信