メインコンテンツにスキップ

Disassembling Nintendo DSi Bottom case

アーカイブされたガイド
このガイドは将来的な使用のためにのみ保存されてます。ご自身の修理作業には更新バージョンをご利用ください。

必要な工具と部品

  1. 注意: 手順 1-2 は、作業進行中としてマークされている ガイド から引用されています。

    Disassembling Nintendo DSi Bottom case, Battery: 手順 1、 1の画像 1
    • Loosen the two screws on the battery panel. Then lift the panel up to remove it.

  2. Disassembling Nintendo DSi Bottom case: 手順 2、 1の画像 1
    • L Button.

    • Top of the battery pack.

    • To remove the battery pack, place your fingernail or a spudger at the top of the battery near the L button. Gently lift the battery out.

  3. 注意: 手順 3-4 は、作業進行中としてマークされている ガイド から引用されています。

    Disassembling Nintendo DSi Bottom case, Motherboard: 手順 3、 2の画像 1 Disassembling Nintendo DSi Bottom case, Motherboard: 手順 3、 2の画像 2
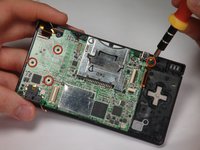
    • Remove 4 Phillips screws from the board.

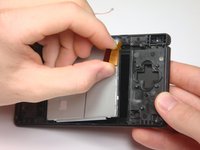
    • Lift the main board from the bottom end and flip it over to reveal the last connector.

    • Keep the main board fairly close to the case, making sure not to damage the last ribbon cable holding it in place.

  4. Disassembling Nintendo DSi Bottom case: 手順 4、 1の画像 1
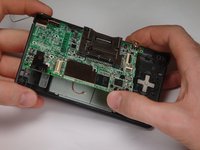
    • Disconnect the ribbon cable by gently using a plastic opening tool to flip up the black connector latch. The cable should easily slide out from the connector.

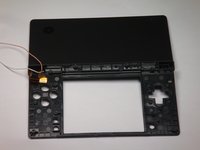
    • The motherboard should now be free from the rest of the device.

  5. Disassembling Nintendo DSi Bottom case, Disassembling Nintendo DSi Bottom case: 手順 5、 1の画像 1
    • Remove the rubber front-panel button membranes from the device. Pay careful attention to where the buttons go, so you can replace them correctly.

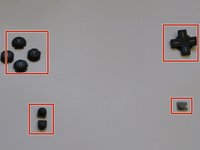
    • A/B/X/Y button assembly

    • Select/Start button assembly

    • D-pad

    • Power button

  6. Disassembling Nintendo DSi Bottom case: 手順 6、 2の画像 1 Disassembling Nintendo DSi Bottom case: 手順 6、 2の画像 2
    • Remove the plastic buttons and keep them in a safe place.

    • All of the buttons have "key" notches to prevent them from being inserted incorrectly (backwards or in the wrong place), but it can take a while to figure out where everything goes if they get shuffled around.

  7. Disassembling Nintendo DSi Bottom case: 手順 7、 2の画像 1 Disassembling Nintendo DSi Bottom case: 手順 7、 2の画像 2
    • Flip the case open, and push the lower screen assembly out of the frame.

終わりに

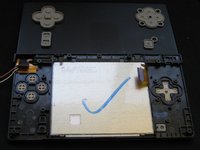
To reassemble your device, follow these instructions in reverse order.

作成者

14人の作成者と共同で作成されました。

rjcamero

メンバー登録日: 11/05/09

50 ポイント

3のガイドは作成済み

チーム

Cal Poly, Team 6-1, Maness Fall 2009 Cal Poly, Team 6-1, Maness Fall 2009人のメンバー

CPSU-MANESS-F09S6G1

5 メンバー

4のガイドは作成済み

0 件のコメント

コメントを追加

統計データ:

過去 24時間: 1

過去 7 日: 1

過去 30 日: 9

今までの合計 5,335