はじめに
お使いのDell XPS 13(Dell XPS 13 Infinity Edge Ultrabook、またはDell XPS 13 Skylakeとも呼ばれる)が充電を保持する能力を失った場合、バッテリーが消耗している可能性が高いため、交換が必要です。
バッテリーの機能は、ノートパソコンへ電源を供給します。充電サイクルを繰り返した後、やがてノートパソコンのバッテリーは急速に消耗します。充電済みバッテリーが普段よりも早く消耗する事が続く場合は、正確な充電容量を判断するためにバッテリーのキャリブレーションを行ってみてください。バッテリー残量のパーセンテージで大幅な低下が継続する場合、バッテリーを交換する必要があります。
劣化したバッテリーは出火を引き起こす可能性があります。バッテリーが膨張している場合は、適切な予防措置を講じてください。
作業開始する前に、デバイスの電源が切れたことを確認してください。
必要な工具と部品
-
-
-
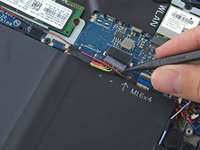
バッテリーのケーブルコネクタをバッテリー側に向けて引き抜いて、ソケットから接続を外します。
-
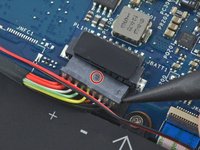
コネクタが固くて外れない場合は、片側を少し押し出してから、反対側も同じように押し出します。
-
コネクターがうまく抜けない場合は、スパッジャーの先端でコネクターのくぼみを軽く押して、コネクターをスライドさせて抜きます。
-
ディスプレイを開き、電源ボタンを5秒間長押しして、放電します。
-


交換用バッテリーを接続し、電源アダプターも接続します。ノートブックが充電も起動もしない場合は、バッテリーと充電器を抜いてください。それからボタン型バッテリーを一度取り出して、再装着してください。 (CMOS, RTC; Dellのガイドを参照してください。)
デバイスを組み立て直すには、これらの手順と逆の順序に従ってください。
279 の人々がこのガイドを完成させました。
以下の翻訳者の皆さんにお礼を申し上げます:
100%


これらの翻訳者の方々は世界を修理する私たちのサポートをしてくれています。 あなたも貢献してみませんか?
翻訳を始める ›
81件のガイドコメント
Put compatible batteries under parts.
Keenan Lewis - 返信 共有
I followed the instruction carefully and it was quite helpful. However, now that I am done with the battery replacement, the speaker no longer works, and it seems that there is a hardware issue. Any thoughts on this?
Sara Hadavi - 返信 共有
@Sara - Looking on another ifixit procedure, I found that the speaker wires are taped to the battery, so I suspect that the speaker was not properly plugged in after reassemble, or that something happened to the wires during battery removal. Hopefully the wires weren’t cut or stretched.
Here is what the XPS 13 teardown procedure had to say:
“….After that, it still isn't a perfectly clean getaway—the speaker wires are strategically taped to the battery in a half dozen spots, which we'll have to liberate to free the battery. (Admittedly, it could have been a lot worse.)
These same wires are trapped under the battery screws—so speaker replacement means battery removal. It looks like the XPS has some layering issues.”
ref: Dell XPS 13 Teardown
I hope this helps.