はじめに
Be sure to check the Dell Precision T3400's manufacturing guidelines and your new CPUs specifications to ensure compatibility.
必要な工具と部品
-
-
If your PC is on, shut it down by navigating to the window tab in the bottom left corner, selecting the power icon, and then selecting shut down.
-
Unplug the PC from the wall.
-
Disconnect the power cable from the tower, unplug keyboards, monitors, or any other devices, and remove any USB devices.
-
-
-
Lay the computer on its side so the panel faces up.
-
Push the cover release latch at the back of the computer's case. The cover should pop off and away from the computer.
-
-
-
If you have a floppy disk drive, it has a ribbon cable that runs over the heat-sink assembly that must be moved out of the way. To remove it, first unplug it from the system board by pulling on plastic pull ring.
-
The ribbon cable is fastened to the heat-sink assembly with four clips. Simply slide the ribbon cable out from under these clips and move the cable out of the way.
-
-
-
-
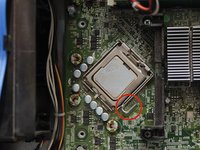
Release the blue plastic secure lever under the heat-sink assembly by pushing the tab and pivoting the lever down and away from the assembly.
-
Remove the two screws located at the top and bottom of the heat-sink assembly using a standard Phillips-head screwdriver.
-
Pull the heat-sink assembly off the board as if it were a door with its hinges on the right.
-
-
-
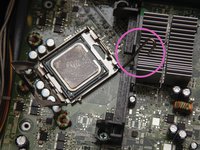
The CPU is held in place by a small metal door. The door is held shut by a lever with a hook. Push that lever down toward the motherboard while sliding it out from under the latch.
-
Once the lever is free, pull it back away from the door - this will free the door from the bar latch.
-
Open the door and carefully lift the CPU chip out of its socket
-
-
-
Make sure to line up the front and rear of the CPU with the front and rear of the socket. Incorrectly placing the CPU into the socket could cause permanent damage to both the motherboard and the CPU.
-
TIP: The CPU and CPU slot have notches on either side that should match up.
-
-
-
Close the metal door carefully once the CPU is in place.
-
Gently push the lever down toward the motherboard, and in to the right so it rests back under the latch hook.
-
If you feel resistance, do not force the lever. Make sure that the CPU is securely in place and try again.
-
-
-
Place the heat-sink assembly back on its hinges.
-
Pivot the heat-sink assembly back to its original position and secure it with the two screws removed earlier.
-
Replace the floppy drive's ribbon cable (if you have one).
-


To reassemble your device, follow these instructions in reverse order.
To reassemble your device, follow these instructions in reverse order.
13 の人々がこのガイドを完成させました。
チーム

UMass Dartmouth, Team 1-2, Gulbrandsen Fall 2013 UMass Dartmouth, Team 1-2, Gulbrandsen Fall 2013人のメンバー
UMASSD-GULBRANDSEN-F13S1G2
3 メンバー
14のガイドは作成済み