メインコンテンツにスキップ

Dell Latitude 7490 CMOS Battery Replacement

必要な工具と部品

  1. Dell Latitude 7490 CMOS Battery Replacement, Prepare your laptop for disassembly: 手順 1、 2の画像 1 Dell Latitude 7490 CMOS Battery Replacement, Prepare your laptop for disassembly: 手順 1、 2の画像 2
    • Allow your laptop's battery to drain below 25% before starting this repair—a charged battery may catch fire if damaged.

    • Unplug all cables and fully shut down your laptop.

  2. Dell Latitude 7490 CMOS Battery Replacement, Flip your laptop over: 手順 2、 1の画像 1
    • Flip your laptop over so the rubber feet strips are facing up.

  3. Dell Latitude 7490 CMOS Battery Replacement, Loosen the captive screws: 手順 3、 2の画像 1 Dell Latitude 7490 CMOS Battery Replacement, Loosen the captive screws: 手順 3、 2の画像 2
    • Use a Phillips screwdriver to fully loosen the eight captive screws securing the back cover.

  4. Dell Latitude 7490 CMOS Battery Replacement, Insert an opening pick: 手順 4、 3の画像 1 Dell Latitude 7490 CMOS Battery Replacement, Insert an opening pick: 手順 4、 3の画像 2 Dell Latitude 7490 CMOS Battery Replacement, Insert an opening pick: 手順 4、 3の画像 3
    • Plastic clips secure the back cover to the frame. You'll hear and feel them release as you work.

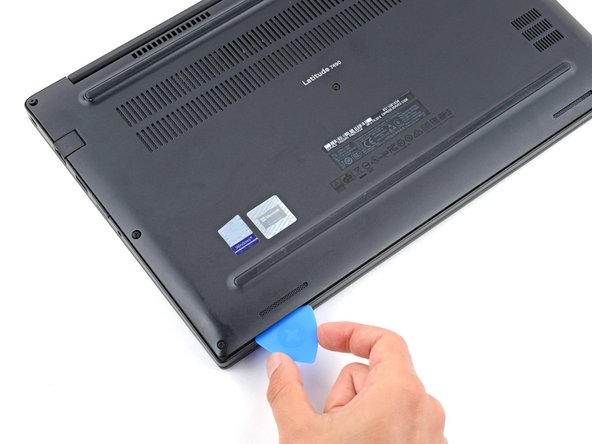
    • Insert the long side of an opening pick between the top right corner of the back cover and frame.

    • Pry the back cover up to release the clips securing the top right corner.

  5. Dell Latitude 7490 CMOS Battery Replacement, Release the clips: 手順 5、 3の画像 1 Dell Latitude 7490 CMOS Battery Replacement, Release the clips: 手順 5、 3の画像 2 Dell Latitude 7490 CMOS Battery Replacement, Release the clips: 手順 5、 3の画像 3
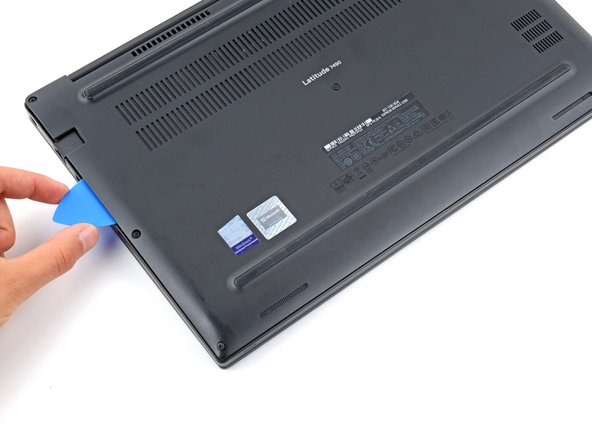
    • Slide the opening pick down the right edge and around the bottom right corner to release the clips.

  6. Dell Latitude 7490 CMOS Battery Replacement: 手順 6、 3の画像 1 Dell Latitude 7490 CMOS Battery Replacement: 手順 6、 3の画像 2 Dell Latitude 7490 CMOS Battery Replacement: 手順 6、 3の画像 3
    • Slide the opening pick along the front edge and up to the top left corner to release the remaining clips securing the back cover.

  7. Dell Latitude 7490 CMOS Battery Replacement, Remove the back cover: 手順 7、 3の画像 1 Dell Latitude 7490 CMOS Battery Replacement, Remove the back cover: 手順 7、 3の画像 2 Dell Latitude 7490 CMOS Battery Replacement, Remove the back cover: 手順 7、 3の画像 3
    • Remove the back cover.

    • During reassembly, lay the back cover on the frame and press down firmly around the perimeter to engage all the clips.

  8. Dell Latitude 7490 CMOS Battery Replacement, Disconnect the battery: 手順 8、 2の画像 1 Dell Latitude 7490 CMOS Battery Replacement, Disconnect the battery: 手順 8、 2の画像 2
    • Grip the plastic tab on the battery connector and pull straight up to disconnect it.

    • During reassembly, align this connector over its socket and press down until it clicks into place. If it doesn't connect, re‑align it and try again.

  9. Dell Latitude 7490 CMOS Battery Replacement, Disconnect the CMOS battery: 手順 9、 3の画像 1 Dell Latitude 7490 CMOS Battery Replacement, Disconnect the CMOS battery: 手順 9、 3の画像 2 Dell Latitude 7490 CMOS Battery Replacement, Disconnect the CMOS battery: 手順 9、 3の画像 3
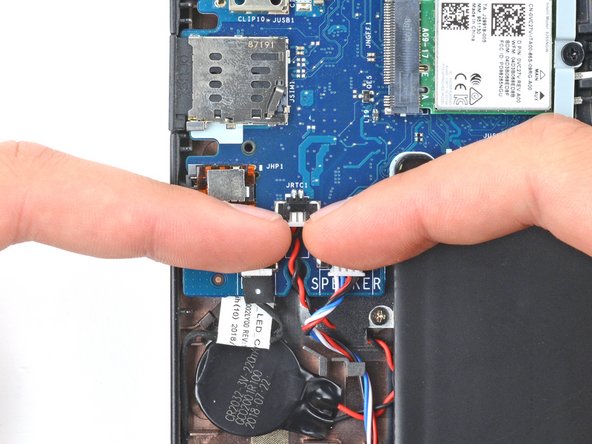
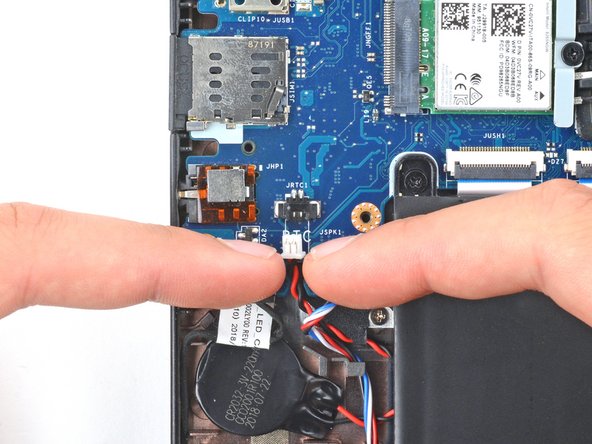
    • Use clean fingernails to pull the CMOS battery connector out of its socket on the motherboard's bottom left corner.

    • If your fingernails aren't long enough, use a spudger to push on alternating sides of the connector to "walk" it out of its socket.

  10. Dell Latitude 7490 CMOS Battery Replacement, Pry up the CMOS battery: 手順 10、 2の画像 1 Dell Latitude 7490 CMOS Battery Replacement, Pry up the CMOS battery: 手順 10、 2の画像 2
    • Adhesive secures the CMOS battery to the frame.

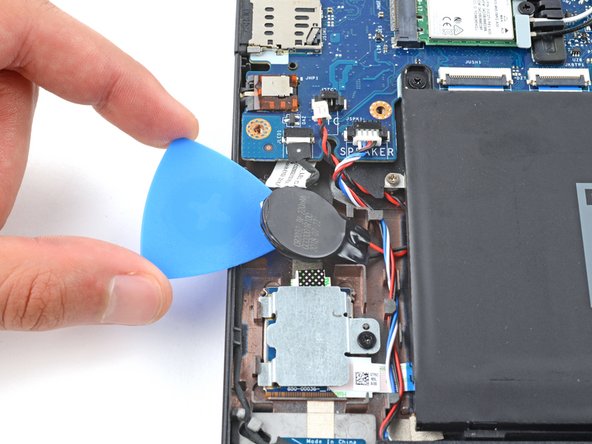
    • Insert an opening pick between the left edge of the CMOS battery and the frame.

    • Use your pick to pry up the CMOS battery and separate the adhesive securing it.

    • If you're having trouble, heat an iOpener and apply it to the battery for two minutes. Alternatively, you can use a hair dryer to heat the battery.

  11. Dell Latitude 7490 CMOS Battery Replacement, Remove the CMOS battery: 手順 11、 3の画像 1 Dell Latitude 7490 CMOS Battery Replacement, Remove the CMOS battery: 手順 11、 3の画像 2 Dell Latitude 7490 CMOS Battery Replacement, Remove the CMOS battery: 手順 11、 3の画像 3
    この手順で使用する道具:
    Tesa 61395 Tape
    $5.99
    購入する
    • Remove the CMOS battery, using your fingers to guide its wires out from under the speaker wires.

    • During reassembly:

    • Reconnect the CMOS battery.

    • Apply double-sided tape such as Tesa Tape to the battery and press it into place on the frame.

終わりに

To reassemble your device, follow these instructions in reverse order.

Take your e-waste to an R2 or e-Stewards certified recycler.

Repair didn’t go as planned? Try some basic troubleshooting, or ask our Answers community for help.

作成者

1人の作成者と共同作成されました。

Spencer Day

メンバー登録日: 09/14/22

53,745 ポイント

394のガイドは作成済み

チーム

iFixit iFixit人のメンバー

Staff

135 メンバー

17,198のガイドは作成済み

0 件のコメント

コメントを追加

統計データ:

過去 24時間: 3

過去 7 日: 20

過去 30 日: 105

今までの合計 508