この翻訳は機械によって生成されたものであり、まだ人間による校正は行われていません。 日本語を話せますか? レビューはこちらから。
はじめに
ハードドライブはコンピューターの主要なコンポーネントの1つです。交換作業はそれほど難しくありませんが、重要な手順です。この修理ガイドでは、Dell Inspiron Duoのハードドライブを交換する手順をステップごとに説明します。どなたでも簡単に作業を行えます。
必要な工具と部品
-
-
-
デバイスを再び裏返し、キーボードにアクセスできるようにノートパソコンを開きます。キーボードの底面にはフックがありますが、キーボードをモニター側へ軽く引くと簡単に取り外せます。リボンケーブルのロックは必ず解除してください。キーボードの下にある3本のネジを取り外します。
-
3つのプラスチック製キーボードおよびトラックパッドコネクタを取り外します(これらは2枚目の写真で青い円で示されています)。
-
-
-
-
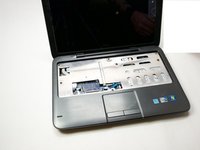
次に、オープニングツールを使用してデバイスから天板を取り外します。天板は側面で留め具によって固定されているため、外れる際に音がしても破損ではありませんので、そのまま作業を続けてください。
-
-
-
-
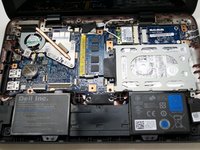
ノートパソコンを開いた状態で、ハードドライブの位置を確認します。ノートパソコンの左側、電源ボタンがある側にあります。
-
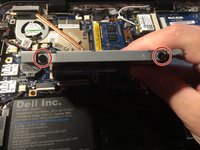
ハードドライブ筐体の左側にある2本のネジを取り外します。
-
-
-
ネジを外すと、ハードドライブが左から右にスライドし、ハードドライブポートから切り離されます。
-
ハードドライブとハードドライブエンクロージャをノートパソコンから持ち上げて取り出します。
-
-
-
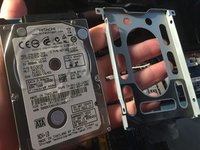
ノートパソコンからハードドライブとそれを囲む金属製のケースを取り外すと、金属ケースの両側にネジが2本ずつ見えます。これらのネジを取り外し、ハードドライブを金属ケースから持ち上げます。
-
取り外したハードドライブは脇に置き、新しいハードドライブを金属ケースに差し込みます。その際、白いラベルが上を向いていることを確認してください。
-
-


 FixBotに聞いてみる




デバイスを再組み立てするには、これらのインストラクションを逆の順番に従って作業を進めてください。
7 の人々がこのガイドを完成させました。

チーム

UW Tacoma, Team 1-1, Liner SU 2015 UW Tacoma, Team 1-1, Liner SU 2015人のメンバー
UWT-LINER-SU15S1G1
3 メンバー
48のガイドは作成済み
2件のガイドコメント
This guide leaves out some critical information:
In step 1 there are two additional screws under the removable panel at the bottom of the picture.
In step 2 it should be noted that the keyboard and trackpad connectors have tiny clamps that should be dealt with carefully. If lost your Duo will no longer function unless you can somehow find replacements.
In step 3 there are four additional screws not mentioned that must be removed before the top panel can be removed. I nearly damaged my Duo irreparably by first unsnapping the sides with a flat spudger and then attempting to lift the panel off. Once the four unmentioned screws are removed the panel comes off easily.
Following this guide to the letter will result in either confusion or damage to your Duo.
Many thanks for the instructions. Very help together with comments from Aaron. Also YouTube video on disassembling the Duo. As Aaron said be careful with the three small connectors. I broke the black plastic on one of them. The trick is to lift the white plastic catch and cable then comes out.
Abaid Mughal - 返信 共有
