メインコンテンツにスキップ
リペアコミュニティに参加 - アカウントの作成

Cuisinart DCC-1100 Display Replacement

必要な工具と部品

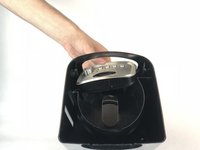
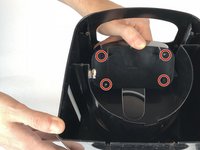
    1. Cuisinart DCC-1100 Display Replacement, Display: 手順 1、 2の画像 1 Cuisinart DCC-1100 Display Replacement, Display: 手順 1、 2の画像 2
      • Unplug the coffee maker and remove the pot.

      FixBotに聞いてみる

      コメントを追加

    2. Cuisinart DCC-1100 Display Replacement: 手順 2、 2の画像 1 Cuisinart DCC-1100 Display Replacement: 手順 2、 2の画像 2
      • Open the lid of the coffee pot.

      • Remove the two 1.6mm Phillips #1 screws from inside of the lid.

      FixBotに聞いてみる

      コメントを追加

    3. Cuisinart DCC-1100 Display Replacement: 手順 3、 1の画像 1
      • Remove the lid.

      FixBotに聞いてみる

      コメントを追加

    4. Cuisinart DCC-1100 Display Replacement: 手順 4、 1の画像 1
      • Remove the two 1.3mm Phillips #0 screws from the display.

      FixBotに聞いてみる

      コメントを追加

    5. Cuisinart DCC-1100 Display Replacement: 手順 5、 2の画像 1 Cuisinart DCC-1100 Display Replacement: 手順 5、 2の画像 2
      • Slide the display into the coffee maker so that way you can access the screws in the back.

      • Remove the four 1mm Phillips #0 screws from the back of the display.

      FixBotに聞いてみる

      コメントを追加

    6. Cuisinart DCC-1100 Display Replacement: 手順 6、 2の画像 1 Cuisinart DCC-1100 Display Replacement: 手順 6、 2の画像 2
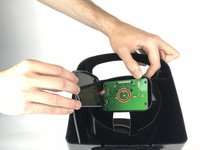
      • Remove the back panel from the display.

      • Remove the 1mm Phillips #0 screw from the motherboard.

      FixBotに聞いてみる

      コメントを追加

    7. Cuisinart DCC-1100 Display Replacement: 手順 7、 1の画像 1
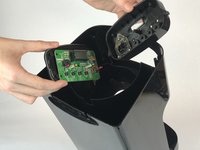
      • Desolder the display from the motherboard.

      FixBotに聞いてみる

      コメントを追加

終わりに

To reassemble your device, follow these instructions in reverse order.

キャンセル: このガイドを終了できませんでした。

2 の人々がこのガイドを完成させました。

作成者

2人の作成者と共同で作成されました。

Josh Harvey

メンバー登録日: 01/25/18

910 ポイント

4のガイドは作成済み

チーム

USF Tampa, Team S20-G4, Passmore Spring 2018 USF Tampa, Team S20-G4, Passmore Spring 2018人のメンバー

USFT-PASSMORE-S18S20G4

4 メンバー

27のガイドは作成済み

0件のガイドコメント

コメントを追加

統計データ:

過去 24時間: 0

過去 7 日: 6

過去 30 日: 21

今までの合計 1,429