メインコンテンツにスキップ

Commodore 64 VIC Chip Replacement

必要な工具と部品

  1. 注意: 手順 1-2 は、作業進行中としてマークされている ガイド から引用されています。

    Commodore 64 VIC Chip Replacement, Removing screws: 手順 1、 3の画像 1 Commodore 64 VIC Chip Replacement, Removing screws: 手順 1、 3の画像 2 Commodore 64 VIC Chip Replacement, Removing screws: 手順 1、 3の画像 3
    • 1. Remove three 6.75mm ph2 screw heads from the casing

  2. Commodore 64 VIC Chip Replacement, Opening: 手順 2、 2の画像 1 Commodore 64 VIC Chip Replacement, Opening: 手順 2、 2の画像 2
    • 2. Split the case of the C64 open by pulling up on the case towards you

    • Do not pull too hard that you break the clips.

  3. Commodore 64 VIC Chip Replacement, Detach the keyboard from the motherboard: 手順 3、 2の画像 1 Commodore 64 VIC Chip Replacement, Detach the keyboard from the motherboard: 手順 3、 2の画像 2
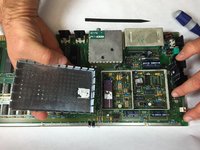
    • 1. Detach the multi-colored wire bundles that's connected to the motherboard

  4. Commodore 64 VIC Chip Replacement, Pull up the VIC plate: 手順 4、 2の画像 1 Commodore 64 VIC Chip Replacement, Pull up the VIC plate: 手順 4、 2の画像 2
    • 2. Without using any tools prop up the metal VIC plate with both hands to expose the VIC chip.

  5. Commodore 64 VIC Chip Replacement, Removing the Chip: 手順 5、 2の画像 1 Commodore 64 VIC Chip Replacement, Removing the Chip: 手順 5、 2の画像 2
    • 3. Use a Phillips screwdriver to pry up the VIC chip. Then, use your hands and with small pressure pull it away to remove it from the motherboard.

    • You can insert a new VIC chip by making it clip back in on the board

終わりに

To reassemble your device, follow these instructions in reverse order.

2 の人々がこのガイドを完成させました。

作成者

5人の作成者と共同で作成されました。

Silvanus Clarke

メンバー登録日: 09/26/14

656 ポイント

5のガイドは作成済み

チーム

USF Tampa, Team 13-6, Staggers Fall 2014 USF Tampa, Team 13-6, Staggers Fall 2014人のメンバー

USFT-STAGGERS-F14S13G6

4 メンバー

15のガイドは作成済み

コメント 1 件

It's awesome to see that people care enough about these machines to make repair guides about them! Great job!

[deleted] - 返信

コメントを追加

統計データ:

過去 24時間: 0

過去 7 日: 2

過去 30 日: 28

今までの合計 4,627