メインコンテンツにスキップ

Cen-Tech Seven Function Digital Multimeter Battery Replacement

必要な工具と部品

  1. Cen-Tech Seven Function Digital Multimeter Battery Replacement, Position Device: 手順 1、 1の画像 1
    • Place the meter face down, and the back panel and screws can be seen.

  2. Cen-Tech Seven Function Digital Multimeter Battery Replacement, Remove Back Panel Screws: 手順 2、 2の画像 1 Cen-Tech Seven Function Digital Multimeter Battery Replacement, Remove Back Panel Screws: 手順 2、 2の画像 2
    • Unscrew the two 9mm screws on the back panel using a #0 Phillips screwdriver.

  3. Cen-Tech Seven Function Digital Multimeter Battery Replacement, Remove Back Panel: 手順 3、 1の画像 1
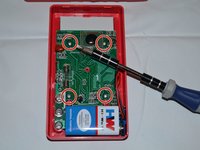
    • Remove the back panel of the device by lifting upward.

    • Remove the battery from the meter before continuing.

  4. Cen-Tech Seven Function Digital Multimeter Battery Replacement, Unscrew Motherboard: 手順 4、 2の画像 1 Cen-Tech Seven Function Digital Multimeter Battery Replacement, Unscrew Motherboard: 手順 4、 2の画像 2
    • Remove the four 7mm Phillips screws holding the circuit board in place.

  5. Cen-Tech Seven Function Digital Multimeter Battery Replacement, Remove Motherboard: 手順 5、 1の画像 1
    • Gently lift the circuit board away from the device casing.

    • Remove the battery after removing the back cover to reduce the chances of short-circuiting the circuit board.

  6. Cen-Tech Seven Function Digital Multimeter Battery Replacement, Locate Battery Attachment: 手順 6、 1の画像 1
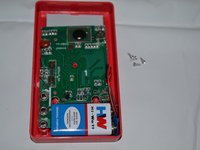
    • After removing the outer casing and motherboard of the device, locate the attachment site of the battery to the motherboard.

  7. Cen-Tech Seven Function Digital Multimeter Battery Replacement, Remove Battery: 手順 7、 1の画像 1
    • Unsnap the battery from its attachment plate.

    • When replacing the battery with a new one, be sure to properly align battery heads (positive and negative) with snaps. The positive battery head should be connected to the negative wire, and vice versa.

終わりに

To reassemble your device, follow these instructions in reverse order.

4 の人々がこのガイドを完成させました。

作成者

3人の作成者と共同で作成されました。

Anna Kihm

メンバー登録日: 10/13/14

938 ポイント

5のガイドは作成済み

チーム

Clemson, Team 2-4, Benson Fall 2014 Clemson, Team 2-4, Benson Fall 2014人のメンバー

CLEM-BENSON-F14S2G4

4 メンバー

6のガイドは作成済み

5 件のコメント

My case was glued or welded together. I thought it was going to break elsewhere first

No need to remove the board. Just use a screwdriver to pop the battery connector off

Osman Vincent - 返信

In at least some of these meters, the caution label has been applied upside-down, so that it covers the screw holes.

dan - 返信

The top of the panel has two tabs engaged (can be seen by carefully examining photos above). After screws are freed, lift the bottom edge first to allow tabs to disengage. Also, routing of battery clip wires is critical; take care that they clear the case edges.

dan - 返信

Can't get 2nd screw out!!

KARIN SPURLING - 返信

I had a spring in mine, and when my grandson took it apart to change battery, I don’t know where the spring came out

Rodney Grainger - 返信

コメントを追加

統計データ:

過去 24時間: 3

過去 7 日: 29

過去 30 日: 129

今までの合計 13,149